Dog Years

The passage of time has confounded me yet again. Sure, I remembered to mark today’s date as something out of the ordinary and had sufficient time in which to prepare for it, but it doesn’t feel like enough time has passed for us to have arrived at this day yet. You see, my puppy, my innocent little baby, is celebrating her birthday today, and I couldn’t be more incredulous. Wasn’t it just a month ago that we drove down the coast and plucked her out that tiny pen holding her brothers and sisters, curious eyes fearful of the uncertain future before her? Although it’s easy to to forget how long Isis has been keeping all of us company, it’s becoming harder to deny that she is slowly but surely shedding her hyperactive youthfulness in exchange for the more mature, calm disposition of a full-fledged adult – Turning 10 years old (Or 70, depending on who you’re talking to) will do that, I suppose.

Long gone are the simpler days, when peeing in as many new rooms as possible was practically a competitive sport, never mind the fact that she was the only competitor. Less often do we return home to discover horrific scenes of destruction as well… But fluffy balls of yarn still prove to be too great a temptation when left within reach, no matter her increasing age. Still, her tastes have become greatly refined since puppy-hood, especially in earlier days when anything even borderline edible [And many things completely inedible, too] would end up in her mouth before we would ever see her approach. Deftly stalking her prey, many rotten vegetables, insects, plastic toys, any so on would meet a swift end via her sharp teeth and tumultuous digestive processes. I remember that milk cartons were a particular delicacy that Isis delighted in, and even after we stopped them, they would still mysterious appear in our yard, carried in by the joyful pup herself. It took us months to figure out that she was in fact stealing them from the neighbors’ recycling bins as if they were her personal all-you-can-eat buffets!

In her advancing age though, she has grown increasingly picky about her food. Only grudgingly eating her own food, it’s real meals that she craves these days. Crumbs of meat scraped from my father’s plate are the ultimate indulgence, just barely out-ranking pizza crusts. Unbelievably, not even all human food is pleasing to her refined palate now; Pretzel crumbs or lettuce leaves? Forget it. What about chunks of apple? Once a real treat that she would snap up and devour with such gusto that neither core nor seeds would remain when she had finished, but now something that she leaves on the floor, untouched. I simply can’t understand her behaviors sometimes.

For this very special birthday of hers, coming up with some sort of desirable treat was not as easy as it used to be. Afraid of a potential rejection and the shame of making something that not even a dog would eat, I almost didn’t venture to even try. Still, it’s not everyday that your darling puppy turns 10, so I sucked it up for her sake and made my best effort. It’s the thought that counts anyways, and there was no way I could sit idly by when she deserved so much more.

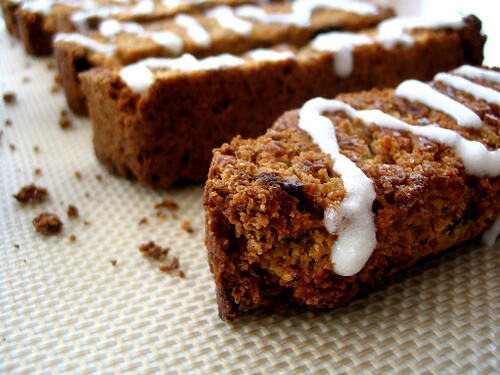
Ultimately, I decided that homemade biscuits should sufficiently satisfy my choosy pup. Adhering to her standard criteria for acceptable foods, I developed these snacks to be similar to pizza crusts in texture, giving her a solid crunch and dog-friendly flavor with every bite. Additional protein joins the mix by using soy flour in order to make it a more nutritionally rich treat, because who wouldn’t want their loved ones to stay healthy and happy for as long as possible? Aromatic and tempting even to me when the emerged from the oven, I was reluctant to give them all away when the time came. They are perfectly decent for humans to enjoy as well… But I don’t know if Isis would be so willing to share with me!

Yield: Makes 24 - 30 Biscuits

Dog Biscuits

Dog Biscuits

Protein-rich soy flour makes these a healthy treat for dogs of all ages, but you can also use chickpea flour or fava bean flour instead.

Prep Time 15 minutes
Cook Time 30 minutes
Total Time 45 minutes

Ingredients

  • 1/2 Cup Soybean Flour (or Chickpea Flour, or Fava Bean Flour)
  • 1 3/4 Cups All-Purpose Flour
  • 3/4 Cup Coarse Yellow Cornmeal
  • 1/4 Cup Dried Parsley
  • 1/4 Cup Olive Oil
  • 1 Cup Vegetable Stock

Instructions

  1. Preheat your oven to 375 degrees.
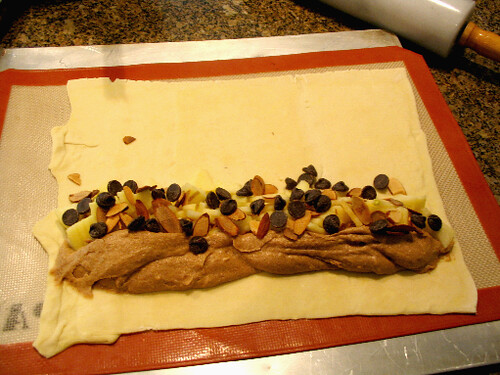
  2. Stir together the bean flour, cornmeal, 1 cup of the all-purpose flour, and parsley together in a medium bowl. Add in the oil and veggie stock, stirring well. Once fully combined, add in the remaining amount of flour, and keep on stirring it until all of the dry ingredients have absorbed – It may take quite a bit of mixing, agitating, and kneading, but it will all come together eventually!
  3. When your dough is completely homogeneous and only slightly sticky, use a rolling pin to flatten it out to a thickness of about 1/4 inch. Use cookie cutters to make the shapes that you want and lay them out on a silpat-lined baking sheet.
  4. Bake for 25 – 30 minutes until golden brown. Remove biscuits from the oven and let air-dry overnight, or for at least 8 hours before storing in an airtight container.
  5. Keep in mind that homemade biscuits go bad much faster than store bought, so use this as an excuse to spoil your furry friend even more than usual!

Notes

Store your biscuits in the freezer for up to 6 months, if you won't go through them as quickly.

Recommended Products

Please note that some of the links above are affiliate links, and at no additional cost to you, I will earn a commission if you decide to make a purchase after clicking through the link. I have experience with all of these companies and I recommend them because they are helpful and useful, not because of the small commissions I make if you decide to buy something through my links.

Nutrition Information:

Yield:

30

Serving Size:

1

Amount Per Serving: Calories: 61Total Fat: 2gSaturated Fat: 0gTrans Fat: 0gUnsaturated Fat: 2gCholesterol: 0mgSodium: 25mgCarbohydrates: 9gFiber: 1gSugar: 0gProtein: 2g

All nutritional information presented within this site are intended for informational purposes only. I am not a certified nutritionist and any nutritional information on BitterSweetBlog.com should only be used as a general guideline. This information is provided as a courtesy and there is no guarantee that the information will be completely accurate. Even though I try to provide accurate nutritional information to the best of my ability, these figures should still be considered estimations.


Rolling in Dough

Hungry for some instant gratitude that goes by the name of delivery pizza? It seems to be a food that few stop craving even as the years of childhood are left in the dust, something that 90% of people at a party could easily agree on, and a forbidden temptation for many vegans. Not satisfied to simply report that Sheese did not perform as I had hoped on top of a pita pizza, I racked my brain to figure out a way around such a huge obstacle. In a moment of inspiration, [or perhaps insanity] I began drafting blueprint a on how to reinvent this classic Italian American favorite, and morph it into something that my enthusiastic taste testers could even consider to be an improvement on the original.

Before the fiercely loyal pizza-lovers start to protest and defend their ways, allow me to explain how I ended up with a rolled bun, and not a flat bread at all.

As effortless and comforting as a floppy slice of grease-laden carbohydrate heaven may be, I have a few pet peeves about the traditional pie. The least of these would have to be the clearly un-vegan layer of cheese, often thick enough to smother a small child. Also, what about those portion sizes? Even if the slices are reasonable enough to form an average-sized meal, the leftovers some how never fit quite right into any sort of container in which to preserve them, and foil allows their aromatic scent to impregnate any of the more impressionable food items sharing the same fridge space. Additionally, that labor-intensive crust on which the whole structure is based tends to become a doughy, unpalatable excuse for bread when attempted by popular franchises. Consider it the Wonderbread of pizza; perfect in appearance to the point of looking like plastic, almost completely devoid of nutrition, and akin to swallowing rocks when it comes time for your stomach to digest it. But what is the average person to do, lacking the time to knead their own and then allow it a proper rise? Being somewhat intimidated by yeast and its curious properties myself, my starting point in this adventure was facing the challenge of working with it, and surely enough, it began to work with me.

Wanting to craft a recipe for dough that needed no time to rise, I found that just adding in yeast without giving it any special treatment would provide those lovely flavors present in any real bread, without extra work or worry. Relying on chemical leaveners as well, this hybrid holds its own when asked to do some serious cooking, but is a bit less elastic and forgiving as a traditional pizza dough, so it must be worked gently.

Rolling it up with shredded vegan cheese safely tucked inside prevents it from burning in the oven, while still melting in your mouth. Once baked, they can be eaten on the side to make room for a more varied meal, and then frozen to easily enjoy later. No awkward wrapping here; they should easily fit in the average Tupperware container.

Consider it the pizza of the future; vegan, delicious, perfectly portable, and decidedly un-greasy. What’s not to like about that?

Yield: Makes 12 - 14 Rolls

Pizza Rolls

Pizza Rolls

Prepared with an effortless pizza dough recipe, these vegan pizza rolls are an instant crowd-pleaser.

Prep Time 30 minutes
Cook Time 20 minutes
Total Time 50 minutes

Ingredients

  • 1 Cup Plain, Unsweetened Non-Dairy Milk
  • 1 Packet (2 1/4 Teaspoons) Active Dry Yeast
  • 1 Cup All-Purpose Flour
  • 1 Cup Whole Wheat Flour
  • 1 Teaspoon Granulated Sugar
  • 1 Tablespoon Baking Powder
  • 1/2 Teaspoon Salt
  • 1/4 Cup Vegan Butter
  • 1/3 Cup Pizza Sauce
  • 1/2 Teaspoon Garlic Powder
  • 3 Ounces Shredded Mozzarella-Style Vegan Cheese
  • Marinara Sauce, to Serve (Optional)

Instructions

    1. Preheat your oven to 425 degrees.
    2. Heat the non-dairy milk in a microwave-safe dish for just about a minute in order to warm it through. Add in the yeast and let sit. While those two ingredients become better acquainted, in a separate bowl, combine both flours, sugar, baking powder, and salt.
    3. Use a pastry cutter or two knives to cut the butter in, and make sure to chop all of the fat into the smallest pieces you can manage, so they are completely coated in the dry ingredients to make fine crumbs.
    4. Pour in the milk mixture, and stir it all together so that it all forms a cohesive, but still rather moist dough.
    5. This is where things get sticky. Dump the dough out onto a well-floured surface, flouring your hands lightly as well so that you can manually pat it out into a rectangle measuring somewhere in the neighborhood of 13 x 8 inches. Being such a loose dough, it won’t play nicely with a rolling pin, so you just need to poke and prod it into shape with your hands.
    6. Once you achieve a satisfactory rectangle, spread the pizza sauce over it, going most of the way to the edges but leaving perhaps a centimeter uncovered all around. Sprinkle the garlic powder over it, followed by the shredded cheese. Try to cover the surface evenly.
    7. Finally, you’re ready to roll! Gently roll up the dough from the long side, moving with care and without stretching or pulling the cylinder.
    8. Once you have a nice log, cut 1-inch pieces with a sharp knife, using a sawing motion and as little downward pressure as you can muster to prevent the rolls from becoming smushed.
    9. Move the rolls to one or two baking sheets lined with parchment paper or a silicone baking mat. You should space them out to about 9 per sheet so that they have room to spread. Reshape gently if necessary, and bake for 13 – 17 minutes, until golden brown. Enjoy warm or reheat in a toaster oven later.
    10. Dip into or top with marinara sauce, if desired.

Recommended Products

Please note that some of the links above are affiliate links, and at no additional cost to you, I will earn a commission if you decide to make a purchase after clicking through the link. I have experience with all of these companies and I recommend them because they are helpful and useful, not because of the small commissions I make if you decide to buy something through my links.

Nutrition Information:

Yield:

14

Serving Size:

1

Amount Per Serving: Calories: 134Total Fat: 6gSaturated Fat: 3gTrans Fat: 0gUnsaturated Fat: 2gCholesterol: 14mgSodium: 332mgCarbohydrates: 17gFiber: 2gSugar: 3gProtein: 5g

All nutritional information presented within this site are intended for informational purposes only. I am not a certified nutritionist and any nutritional information on BitterSweetBlog.com should only be used as a general guideline. This information is provided as a courtesy and there is no guarantee that the information will be completely accurate. Even though I try to provide accurate nutritional information to the best of my ability, these figures should still be considered estimates.

Get Sconed!

Lest you think I’m being a tease, flaunting those savory, mouth-watering cheddar Sheese scones, wipe up that drool off the keyboard and turn on your oven, because the recipe is coming right up!

These cheesy biscuits are so versatile, after you make them the first time, you won’t know how you ever assembled a meal without them. So unbelievably buttery, especially for a vegan creation, you won’t need any sort of additional spreads or fixings to enjoy them. Perfect for breakfast, tea time, or along side a hearty main course for dinner, I would be hard pressed to find a time that these wouldn’t be appropriate. Make a single batch to satisfy your own cravings, but be prepared to mix up more if friends should appear! Left unguarded, every last scone will be gone before you know it; Trust me, I know from experience.

Yield: 6

Cheddar Sheese Scones

Cheddar Sheese Scones

Buttery, flaky, and packed with cheddar shreds, it’s never been so good to be so cheesy. These savory biscuits are moist and soft inside while remaining crisp and golden brown all over.

Prep Time 10 minutes
Cook Time 20 minutes
Total Time 30 minutes

Ingredients

  • 1 Cup All-Purpose Flour
  • 2 Teaspoons Baking Powder
  • 1/4 Teaspoon Cream of Tartar
  • 1/4 Teaspoon Granulated Sugar
  • 1/4 Teaspoon Salt
  • 1/4 Cup Vegan Butter
  • 1 Cup Shredded Cheddar-Style Vegan Cheese
  • 1/3 – 1/4 Cup Unsweetened Non-Dairy Milk

Instructions

  1. Preheat your oven to 425 degrees.
  2. Sift all of the dry ingredients together in a medium bowl. Using a pastry cutter or two knives, cut the butter into your flour mixture until it begins to come together as coarse crumbs. Fold in the cheese using a large spatula, trying not to press or agitate the dough but simply move it in order to integrate the cheese. Depending on how dry your atmosphere is you may need more or less liquid, so pour in just enough non-dairy milk for the mixture to form a cohesive dough.
  3. Turn the dough out of your bowl onto a silicone baking mat or parchment-lined baking sheet. Pat it into a circle, and cut into 6 equal triangles. Separate the triangles slightly, but if you don’t want to bother, it’s not completely necessary – Just be prepared to cut them apart after they’ve expanded some from baking.
  4. Keep a keen eye on your scones, looking for the edges to just begin to turn golden brown before pulling them out of the oven. Bake for approximately 12 – 18 minutes, and let them cool on the sheet afterwards.

Notes

If prepared in advance, I highly recommend splitting them in half and giving them just a moment to warm them in the toaster oven before serving, because nothing says delicious like a hot, toasty cheese scone.

Nutrition Information:

Yield:

6

Serving Size:

1

Amount Per Serving: Calories: 245Total Fat: 15gSaturated Fat: 9gTrans Fat: 1gUnsaturated Fat: 5gCholesterol: 41mgSodium: 478mgCarbohydrates: 19gFiber: 1gSugar: 3gProtein: 8g

Big News

Thinking of something as an unforeseen event typically evokes negative connotations for me, as the past couple years have been full of some pretty painful surprises. Usually when this phrase comes up, it is accompanied by some terrible news, more horrendous than even the previous hardship. Well, time continues on and now change is in the air, pushed gently ahead by the cool breeze of a new season, straight into what could very well be the next chapter in my life. Suddenly I find myself face to face with another unforeseen event, but this time, it’s so fantastical I can hardly believe it’s true. The surprise is similar, but the accompanying joy is completely unfamiliar. Good luck is not something I tend to have in abundance, if at all, but now it seems as though I’ve won the lottery. However, my prize is far greater than any sum of money.

You may have already noticed some changes taking place here, namely in the frequency of my posting. Priding myself on taking no breaks, posting almost everyday, it would appear as though I’ve started slacking. Truly, it’s quite the contrary; I’ve been working around the clock, with scarcely a moment to complete my homework! Countless hours have been spent slaving away in the kitchen, even more so than usual, because… Well… I can’t believe it myself, but I’ve been working on recipes for my own cookbook of vegan desserts!

When I was first approached by Alisa of Go Dairy Free about this possibility, I was incredulous, to say the least. I still am. Honestly, the timing has been so perfect, it’s an absolute dream come true – Just days before receiving her first email, I had been musing aloud to my mom about how much fun it would be to actually compile my recipes for a book. A real book, a published book… It doesn’t even sound like a reality yet!

So please bear with me if I don’t have as many new posts available for your reading pleasure, but rest assured, I’m still crafting like mad despite my baking frenzy. For now, I’ll leave you with just a few teasers of what you can expect to find in my book…

Puff, the Magic Pastry

As shows like Semi Home-Made Cooking and 30 Minute Meals rise in popularity, it would appear that the average American is very easily swayed by attractive people that flaunt “easier” ways to make presumably labor-intensive dishes, but in reality their cooking skills don’t go much further than the ability to work an oven. Beyond that, it would also seem to indicate that as the working class continues struggling to make a living and be home at a decent hour, regular cooking, let alone baking, is a rare phenomenon indeed. Short cuts are what everyone’s after, which would explain how a whole aisle of a grocery store could be composed of nothing but one baking mix after another, each one filled with more chemicals than actual ingredients like those found in your own cupboard. Perhaps I’m spoiled by the luxury of unemployment, seeing as I’m left to my own devices all day after school, but the thought of making an “instant” dessert out of a box seems like some terrible joke gone awry to me. Still, I will admit there are definitely times when the effort to make something from scratch feels akin to running a marathon after having just swam across the Mississippi River. When this debilitating laziness strikes however, I don’t go scrounging around for the cake mix, oh no, I dig deep into my freezer to pull out my secret weapon: Puff Pastry.

First stumbling upon this fantastic resource a year or two ago, I was initially surprised to find that many mainstream brands of pre-made puff pastry are in fact vegan! Basic and bland on its own, this magical dough is all about what you put into it. That’s why it’s the perfect starting block for your own sweet (or even savory) creations, able to easily adapt to your exacting tastes and preferences. Should you have no idea where to begin, allow me to demonstrate how unbelievably simple it is to throw one of these instant desserts together with minimal work, but end up with maximum flavor. I digress though; This particular pastry was assembled many months ago, so the measurements aren’t exactly fresh in my mind. This is just an approximation, so if things seem a bit off, please alter your own creation based on your own intuition.

Begin by allowing the puff pastry to thaw on its own just sitting at room temperature for at least 30-45 minutes. This is absolutely necessary! If you don’t wait for it to become soft and pliable, it will simply crack when you try to unfold it! Once it has warmed, you will want to spread it out on a silpat or piece of parchment paper, using a rolling pin to smooth out the creases where it was folded and any other small lumps that may exist.

Now, when it comes to the filling, anything goes. This is an excellent opportunity to use up leftovers in the fridge, so whatever you have on hand could probably work as well. In my case, I had some extra vanilla frosting [As always] so I combined that with a good dollop of apple butter in a ratio of about 2:1. Starting about an inch in from the long side of the flattened pastry, apply your choice of spread in a generous line, reaching to about 1/4 inch from the short sides. Other excellent substitutes would be jams, preserves, etc. Continuing the apple theme, I opted to chop up a Fuji apple, sprinkled it with cinnamon, and dropped that in alongside my spread. Again, any fruit waiting to be used works just as well. Add ins should be used sparingly so as not to over stuff or over power the other main players in this delicate melody, but could include perhaps 1/4 – 1/2 cup of toasted nuts, chocolate… Or in this case, both!

The only rule to remember is to not spread your filling over more than 1/3 of the surface of the puff pastry. Once you’ve evenly distributed everything you’d like to include, gently roll up the pastry, using the silpat to help you. To secure the edge, moisten it with just a dab of water and press against the other side you wish to adhere it to. Placing this seam downwards, reposition the roll in the center of the silpat, and slide a baking sheet underneath. I chose this time to top it with some addition cinnamon, but you could also sprinkle on a different spice or some turbinado sugar for an extra crunch. Bake in the oven, following the instructions specified on the package of your puff pastry – This can vary depending on brand!

When it’s all done, the pastry will be a lightly golden / brown color, and if you used a margarine-based spread like frosting as I did, you will see a small pool of run-off at the ends. Do not panic – Most will remain safely inside, and the dripping will stop as it cools.

Wait until your roll as completely cooled before slicing. To cut, use a serrated knife and use a sawing motion without using any downward pressure so as not to crush or crack the flaky surface. A good portion in my opinion is a 1 inch wide slice, but divide them as you see fit.

Served alongside a dairy-free ice cream or vegan whipped topping, you’ll be thankful that you still made the effort to create something delicious, and not resort to that dreaded box of chemical-based cake substitute!

Sugar Rush

Seeing as one of my favorite pastimes is doting upon and spoiling the ones I love, extra time at home for me almost always means special treats for anyone who I happen to seeing that day. With my final days of February vacation coming to a close just last week, my dad quickly became an easy target these tendencies. With cupcakes still on the mind, I was knew I would need to baked such a dessert in such a way as to cater better to his tastes, as I distinctly remembered him complaining that they “weren’t sweet enough” last time. Watching in vague horror and amusement as he piled on another dollop of leftover frosting, followed by multicolored sprinkles, I wondered if maybe simply molding pure sugar into the cupcake paper instead would have better appeased his peculiar tastes. Such an extreme sweet tooth called for extreme measures, so I armed myself with four types of sweeteners and layered it on.

For those brave souls who wish to destroy any semblance of healthy glucose levels, I have assembled this tutorial to create a decadent sweet treat. The following images are not for the weak of stomach, and may be considered “not safe for work” in some circles. Proceed with caution, and please do not attempt to lick your monitor.

Step one: Pick out a cupcake recipe that includes some sort of sweetener in the title. The Maple Syrup Cupcakes from Vegan Cupcakes Take Over the World seemed like a safe bet, so that one was an easy starting point.

Step two: Combine maple syrup and confectioner’s sugar to create a glaze. Maybe, but only maybe, add in some extra liquid to thin it out a bit, but if possible I suggest using something extra-sweet, like Silk’s Very Vanilla Soymilk. Pour this glaze over the tops of your fresh cupcakes.

Step three: After letting the glaze to harden a bit, mix up a standard vanilla frosting, with the addition of more syrup, and pile it on high. This aspect is crucial, so be sure to achieve at least 1-2 inches of solid vegan buttercream to crown your cupcakes.

Step four: Making a caramel coating in a heavy sauce pan, coat toasted almonds and let dry. Sprinkle sugared nuts over the tops of each cupcake. Be generous in distribution!

Step five: Prepare to bounce around the room immediately following consumption, but have a good place to lay down ready for the onset of a sugar coma.

[No humans were harmed in the making of these cupcakes, only somewhat sedated due to crashing after the sugar-high.]