Hello, Beautiful

Glowing brightly like a cool, colorful homing beacon, the modest Ciao Bella kiosk in Grand Central Station would taunt me every time I arrived in New York City, straight off of a hot and sweaty ninety-minute train ride. Every flavor always appeared to be artfully arranged in its metal pan, carefully swirled and smoothed into undulating waves of frozen dessert. The heat must have always thoroughly fried my brain by that point though, as I never looked closely enough to see that there was in fact much more than the rich dairy-based gelato that the brand is so well known for. Sorbet, a mainstream godsend for the lactose intolerant, populates those immaculate cases in nearly equal numbers.

The best news of all, though, is twofold.

Just recently, Ciao Bella has decided to go au naturel and dump the corn syrup and refined sugar, and that this very sorbet can be found in the freezer cases of most mainstream grocery stores, instead of just behind ice cream shop counters.

Boasting 12 different varieties of sorbet, choosing a limited selection to sample was a tricky task.

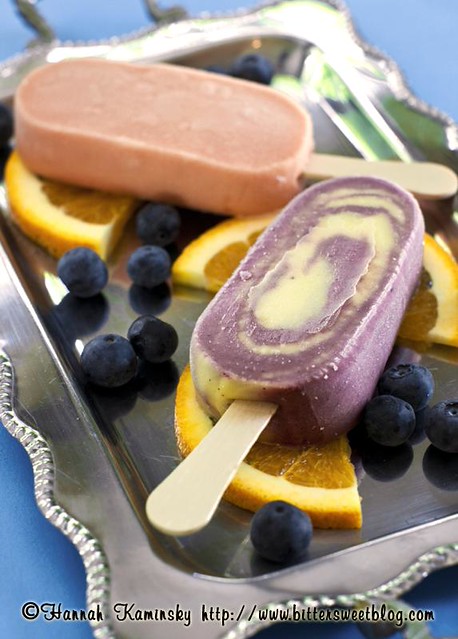
Noted as their best selling sorbet, their Blood Orange was the one clear pick. Peachy orange in color without much apparent aroma, this was clearly not your typical orange offering. Sweet and fruity, with subtle floral notes, the citrus flavor was still bright and clear, but not at all sharp or aggressive. Mellow, well-rounded, and highly refreshing, it strikes me as a summer snack that children and adults of all ages could enjoy alike. Super smooth, without the slightest hint of ice crystals, it scoops like a dream, too.

Wanting to try a more diverse lineup, but unable to fight off my rampant cravings for tangy citrus treats, I found myself drawn back, time and again, to the beckoning pint of Lemon sorbet on the frost-encrusted supermarket shelves. Hitting all the zesty high notes I could hope for, this was one intense, vibrant lemon experience! Like the Italian ice of my childhood all grown up, the ultra-smooth texture was practically creamy, but completely weightless without the cloying richness of premium ice cream. Also perfect as a palate cleanser between a multi-course meal, this sorbet didn’t stick around long after it made it into my home.

Most alluring of all, however, is Ciao Bella’s latest sorbet creation.

Their sorbet bars, available in both their flagship Blood Orange flavor and brand new to the line up, Blueberry Passion. Swirled throughout with contrasting colors of deep violet and pale orange, each bite unexpectedly consistent in flavor. A tropical, unidentifiable flavor hits me immediately, and I recognize that this must be the passion fruit element. Not as well acquainted with this primarily South American, it provided an unexpected exotic element, reminiscent of a vacation on the beach. The sweet and simple blueberry flavor kept things comforting, making for a well balanced combination of both exciting and familiar tastes.

For the avid home cook or DIY-er, fret not.

Ciao Bella has even come out with a cookbook, The Ciao Bella Book of Gelato and Sorbetto, divulging their secret formulas for every flavor in the lineup, including exotics not available in hard-pack pints. Although most intriguingly, this provides otherwise impossible opportunities to veganize Ciao Bella’s gelatos, I was still drawn to the simplicity of the sorbet section. Besides, with a chocolate sorbet with such an intense, and complex depth of flavor, I don’t think I need the gelato version at all! Scooping soft and easily straight out of the freezer, just like the store-bought options, it seemed completely consistent with the quality of their factory-made frozen desserts.

I’m grateful that the folks at Ciao Bella were kind enough to provide me with a taste of their vegan offerings.  Next time, whether purchasing a single scoop from a Ciao Bella kiosk, grabbing a pint at the store for an impromptu indulgence, or crafting my own version at home, I know I’ll be in for a treat.

Yield: Makes About 1 Quart

Chocolate Sorbetto

Chocolate Sorbet

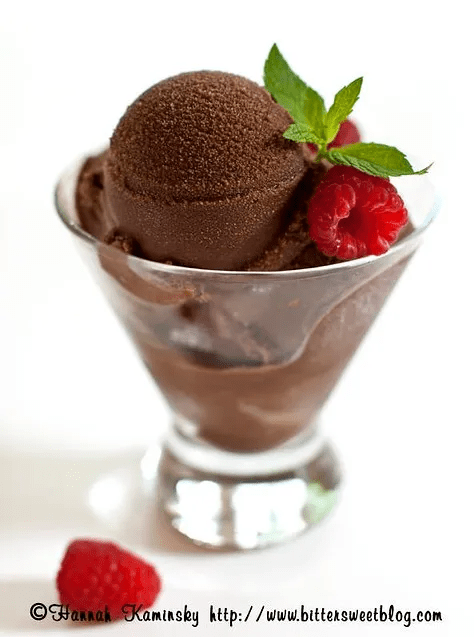
This is chocolate sorbet with an Italian accent; intense, decadent, and complex in rich flavor.

Cook Time 10 minutes
Additional Time 6 hours
Total Time 6 hours 10 minutes

Ingredients

  • 3 Cups Water
  • 1 1/2 Cups Granulated Sugar
  • 4 Ounces Bittersweet Chocolate (About 60% Cacao), Finely Chopped
  • 1/2 Cup Unsweetened Cocoa Powder
  • 1 Teaspoon Dark Rum
  • 1/4 Teaspoon Vanilla Extract

Instructions

  1. In a medium saucepan, combine the water and sugar. Place over medium-high heat and bring to a boil, whisking often to dissolve the sugar. Reduce the heat to medium-low and simmer for 4 minutes, continuing to whisk until all the sugar is dissolved.
  2. Remove the pan from the heat and add the chopped chocolate; whisk until the chocolate is completely melted. Add the cocoa powder and whisk until incorporated and the mixture is smooth. Add the rum and vanilla, then pour though a fine-mesh strainer into a clean bowl. Let cool, stirring often. Once cooled, cover and refrigerate until very cold, at least 4 hours or overnight.
  3. Churn in your ice cream maker according to the manufacturer’s instructions. Transfer to an airtight container and freeze for at least 2 hours before serving.

Notes

Reprinted with permission from The Ciao Bella Book of Gelato and Sorbetto

Recommended Products

Please note that some of the links above are affiliate links, and at no additional cost to you, I will earn a commission if you decide to make a purchase after clicking through the link. I have experience with all of these companies and I recommend them because they are helpful and useful, not because of the small commissions I make if you decide to buy something through my links.

Nutrition Information:

Yield:

8

Serving Size:

1

Amount Per Serving: Calories: 258Total Fat: 8gSaturated Fat: 5gTrans Fat: 0gUnsaturated Fat: 3gCholesterol: 0mgSodium: 7mgCarbohydrates: 45gFiber: 3gSugar: 38gProtein: 3g

All nutritional information presented within this site are intended for informational purposes only. I am not a certified nutritionist and any nutritional information on BitterSweetBlog.com should only be used as a general guideline. This information is provided as a courtesy and there is no guarantee that the information will be completely accurate. Even though I try to provide accurate nutritional information to the best of my ability, these figures should still be considered estimations.


Reunited and It Tastes So Good!

Nine years is a long time to go without a childhood favorite. Comfort food that evokes the warmest, coziest memories, even if it did come out of a blue box and was composed of more chemicals than you might find in the average chemistry set. Something about that simple amalgamation of noodles and cheese-product sauce managed to reach the farthest corners of my young brain, imprinting a deep appreciation for the day-glow orange noodles. Sure, I’ve since had numerous non-dairy renditions, some even quite good and worthy of recommendation, but none were quite right. Some unidentifiable piece of the puzzle remained lost, that “perfect” mac and cheese just beyond my reach.

Every vegan and their mother and best friend has a unique formula for creating their ideal mac, so it was one of those things I simply didn’t pursue. There were enough recipes that came close enough; why keep picking on something so close?

But then, there was the mac that changed everything. Assigned by VegNews to shoot their signature macaroni and cheese, as formulated by Allison Samson of Allison’s Gourmet, it was admittedly the first time I had ever made or eaten an oven-baked casserole version of the classic dish. That first bite was just short of transcendent- And even more so if you consider that fact that the original recipe included absolutely no nutritional yeast. A potato-based sauce, standing in for rich, cheesy-creamy-goodness? You bet.

And thus, my macaroni quest began.

Drawn back to my memories of simple stove-top mac, my first adaptation was to lose the casserole dish and bread crumbs. Feel free to add both back into the equation, as I was definitely impressed by how much those crispy edges added to the mix; it’s merely a matter of personal preference.

Naturally, I couldn’t keep away from the nooch, what with it’s delicious umami notes and undeniably “cheesy” essence.

Rich, but not unctuous or artery-clogging, this is perhaps as close to perfection as I’ve tasted in nine years or more. Creamy, very saucy (who hasn’t wished those boxes made about twice as much sauce?), bright but natural orange in hue, this is the mac I’ve been craving all along. That long awaited reunion tasted even better than I had hoped!

Yield: Makes 6 - 8 Servings

Stove-Top Style Vegan Mac and Cheese

Stove-Top Style Vegan Mac and Cheese

Rich, creamy, saucy, and bright but natural orange in hue, this is the plant-based mac and cheese you've been craving all along. It's even better than the blue box!

Ingredients

  • 1 Cup Peeled and Diced Yukon Gold Potatoes
  • 1/4 Cup Shredded or Finely Diced Carrot
  • 1/2 Cup Chopped Yellow Onion
  • 1 Clove Garlic, Thinly Sliced
  • 1 Cup Water
  • 1/4 Cup Raw Cashews
  • 1/4 Cup Nutritional Yeast
  • 1 Teaspoon Salt
  • 1/4 Teaspoon Dijon Mustard
  • 2 Teaspoons Lemon Juice
  • 1/4 Teaspoon Smoked Paprika
  • 1/8 Teaspoon Turmeric (Optional, for Color)
  • 3/4 – 1 Cup Unsweetened Non-Dairy Milk
  • 1/3 Cup Neutral-Flavored Oil, Such as Avocado or Rice Bran
  • 1 Pound Pasta, Cooked*

Instructions

  1. Place the cut potatoes, carrots, onion, and garlic in a small sauce pan, and pour in the water. Set over medium heat on the stove, and bring to a boil. Once the water reaches a vigorous boil, cover the pot, turn down the heat to medium-low, and let simmer for 15 minutes, until the potatoes are extremely tender.
  2. Meanwhile, prep the other ingredients to speed things along. Place the cashews, nutritional yeast, salt, mustard, lemon juice, paprika, and turmeric (if using) in your blender. A high-speed blender is recommended for the best results, but you can also use an ordinary machine as long as you have patience. Give these ingredients a light pulse just to begin breaking down the cashews slightly.
  3. When the vegetables on the stove are fully cooked and ready, pour them into your blender along with all of the cooking water. Add in 3/4 cup of the non-dairy milk, and turn on the blender to its highest setting. Thoroughly puree the mixture, until completely smooth and lump-free. If you’re using a blender that isn’t so hearty, this could take 6 – 10 minutes.
  4. With the motor still running, slowly drizzle in the oil, to allow it to properly emulsify. Check the consistency; if you like your sauce a bit thinner blend in the remaining 1/4 of non-dairy milk.
  5. Pour the sauce over your cooked noodles, and serve immediately.

Notes

*I’m rather fond of tiny spirals or twists here, but elbows are more traditional. Any shape you’ve got, other than long spaghetti, pretty much works though.

Recommended Products

Please note that some of the links above are affiliate links, and at no additional cost to you, I will earn a commission if you decide to make a purchase after clicking through the link. I have experience with all of these companies and I recommend them because they are helpful and useful, not because of the small commissions I make if you decide to buy something through my links.

Nutrition Information:

Yield:

8

Serving Size:

1

Amount Per Serving: Calories: 343Total Fat: 19gSaturated Fat: 3gTrans Fat: 0gUnsaturated Fat: 15gCholesterol: 3mgSodium: 305mgCarbohydrates: 39gFiber: 8gSugar: 4gProtein: 10g

All nutritional information presented within this site are intended for informational purposes only. I am not a certified nutritionist and any nutritional information on BitterSweetBlog.com should only be used as a general guideline. This information is provided as a courtesy and there is no guarantee that the information will be completely accurate. Even though I try to provide accurate nutritional information to the best of my ability, these figures should still be considered estimations.

Quirky, Crunchy Quinoa

Craving a thick slice of cake first thing in the morning isn’t such an unusual thing in this house; Typically, one would simply need to pick up a knife, and shave a hunk off of whatever was made the day prior to indulge that impulse. The breakfast of champions, we would joke to anyone who could hear it, and possibly question that breakfast choice. Lately though, the cake stand has remained clean and empty, tucked away with the other stacks of plates and props in the closet. Time is getting the best of me, with the demands of so many freelance assignments on top of a brand new school semester to juggle, and the pastries just aren’t flying out of the kitchen like they used to. Plus, working on an ice cream cookbook demands that the oven remain silent for the better part of the week, lest I end up contending with a very messy and sticky photo shoot mid-afternoon.

So, what’s a gal with a yen for something sweet supposed to do in the early morning, craving something reminiscent of cake? Given the time to think about it and prepare in advance, make something healthier.

Perhaps I’ve strayed too far off the pastry path for some of you, but believe it or not, this quinoa concoction fulfilled that breakfast craving. Think carrot cake with a crunchier outcome, this simple cereal is more like granola in texture, but still much lighter than the typical nut- and fruit-heavy options.

I like it best with the sweetness and gentle twang of vanilla coconut yogurt (that early in the morning, I can almost pretend it’s cream cheese frosting) plus fresh berries, but the beauty of this basic formula is how easy it is to dress it up or down. Go crazy with mix-ins, or just eat it out of hand, on the go. This was just the healthy remodel that my “cake for breakfast” habit was long overdue for anyway!

Carrot Cake Quinoa Cereal
Inspired by Oh She Glows

1 Cup Uncooked Quinoa
2 Cups Carrot Juice
1 Tablespoon Flax Seeds, Ground
1 Tablespoon Chia Seeds
1 Tablespoon Olive Oil
3 – 4 Tablespoons Agave Nectar
1 1/4 Teaspoons Ground Cinnamon
1/2 Teaspoon Ground Ginger
1/2 Teaspoon Vanilla Extract
Pinch Ground Nutmeg
Pinch Salt

Begin by cooking your quinoa in the carrot juice. Simply bring the carrot juice to a boil in a small pot, and add in the dry quinoa. Cover, reduce the heat to low, and let cook gently for 15 – 20 minutes, until the liquid has all been absorbed. Let cool completely before proceeding. You can speed this up by transferring the cooked quinoa to a large bowl and stirring it around a bit, to let it air-dry more quickly.

Preheat your oven to 375 degrees, and lightly grease a baking sheet with sides.

In a medium bowl, mix the cooled quinoa in with all of the remaining ingredients. Spread the mixture out on your prepared sheet, in as thin and even a layer as you can manage. This will help the cereal bake up nice and crispy, so take your time smoothing it out with either a spatula or lightly moistened hands.

Bake for 45 – 60 minutes, stirring every 15 minutes or so, until lightly browned and seemingly dry. It may still have a little bit of “bounce” to it, but don’t worry; it will continue to crisp up as it cools.

Let cool completely before storing in an airtight container.

Makes about 2 – 3 Servings

Printable Recipe

Can’t Stand the Heat

Making the transition back to a summer climate, that elusive warm state that up until recently seemed to exist only in exotic locales, many miles away, has been a bit more jarring than initially anticipated. Yes, of course, I realized that it would someday register above 70 degrees outside, and yes, New England is notorious for its oppressive humidity, but somehow that all slipped my mind as I daydreamed of summer just a month or two ago. Happily glossing over those unpleasant aspects, I somehow envisioned a June and July as the two most perfect months of the year; free of bugs, hot but crisp and dry, and with gentle showers in the evenings to cool things down each night. We’re still just on the cusp of Summer, but already reality has smacked me in the face and set me straight. That ideal summer just doesn’t exist, my dear.

And just as suddenly, the kitchen is no longer the 24/7 hangout, the thought of lighting up every burner and cranking the oven as high as it will go growing less appealing by the day.  Anything that can be made in quantity, stuffed into the fridge for later, and eaten cold with no fuss has become my favorite thing on the menu.  This means lots of cold salads, primarily, but rarely the leafy, insubstantial sort one might initially envision.  I’m talking nutrient-dense, hearty chilled melanges of anything from grains, beans, nuts, tubers, pasta- Anything in the house is fair game when I’m putting together one of these powerhouse one-bowl meals.

Having pledged my allegiance to no one cuisine in particular, what often results is an odd fusion of ingredients and flavors, as this particular riot of colors and textures in a bowl may indicate. Borrowing both an Asian and Mediterranean sensibility, cooked pearl couscous and fresh veggies meet edamame, all married together beneath of light blanket of miso dressing. Refreshing and light but still filling and full of flavor, it’s the kind of salad that’s just as happy being thrown on a plate for a rushed weekday lunch, taking in the glorious AC, as it is being bundled up with care for a picnic on the beach. No matter what Summer throws at you, you’ve got to be prepared!

Yield: Makes 6 - 8 Servings

Mediter-Asian Couscous Salad

Mediter-Asian Couscous Salad

Borrowing both an Asian and Mediterranean sensibility, cooked pearl couscous and fresh veggies meet edamame, all married together beneath of light blanket of miso dressing.

Prep Time 10 minutes
Cook Time 15 minutes
Total Time 25 minutes

Ingredients

Sweet Miso Dressing:

  • 1 Cup Plain, Unsweetened Vegan Yogurt
  • 1/4 Cup Rice Vinegar
  • 1/4 Cup Olive Oil
  • 1/3 Cup White Miso Paste
  • 3 Tablespoons Honey-Flavored Agave, or Amber Agave Nectar
  • 2 Tablespoons Mirin
  • 1 Tablespoon Tamari or Soy Sauce

Mediter-Asian Salad:

  • 1/2 Pound (1 1/4 Cups) Israeli (Pearl) Couscous*
  • 1 Cup Kalamata Olives, Pitted and Sliced
  • 1 1/2 Cups Diced English Cucumber
  • 1 Small Tomato, Diced
  • 1/2 Cup Chopped Roasted Red Pepper
  • 1/4 Cup Finely Diced Red Onion
  • 1 Cup Shelled Edamame (Thawed if Frozen)
  • 1/3 – 1/2 Cup Thinly Sliced Scallions
  • 10 – 12 Fresh Mint Leaves, Chiffonade
  • 1/4 Cup Toasted Pine Nuts

Instructions

  1. First things first, whisk together all of the ingredients for the dressing in a medium-sized bowl, and set aside for the time being.
  2. Moving on to the bulk of the salad, cook you Israeli couscous or couscous blend according to the package, drain (or if it’s meant to absorb all of the liquid while cooking, simply transfer it to a strainer) and rinse under cold water until cool to the touch. This will both help to stop the cooking and get it down to a workable temperature.
  3. Move the cooked couscous into a large bowl, and add in all of the cut veggies, edamame, and herbs. Toss lightly to evenly distribute all of the ingredients. Start by mixing in about 1/2 cup of your prepared miso dressing, mix to incorporate and coat all of the goods, and stir in an additional splash or two until it’s dressed to your liking.
  4. If you want to make this salad in advance, mix in only the initial 1/2 cup of dressing for now, and incorporate the final addition right before serving. Sprinkle the pine nuts over the top to finish.
  5. Store in a large, air-tight container for 3 – 4 days. Separately, the dressing will keep for 7 – 10 days.

Notes

*For this particular rendition pictured above, I used the Harvest Grains Blend from Trader Joe’s, which simply adds some orzo pasta, quinoa, small beans and such into the mix. Pearl couscous is simply more accessible,
in case you don’t have a local Trader Joe’s to raid.

Recommended Products

Please note that some of the links above are affiliate links, and at no additional cost to you, I will earn a commission if you decide to make a purchase after clicking through the link. I have experience with all of these companies and I recommend them because they are helpful and useful, not because of the small commissions I make if you decide to buy something through my links.

Nutrition Information:

Yield:

8

Serving Size:

1

Amount Per Serving: Calories: 241Total Fat: 15gSaturated Fat: 2gTrans Fat: 0gUnsaturated Fat: 12gCholesterol: 2mgSodium: 792mgCarbohydrates: 22gFiber: 4gSugar: 14gProtein: 6g

All nutritional information presented within this site are intended for informational purposes only. I am not a certified nutritionist and any nutritional information on BitterSweetBlog.com should only be used as a general guideline. This information is provided as a courtesy and there is no guarantee that the information will be completely accurate. Even though I try to provide accurate nutritional information to the best of my ability, these figures should still be considered estimates.

Winners of Books and Breads

Selected by the wise and all-knowing random number generator, today’s pick for who will receive a copy of the Green Market Baking Book is…

The comment belonging to the 11th poster, who happens to be…

VeggieGirl! This gal has definitely got luck on her side, because if I’m not mistaken, this is actually the second giveaway she’s won from this little blog. Stick around as long as she has though, and you’d have a pretty good chance of hitting the jackpot, too. That first win came around 3 or 4 years ago, so she’s certainly been in it for the long haul. Congrats on win #2!

There are no losers here though, because I have a fantastic treat to share with everyone else. Even if you aren’t getting the full cookbook today, you’ll be able to bake your very own tomato bread!

Since it generated the greatest interest, I thought that everyone should have this recipe to share. It really is a winner, and with my small modifications, one that will visit my kitchen many times more.

Yield: Makes 1 Loaf; 10 - 12 Servings

Tomato Bread

Tomato Bread

Brilliant orange and rust hues embolden this otherwise plain loaf, hinting at the flavor contained within. Subtle sweetness and acidity brightens the soft crumb, allowing the gentle but clear tomato essence to shine.

Prep Time 30 minutes
Cook Time 35 minutes
Additional Time 2 hours
Total Time 3 hours 5 minutes

Ingredients

  • 1/2 Cup Sun-Dried Tomatoes, Chopped
  • 1 15-Ounce Can (1 3/4 Cups) Tomato Sauce
  • 4 Cups Bread Flour, Plus additional as needed
  • 2 Tablespoons Active Dry Yeast
  • 1 1/2 Teaspoons Salt
  • 4 Tablespoons Olive Oil, Plus Additional for Bowl

Instructions

  1. First, soak the sun-dried tomato pieces in just enough hot water to cover, for about 15 minutes, until softened.
  2. Mix the yeast with the tomato sauce and let the mixture stand about 5 minutes, or until it starts to bubble.
  3. In the bowl of a standing electric mixer fitted with the paddle attachment, combine half the bread flour with the tomato mixture and salt, and mix to form a smooth batter. Blend in the olive oil.
  4. Change the mixer attachment to the dough hook. With the hook in motion, add the soaked sun-dried tomatoes along with the remaining bread flour, 1/2 cup at a time, until the dough forms into a rough mass that easily pulls away from the sides of the bowl.
  5. Transfer the dough to a large, lightly oiled bowl and cover it with plastic wrap. Place the covered bowl in a warm, draft-free spot and let it rise about 1 hour, or until doubled in bulk.
  6. Lightly grease a 9 × 5-inch loaf pan.
  7. On a floured surface, roll the dough into a log that fits the pan. Place the dough into the pan and cover it with lightly oiled plastic wrap. Let it rise until the dough reaches a half inch over the top of the pan (about 1 hour).
  8. Preheat the oven to 400°F.
  9. Bake for 35 minutes. If it appears to be browning too quickly after 20 minutes, place a foil tent over the top to prevent it from burning. Remove the bread from the pan and cool on a wire rack. Serve warm or at room temperature.

Notes

Adapted from Green Market Baking Book © 2011 by Laura C. Martin, Sterling Publishing Co., Inc. Recipe by Amy Besa and Romy Dorotan

Recommended Products

Please note that some of the links above are affiliate links, and at no additional cost to you, I will earn a commission if you decide to make a purchase after clicking through the link. I have experience with all of these companies and I recommend them because they are helpful and useful, not because of the small commissions I make if you decide to buy something through my links.

Nutrition Information:

Yield:

12

Serving Size:

1

Amount Per Serving: Calories: 238Total Fat: 6gSaturated Fat: 1gTrans Fat: 0gUnsaturated Fat: 5gCholesterol: 1mgSodium: 449mgCarbohydrates: 38gFiber: 3gSugar: 3gProtein: 7g

All nutritional information presented within this site are intended for informational purposes only. I am not a certified nutritionist and any nutritional information on BitterSweetBlog.com should only be used as a general guideline. This information is provided as a courtesy and there is no guarantee that the information will be completely accurate. Even though I try to provide accurate nutritional information to the best of my ability, these figures should still be considered estimations.

Start Spreading the News

Ordinarily a stellar candidate for keeping a secret, I’ve been a regular blabbermouth when it comes to my own.  After practically shouting it from the roof tops around town, spilling the details to anyone who sees me and stops to say “Hi,” it’s about time the rest of the world (or at least, the internet) knows…

I’m writing a third cookbook, about vegan ice cream! Tentatively titled “Vegan À La Mode,” you can expect plenty of wild and crazy flavors, alongside decadent classics reinvented. I’m only about 40 recipes in thus far, and there’s so much more left to churn up… You just wait, because this one is gonna be sweet!