Pommes d’Amour

Botanically incorrect but poetically true, the French demonstrated great wisdom when they named tomatoes “love apples.” What savory fruit is more beloved than the tomato, across all continents with favorable growing climates? Watching their vines twist upwards towards the sky, reaching out for the sun’s warmth, it’s only a matter of time before flowers come, begetting tiny green globes. Initially sour, unpromising at first glance, they slowly swell larger, growing juicier and sweeter with every blush. Even if you’re not a gardener and don’t watch your own tomato babies mature from seed, it’s impossible not to fall for them.

Now that real tomatoes have returned to markets, little by little, it’s about time I shared my recipe for tomato pie. Though initially created only for looks to fulfill a photography assignment, and inspired by a less than attractive recipe with highly processed ingredients, it didn’t take much work to create something worthy of the fresh tomatoes that fill it.

Brightened up with additional herbs and garlic, subtle seasonings make a world of difference in banishing blandness, all while still allowing the tomato to take center stage. It’s the kind of recipe that’s so simple that only the best ingredients will do, because you taste each and every one of them. Don’t even dream of whipping this one up in the middle of January- A winter tomato is nowhere near as lovable.

Yield: Makes 8 - 10 Servings

Tomato Pie

Tomato Pie

Brightened up with additional herbs and garlic, subtle seasonings make a world of difference in banishing blandness, all while still allowing the tomato to take center stage. It’s the kind of recipe that’s so simple that only the best ingredients will do, because you taste each and every one of them.

Prep Time 20 minutes
Cook Time 50 minutes
Additional Time 20 minutes
Total Time 1 hour 30 minutes

Ingredients

  • 2 Unbaked Classic Crusts, 1 Lining an 9-Inch Pie Pan and 1 Unrolled
  • 1 8-Ounce Package Vegan Cream Cheese
  • 2 Cloves Garlic, Finely Minced
  • 1/2 Teaspoon Lemon Zest
  • 1/2 Teaspoon Dried Basil
  • 3/4 Teaspoon Dried Parsley, Divided
  • 1/4 Teaspoon Dried Oregano
  • 1/2 Teaspoon Salt
  • 1/4 Teaspoon Ground Black Pepper
  • 3 Tablespoons Cornstarch, Divided
  • 3 – 4 Firm, Slicing Tomatoes
  • 3/4 – 1 Cup Vegan Mozzarella-Style Shreds

Instructions

  1. Preheat your oven to 425 degrees.
  2. Place the cream cheese in a large bowl and thoroughly mash in the garlic, zest, dried herbs, salt, and pepper. Stir until the cream cheese is smooth and all of the seasonings are well-distributed. Smear the mixture evenly across the bottom of your crust-lined pie pan, smoothing out the top as best you can. Sprinkle 2 tablespoons of the cornstarch over the exposed surface.
  3. Slice your tomatoes to about an 1/8th inch in thickness, and remove the watery seeds. Arrange the slices over the cream cheese layer in concentric circles, overlapping and fitted together as closely as possible. Continue stacking them until they reach the brim of the pie pan. The final amount will depend on the size of your tomatoes and how seedy they are. Sprinkle the final tablespoon of cornstarch over the tomatoes, and then top evenly with your cheesy shreds.
  4. Roll out the second piece of dough on a lightly floured surface to 1/8 inch thick. Use a sharp knife to cut a few vents in the center. Gently drape the dough over filling, and trim so that there’s still about 3/4-inch of dough overhanging the edge. Fold and roll the excess under the bottom crust, pressing the edge to seal it, and crimp decoratively as desired.
  5. Tent with aluminum foil and bake for 25 minutes. Reduce the temperature to 350 degrees, uncover the pie so that it can brown, and bake for a final 25–35 minutes. Let cool for at least 20 minutes before digging in. The pie can be served at any temperature, but best when warm.

Recommended Products

All nutritional information presented within this site are intended for informational purposes only. I am not a certified nutritionist and any nutritional information on BitterSweetBlog.com should only be used as a general guideline. This information is provided as a courtesy and there is no guarantee that the information will be completely accurate. Even though I try to provide accurate nutritional information to the best of my ability, these figures should still be considered estimations.

Nutrition Information:

Yield:

10

Serving Size:

1

Amount Per Serving: Calories: 140Total Fat: 10gSaturated Fat: 5gTrans Fat: 0gUnsaturated Fat: 5gCholesterol: 7mgSodium: 204mgCarbohydrates: 9gFiber: 1gSugar: 3gProtein: 4g

Please note that some of the links above are affiliate links, and at no additional cost to you, I will earn a commission if you decide to make a purchase after clicking through the link. I have experience with all of these companies and I recommend them because they are helpful and useful, not because of the small commissions I make if you decide to buy something through my links.

Hanging with My Peeps

Come March 1st, grocery store shelves are already fully stocked with enough Easter paraphernalia to power non-stop spring fetes lasting a full month, regardless of when Easter Sunday is actually observed. For all the pastel glitter and sugar on offer, they still lack what is arguably the single most important element to a proper holiday celebration: Vegan marshmallow peeps. Peeps may have gotten a life outside of the spring season, but they will forever be inextricably linked with Easter in my mind, and vice versa. Since there was little understanding of what Easter really was in my formative years, all that in my eyes were those colorful, sugar-encrusted chicks and bunnies, staring out of their cardboard sleeves with emotionless dots for eyes.

Sweet & Sara has taken up the task of providing this essential Easter staple, easily surpassing that original standard. This isn’t the first time I’ve shared about these seasonal treats, but I’m happy to say that they’ve only improved over time. Now they too come dusted in a light coat of colored sugar, matching my fond childhood memories, but with real dark chocolate adorning each adorable shape. You won’t find them in stores any time soon, but they’re worth seeking out during this limited window of availability. Spring just wouldn’t be nearly as sweet without them.

Run, Run, as Fast as You Can…

…But you’ll never escape my ravenous sweet tooth, Mr. Gingerbread Man.

Fully embracing the temptations of excess, especially abundant in this celebratory season, all I want to make and eat is candy. Typically, just a bite or two of concentrated sweetness will do me, but reaching a sugar coma has seemed to be the end goal recently. At least, that’s how the revelry tends to end, with my poor throbbing head so much the worse for wear. Must the desire for a few extra comforting confections always carry such a terrible price tag? Turns out that raw nuts help quite a bit to satiate the inner sweet-toothed monster, and a handful of whole grains give even tiny morsels far greater staying power.

When Hodgson Mill originally sent a box of pro bono flours and baking mixes, I found myself stumped by the pre-measured mixtures. They’re simply not something I stock my pantry with or employ, so straight away, it was a curious puzzle: What can be made with cake mix, that isn’t cake? Perhaps it’s fudging the boundaries of definition a bit, but how about cake truffles?

With a half-empty jar of speculoos spread just begging to be finished off, the pairing was inevitable, and a delicious match indeed. Enrobed in dark chocolate, the tender cake centers have just enough spice and sweetness to disguise the whole wheat and flax within. Each bite yields nothing but candy bliss, without the sugar hangover afterward.

Better yet, these adorable treats can be dressed up as cake pops. Adorable hand-held gifts or party favors, not a single one of these gingerbread men will escape the mouths of delighted guests.

Naturally, you can just as well whip up a little over one pound of gingerbread cake from any recipe you desire, boxed or fully homemade. Just be mindful of the amount of sugar, because the frosting itself is quite sweet. In the end, though, it’s all good when it’s dipped in chocolate.

Speculoos Gingerbread Cake Truffles

Gingerbread Cake:

1 15-Ounce Package Hodgson Mills Whole Wheat Gingerbread Mix
1 1/2 Cups Plain Non-Dairy Milk
1/2 Tablespoon Whole Flaxseeds, Ground
2 Tablespoons Water
1/2 Teaspoon Apple Cider Vinegar
1/4 Cup Canola Oil

Speculoos Frosting:

3/4 Cup Speculoos Spread
1/4 Cup Non-Dairy Margarine, at Room Temperature
1 Cup Confectioner’s Sugar
1/2 – 1 Tablespoon Plain Non-Dairy Milk

Chocolate Coating:

12 Ounces (2 Cups) Semi-Sweet Chocolate Chips
2 Tablespoons Coconut Oil or 100% Cocoa Butter

Optional Additions and Garnishes:

Small Lollipop Sticks
Colored Nonpareil Sprinkles
Chocolate Jimmies*

*Before dipping the truffles, go through the bottle of sprinkles and pick out any that have a slight curve to them. The majority will be straight, but if you look closely enough, you will find plenty that are “smiling.” You may also want to apply your sprinkles with a pair of tweezers for the most precision.

Preheat your oven to 350 degrees and lightly grease an 8 x 8 square pan.

In a large bowl, whisk all of the cake ingredients together until thoroughly combined, with no pockets of dry ingredients remaining. Bake for 28 – 32 minutes, until set around the edges and a toothpick inserted into the center of the cake pulls out cleanly, without any slick of raw batter. Let cool completely before breaking up the cake and crumbling it into small, even pieces.

The frosting is equally effortless and speedy: Place the speculoos spread, margarine, and confectioner’s sugar in the bowl of your stand mixer, and start the machine on a low speed. Once the powder has been incorporated and is no longer at risk of flying out, turn up the speed to high, and slowly drizzle in the “milk,” until the frosting is smooth, homogenous, and a spreadable consistency.

Add a modest dollop into the bowl of cake crumbs and mix it all around. This is a messy job, as the best way to combine the two components is to get in there with your hands. Don’t be shy! It could be a fun job for the kids to help out with, too. Add in more frosting as needed, until the mixture just comes together when squeezed. You will likely have extra frosting, so don’t be tempted to add all of it, lest you want mushy truffles.

Dump the cake mixture out onto a silpat or piece of parchment paper, and flatten it out to about 1/2 – 3/4 inch in thickness. Use a small gingerbread man cookie cutter to cut out the shapes, pulling away the excess. Recombine the extra “dough”, flatten out once more, and cut more figures until the cake is all used up. Insert sticks now if using, and carefully move the silpat or parchment onto a baking sheet. Place the whole thing in the freezer on a flat surface, and let freeze for at least 3 hours, until solid.

To coat the truffles, combine the chocolate and coconut oil or cocoa butter in a microwave-safe dish, and heat for 60 seconds. Stir very well until the mixture is smooth. If there are still a few stubborn chips that refuse to melt, continue heating the coating at 30 second intervals, stirring thoroughly between each, until entirely lump-free.

Dip each truffle center, one at a time, into the melted chocolate. Use a fork to pull individual truffles out of the mixture and allow the excess coating to drip free. Be especially careful with any truffles on sticks, because they are particularly delicate. Move each piece back onto the silpat or piece of parchment paper, and quickly add sprinkles for the eyes and mouth before the coating solidifies. Repeat with the remaining truffles. Store in the fridge in an air-tight container.

Makes 30 – 40 Truffles

Printable Recipe

Holly, Jolly, Nog-gy

Thank goodness Christmas is still ahead of us. Winding down one winter holiday so early in the season turns out to be a brilliant stroke of good luck, because now the celebrations can go on twice as long. Eggnog is hands-down my favorite flavor of the upcoming fete, despite the fact that I’ve never had a nog with egg in it. An rich and frothy beverage combining all the best sweet, savory, and salty elements that could possibly mingle in one glass, it doesn’t have to be “authentic” to be utterly delicious. As long as there’s a light splash of rum and a generous sprinkle of nutmeg, it’s all nog to me.

Converting those essential essences into a bite-sized sweet treat was a must for gift giving and snacking this year. A truffle of a different color, these would be beautiful mixed into an assortment of various spiced, mint, or dark and candies as well. In fewer words, they play well with others.

Nog Truffles

1 Cup Raw Whole Cashews, Soaked for 2 – 3 Hours and Thoroughly Drained
1/4 Cup Light Agave Nectar
1/4 Cup (2 Ounces) 100% Pure Cocoa Butter, Melted
1 Tablespoon Dark Rum
2 Teaspoons Vanilla Extract
1 1/2 Teaspoons Nutritional Yeast
1/4 Teaspoon Ground Nutmeg
1/2 Teaspoon Ground Cinnamon
1/4 Teaspoon Kala Namak (Black Salt)

White Chocolate Coating:

2/3 Cup Vegan White Chocolate Chips
1 Tablespoon 100% Pure Cocoa Butter
Ground Nutmeg, to Garnish

Place the soaked and drained cashews in your blender or food processor, along with all of the remaining ingredients that make up the centers. Blend until completely and perfectly smooth, pausing to scrape down the sides of the work bowl as needed to ensure that all small nut fragments are incorporated. Transfer the sweet puree to a heat-safe bowl and let rest in the freezer until firm; at least 1 hour.

Retrieve the truffle centers from the freezer and use a small cookie scoop or 2 spoons to scoop out about 1 tablespoon of the mixture at a time, rolling the chunks into smooth balls between the palms of your hands. Place the rounded centers onto a silpat or piece of parchment paper on top of a sheet pan, and repeat until the mixture is used up. Work quickly to prevent the filling from becoming too soft and unworkable. Move the whole sheet of naked truffles back into the freezer on a flat surface, and chill until solid; at least another hour.

When you’re ready to finish off the candies, combine the white chocolate chips and cocoa butter in a microwave-safe dish, and heat for 60 seconds. Stir very well until the mixture is smooth. If there are still a few stubborn chips that refuse to melt, continue heating the coating at 30 second intervals, stirring thoroughly between each, until entirely lump-free.

Dip each truffle center, one at a time, into the melted white chocolate. Use a fork to pull them out of the mixture and allow the excess coating to drip free. Move each piece back onto the silpat or piece of parchment paper, and quickly sprinkle lightly with additional ground nutmeg before the coating solidifies. Repeat with the remaining truffles. Store at room temperature in an air-tight container.

Makes 12 – 18 Truffles

Printable Recipe

In the Eleventh Hour

Long before the word “vegetarian” had even entered my vocabulary or tofu occupied a place on my plate, Thanksgiving turkey nonetheless failed to excite any hunger in my young belly. I had yet to cultivate a true appreciation of any greener fare, and yet the side dishes were what always held the key to holiday dinner bliss. Anything starchy, buttery, and sweet was piled on with aplomb, moderation be damned. No matter how they were prepared, potatoes especially were key to a successful meal, often turning up in multiple forms to satisfy all family members. Mashed, roasted, scalloped, or fried, they all had equal billing on the menu, devoured far more enthusiastically than the obligatory bird.

Ironically, this habit has made the main dish beside the point, the backup singer rather than the star of the show. I’d gladly make space for another side dish or two than an extra serving of seitan roulade, no matter how delicious or painstakingly stuffed.

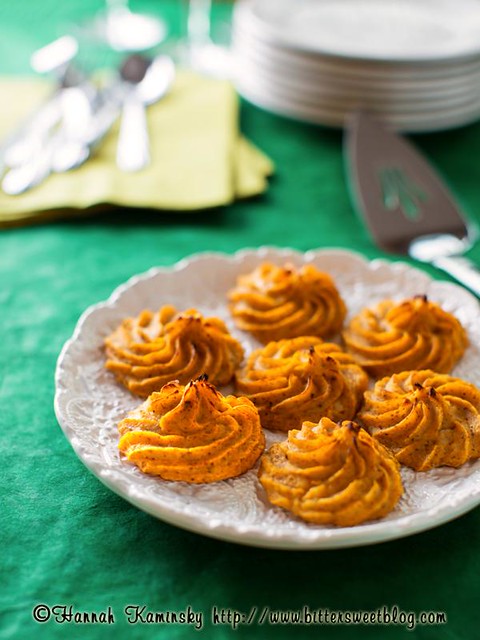
That’s why I have no compunctions about suggesting yet another starchy side, even in this eleventh hour of Thanksgiving prep. Inspired by my grandpa’s classic potato puffs, my rendition lightens the potato load with golden butternut puree. Pumpkin could effortlessly slip into that same role as well, if canned butternut is hard to come by. Crisp on the outside and creamy on the inside, these tiny mountains of mashed potatoes finally introduce the textural interest that plain old smashed spuds lack. Mercifully, their compact design allows for advance prep as well; bake them through as instructed, chill until dinner time, and them pop them back into a 400 degree oven for 5 – 10 minutes, just to heat them through.

Yield: Makes 1 1/2 – 2 Dozen Puffs

Butternut Potato Puffs

Butternut Potato Puffs

Inspired by my grandpa’s classic potato puffs, my rendition lightens the potato load with golden butternut puree. Pumpkin could effortlessly slip into that same role as well, if canned butternut is hard to come by. Crisp on the outside and creamy on the inside, these tiny mountains of mashed potatoes finally introduce the textural interest that plain old smashed spuds lack.

Prep Time 15 minutes
Cook Time 20 minutes
Additional Time 1 hour
Total Time 1 hour 35 minutes

Ingredients

  • 1 Pound Yukon Gold Potatoes, Peeled and Diced
  • 1 15-Ounce Can Butternut Squash Puree
  • 3 Tablespoons Non-Dairy Margarine or Coconut Oil, Melted
  • 1 Teaspoon Seasoned Salt
  • 1 Teaspoon Garlic Powder
  • 1 Teaspoon Onion Powder
  • 1/2 Teaspoon Poultry Seasoning
  • 1/4 Teaspoon Ground Black Pepper
  • 2 Tablespoons Cornstarch
  • 1 Tablespoon Whole Flax Seeds, Ground

Instructions

  1. Place your peeled and cut potatoes in a medium-sized pot of cool water. Set over moderate heat and bring up to a boil, reducing the heat to a lively simmer and cooking them until fork-tender. Drain thoroughly.
  2. Mash the potatoes as smoothly as possible before adding in all of the remaining ingredients, mashing and stirring to combine and beating out any lumps. Transfer the mashed mixture to a piping bag fitted with a large star tip and pipe the potatoes into small rosettes on two baking sheets lined with parchment paper or silpats. Aim for them to measure approximately 1 1/2 – 2 inches across the bottom, but there’s no need to break out a ruler here.
  3. Place the whole sheets in the freezer for about an hour, until solid. Once they’ve had ample time to chill out, preheat your oven to 450 degrees.
  4. Bake for 15 – 18 minutes, until golden brown all over. Serve right away while still hot.

Notes

To prepare in advance, bake through as instructed, chill until dinner time, and them pop them back into a 400 degree oven for 5 – 10 minutes, just to heat them through.

Recommended Products

Please note that some of the links above are affiliate links, and at no additional cost to you, I will earn a commission if you decide to make a purchase after clicking through the link. I have experience with all of these companies and I recommend them because they are helpful and useful, not because of the small commissions I make if you decide to buy something through my links.

Nutrition Information:

Yield:

24

Serving Size:

1

Amount Per Serving: Calories: 48Total Fat: 2gSaturated Fat: 1gTrans Fat: 0gUnsaturated Fat: 1gCholesterol: 0mgSodium: 66mgCarbohydrates: 7gFiber: 1gSugar: 1gProtein: 1g

All nutritional information presented within this site are intended for informational purposes only. I am not a certified nutritionist and any nutritional information on BitterSweetBlog.com should only be used as a general guideline. This information is provided as a courtesy and there is no guarantee that the information will be completely accurate. Even though I try to provide accurate nutritional information to the best of my ability, these figures should still be considered estimates.

Have a GRAIN Holiday!

Funny how the most open-ended requests are often the most challenging to fulfill. Narrow down the criteria to something incredibly specific, to what might be consider severely limited, even, and that’s where it’s easy to excel. The answer has almost been handed over, outlined in great detail about what it must or must not be, so it’s hard to go too far wrong. When tasked with creating something as vague as a “holiday dessert,” however, my mind goes blank. With endless paths to go down or ideas to explore, how can one determine what would be best?

Similarly, the concept of creating a recipe that simply must have flour as an ingredient left me just short of baffled. Flour, that ubiquitous ground wheat product, is so prevalent in this household that I’d swear I could sweep up all the dust on the shelves and bake a loaf of bread with it. After churning out hundreds of desserts over the past decade, it takes a deliberate effort not to start a recipe with flour.

That’s what made Hodgson Mill‘s call to arms equally enticing and perplexing. Mandating only that recipes include one or more of their whole grain flours, such an ambiguous lure proved impossible to resist. Surely I could make something with flour- What else do I do? And yet the concepts flew by, turning out only cakey, disappointing scones and a platter of cookies with an identity crisis, seeming more like little pies than discrete 2-bite confections. Given so much free rein, I didn’t quite know what to do with myself.

Until I focused my attention on chestnuts, that is. Gravely undervalued, these nuts have only a short window of availability, and rarely get the attention they deserve. Thinking more about the featured flavors than the construction allowed me to get around my baker’s block and create something truly prize-winning, if only amongst my taste testers.

Creating a hearty crumb that isn’t too dense, a blend of both whole wheat pastry flour and bread flour lends this sweet loaf a unique texture, slightly fluffier than your average pound cake. Chestnuts are blended to weave their unique essence into every bite, paired with sizable pieces for toothsome pops of nutty flavor. Though icing is typically an after though, something that could be listed as optional, this particular spicy topping is absolutely essential to contrast the hearty crumb. Don’t rush it either; the crunch and slight cooling sensation it provides after it hardens is critical to maximum enjoyment.

Yield: Makes 1 Loaf Cake; 8 – 10 Servings

Chestnut Pound Cake

Chestnut Pound Cake

Tender roasted chestnuts are woven into every bite of this wholesome cake. Warmly spiced icing set up to a crunchy contrast on top for maximum satisfaction.

Prep Time 20 minutes
Cook Time 1 hour
Additional Time 1 hour
Total Time 2 hours 20 minutes

Ingredients

Chestnut Pound Cake:

  • 1 Cup Whole Wheat Pastry Flour
  • 1/2 Cup Bread Flour
  • 1/2 Cup Confectioner’s Sugar
  • 1/4 Cup Cornstarch
  • 1/2 Teaspoon Baking Powder
  • 1/2 Teaspoon Baking Soda
  • 1/4 Teaspoon Salt
  • 1/2 Cup Olive Oil
  • 1/2 Cup Dark Brown Sugar, Firmly Packed
  • 10 Ounces (About 1 1/2 Cups) Whole Roasted and Shelled Chestnuts, Divided
  • 1/2 Cup Plain Non-Dairy Milk
  • 1 Teaspoon Ground Cinnamon
  • 1/2 Teaspoon Apple Cider Vinegar
  • 1 Teaspoon Vanilla Extract
  • 1/2 Teaspoon Almond Extract

Spiced Icing:

  • 1 Cup Confectioner’s Sugar
  • 1/2 Teaspoon Ground Cinnamon
  • 1/2 Teaspoon Ground Ginger
  • Pinch Ground Nutmeg
  • 1 – 2 Tablespoons Water

Instructions

  1. Preheat your oven to 350 degrees and lightly grease an 8 x 4-inch loaf pan.
    In a large bowl, sift together both flours along with the confectioner’s sugar, cornstarch, baking powder and soda, and salt. Roughly chop half of the chestnuts and toss them in, stirring to coat with flour to help prevent the pieces from all sinking to the bottom while baking. Set aside.
  2. Place the oil, brown sugar, and the remaining half of the chestnuts into the container of your blender or food processor and thoroughly puree. Pause to scrape down the sides if necessary, ensuring that everything is smoothly combined. Add in the “milk,” cinnamon, vinegar, vanilla, and almond extract, blending once more to incorporate.
  3. Pour the liquid mixture into the bowl of dry goods, and stir with a wide spatula just enough to bring the batter together. A few small lumps are far better than an overworked, tough cake. Pour the batter to your prepared pan and bake for 50 – 60 minutes, until amber brown all over an a toothpick inserted into the center pulls out cleanly. Let sit in the pan for about 5 minutes before transferring to a wire rack to cool completely.
  4. To prepare the icing, simply whisk together all of the ingredient, slowly adding water one drop at a time until it reaches your desired consistency. Drizzle generously over the top of the cake and allow it 1 – 2 hours to set and harden. Slice, serve, and enjoy!

Recommended Products

Please note that some of the links above are affiliate links, and at no additional cost to you, I will earn a commission if you decide to make a purchase after clicking through the link. I have experience with all of these companies and I recommend them because they are helpful and useful, not because of the small commissions I make if you decide to buy something through my links.

Nutrition Information:

Yield:

10

Serving Size:

1

Amount Per Serving: Calories: 400Total Fat: 13gSaturated Fat: 3gTrans Fat: 0gUnsaturated Fat: 10gCholesterol: 5mgSodium: 179mgCarbohydrates: 65gFiber: 4gSugar: 28gProtein: 6g

All nutritional information presented within this site are intended for informational purposes only. I am not a certified nutritionist and any nutritional information on BitterSweetBlog.com should only be used as a general guideline. This information is provided as a courtesy and there is no guarantee that the information will be completely accurate. Even though I try to provide accurate nutritional information to the best of my ability, these figures should still be considered estimations.