
Sharp. Salty. Smelly. Moldy.
What, were you raised in a cave?

If you happened to be a wheel of blue cheese, the answer is most likely “Yes!”
These complex blue-veined curds have traditionally been aged in caves, and still are to acquire the distinctive ambrosial funk specific to the local bacterial population. Some speculate the the earliest batches of the stinky wheels were actually mistakes, unintentionally inoculated with the natural mold in these subterranean shelters. Praise of the highest order is due to the brave soul who first thought such a terrible case of spoilage might still be edible, let alone delicious.
Though caves are no longer required for production, such a unique flavor and aroma can only be reproduced with Penicillium roqueforti cultures to accurately bear the label. Such rigorous regulations put this funky delicacy firmly out of reach for the average food crafter, no matter how obsessive, especially if dairy is off the menu.

Authenticity be damned, irrepressible cravings for a bite of the blue stuff needn’t be denied for lack of access to this illusive ingredient. Lending its own singular sort of funk, fermented Chinese tofu is what gives my plant-based facsimile its unmistakable, irrepressible twang. Taking this shortcut to building instant bold flavors allows my particular cheesy delight to achieve depth without delay. No need to wait for any spores to work their magic; it’s instantly delicious, as soon as it’s set.
Swirls of blue-green algae lend it a convincing appearance, but this is purely for aesthetics. Feel free to skip straight to the finish line without detracting from the overall eating experience one bit.

Such a pungent fixing goes a long way in small doses, which makes it ideal for sprinkling on salads or mixing into dips, rather than serving it up solo. Finally achieving my platonic ideal of a wedge salad, this deceptively simple composition of crunchy lettuce, smoky bacon bits, and fresh cherry tomatoes is really just a vehicle for that deeply savory dressing. Go ahead and really slather it on thick; we all know you’re not eating a head of iceberg lettuce for any other reason.
Funky, fermented blue cheese takes shape with a Chinese tofu and no dairy at all! This vegan version is quick and easy to whip up, and packs in a savory, satisfyingly salty flavor into every creamy bite. Please note that some of the links above are affiliate links, and at no additional cost to you, I will earn a commission if you decide to make a purchase after clicking through the link. I have experience with all of these companies and I recommend them because they are helpful and useful, not because of the small commissions I make if you decide to buy something through my links. The ideal wedge salad s deceptively simple composition of crunchy lettuce, smoky bacon bits, and fresh cherry tomatoes is really just a vehicle for that deeply savory dressing. Go ahead and really slather it on thick; we all know you’re not eating a head of iceberg lettuce for any other reason. Please note that some of the links above are affiliate links, and at no additional cost to you, I will earn a commission if you decide to make a purchase after clicking through the link. I have experience with all of these companies and I recommend them because they are helpful and useful, not because of the small commissions I make if you decide to buy something through my links.Vegan Blue Cheese

Ingredients
Instructions
Recommended Products


Nutrition Information:
Yield:
16
Serving Size:
1
Amount Per Serving:
Calories: 56Total Fat: 5gSaturated Fat: 4gTrans Fat: 0gUnsaturated Fat: 1gCholesterol: 0mgSodium: 41mgCarbohydrates: 2gFiber: 0gSugar: 0gProtein: 1g Classic Wedge Salad

Ingredients
Blue Cheese Dressing:
Wedge Salad Fixings:
Instructions
mayo, non-dairy milk, parsley, and vinegar in a medium bowl, stirring
until smooth. Add the blue cheese chunks and mix in gently.
wedge on each plate. Drizzle liberally with the blue cheese dressing and
top with meatless bacon bits, scallions, and cherry tomatoes. Serve
right away.Recommended Products


Printed, Published, Imperfect
Every time a book is published, print set to dry and locked in place for all eternity, a certain number of errors and omissions are inevitably sealed in at the same time. Some are more egregious than others, but any blemish on a beloved manuscript is hard for any passionate author to accept. Luckily, it seems that nothing untoward was baked into the cake for Real Food, Really Fast, but what wasn’t included feels like a terrible personal failing that’s hard to accept.
Somehow, despite best scrupulous proofreading and tireless testing, my Samosa Gnocchi managed to miss the last call and got left behind on the digital cutting board. Though simple in their final format, those spicy potato dumplings went through the gantlet and back to achieve perfection, making it an even greater shame that they couldn’t join the party.

Luckily, it seems as though the book is on track for many more re-printings to come, and in the meantime, I’m happy to share these spicy morsels to celebrate such success. In fact, Real Food, Really Fast has been selected as a featured ebook until May 23rd on Amazon.com which means you can snap up a digital copy for the fire sale price of just $1.99. If you haven’t poured over these pages yet, now is your chance to do it on the cheap!
Samosa Gnocchi with Quick Mango Chutney

Plain potato gnocchi are about as exciting as white bread, which is why they rarely showed up on my dinner plate before I considered that baseline as just a blank canvas to build upon. Fix them up with a pinch of curry powder, for example, and you could consider each starchy sphere as merely a naked samosa, stripped of its deep-fried pastry shell. Akin to dried pasta, packaged gnocchi make fast work of this preparation, lending a toothsome bite to each chewy orb. As a brilliantly spiced side dish that could complement a wide range of proteins or simple stews, you’ll never accuse this humble spud of being bland again.
Ingredients
Samosa Gnocchi
- 1 (16 – 17 Ounce) Package Potato Gnocchi
- 1 Tablespoon Coconut Oil
- 1/3 Cup Full-Fat Coconut Milk
- 2 1/2 Teaspoons Madras Curry Powder
- 1/2 Teaspoon Garam Masala
- 1/4 Teaspoon Salt
- 1 Tablespoon Lemon Juice
- 1 Cup Frozen Peas, Thawed
Quick Mango Chutney
- 1 1/2 Cups Diced, Frozen Mango
- 1/2 Cup Diced Tomato
- 1/4 Cup Diced Yellow Onion
- 1/4 Cup Golden Raisins
- 2 Tablespoons Lemon Juice
- 1 Teaspoon Ground Ginger
- 1/4 Teaspoon Ground Turmeric
- 1/8 Teaspoon Ground Cloves
- 1/8 Teaspoon Salt
Instructions
- Bring a medium pot of water to a boil and pop in the gnocchi, using a spatula to gently break them apart. Cook just shy of al dente as the dumplings will continue to soften in the curry sauce. In some cases, this might amount to only 1 or 2 minutes in the water, so keep a close eye on the process and test frequently by poking the pieces with a fork. Drain and rinse with cold water to immediately stop the cooking process.
- In a medium saucepan, melt the coconut oil over medium-high heat and add in the par-boiled gnocchi. Spread them out to cover the bottom of the pan as evenly as possible, and resist the urge to stir for about two minutes, allowing them to dry and very lightly toast. Separately, whisk together the coconut milk, both spice mixtures, and salt before pouring them into the pan. Turn down the heat to medium-low, mix thoroughly, and simmer for 1 – 2 minutes longer, until the sauce coats the gnocchi nicely. Toss in the thawed peas and serve with mango chutney on the side, if desired.
- To make the mango chutney, place the mango and all ingredients in a microwave safe dish, stir well, and heat on full power for 4 – 7 minutes. The fruit should be softened, syrupy, and well-seasoned. This chutney will keep well if stored in an airtight container in the fridge for up to a week. Makes 2 Cups
Notes
There are more types of chutney on the market than there are days in the year, from creamy coconut to fiery habanero varieties, but one of my favorites is made from mango. You can pick up a jar of it at most grocery stores these days, but you can also throw together a quick version at home, if you have an extra couple of minutes to spare.
Recommended Products
Please note that some of the links above are affiliate links, and at no additional cost to you, I will earn a commission if you decide to make a purchase after clicking through the link. I have experience with all of these companies and I recommend them because they are helpful and useful, not because of the small commissions I make if you decide to buy something through my links.


Nutrition Information:
Yield:
4Serving Size:
1Amount Per Serving: Calories: 247Total Fat: 8gSaturated Fat: 7gTrans Fat: 0gUnsaturated Fat: 1gCholesterol: 9mgSodium: 239mgCarbohydrates: 40gFiber: 5gSugar: 18gProtein: 6g
All nutritional information presented within this site are intended for informational purposes only. I am not a certified nutritionist and any nutritional information on BitterSweetBlog.com should only be used as a general guideline. This information is provided as a courtesy and there is no guarantee that the information will be completely accurate. Even though I try to provide accurate nutritional information to the best of my ability, these figures should still be considered estimates.
[Not Quite] Silent Sunday: Dal-icious


Dal Puri Roti with Tamarind Sauce
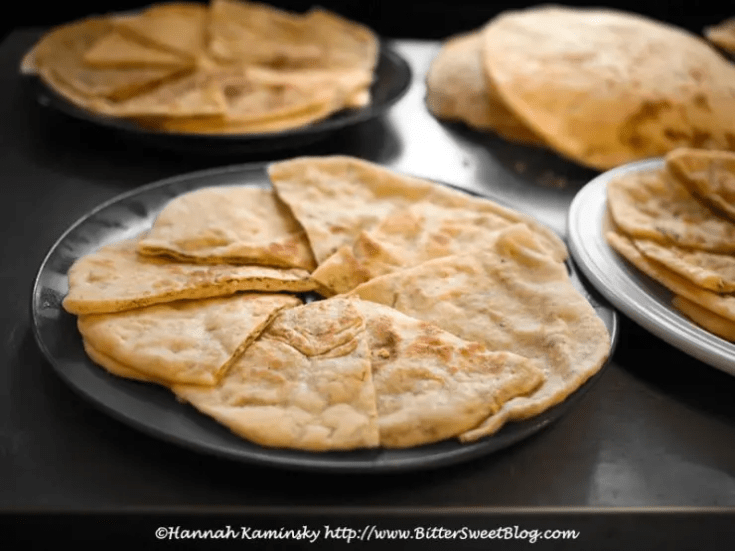
"I do not exaggerate when I say this is one of my favorite breads in the world! It’s obviously of Indian origin, but this version is a Trinidad specialty. It works well on it’s own, but if you roll it out thin enough you can then stuff it with various curries and roll it up like a burrito for some Trini heaven.
Culantro is a related to cilantro and similar, yet different enough to seek out. If you have Latin markets in your area, you may be able to find it. It’s also called chado beni in Trinidad.
A tawa is a cast-iron or stainless steel griddle that fits on top of your stove burner (gas or electric.) These are inexpensive, usually made in India, and easily found at Indian or Caribbean markets or online.”
By Chef Philip Gelb of Sound & Savor
Ingredients
Tamarind Sauce:
- 1 Tablespoon Coconut Oil
- 4 Green Onions, Diced
- 2 Cloves Garlic, Minced
- 2 Tablespoons Fresh Cilantro
- 1/2 Teaspoon Salt
- 1/2 Teaspoon African Bird Pepper or Cayenne Pepper
- 1/4 Cup Palm Sugar or Coconut Sugar
- 1 Cup Water
- 1/3 Cup Tamarind Concentrate
Dal Puri Roti Filling:
- 1 14-Ounce Cans Garbanzo Beans
- 1 Habanero Pepper, Seeded and Minced
- 3 Cloves Garlic, Minced
- 1 Teaspoon Salt
- 1 Teaspoon Ground Cumin
- 1 Bunch Fresh Cilantro
- 1 Bunch Fresh Culantro
Roti Dough:
- 3 Cups All-Purpose Flour
- 2 Teaspoons Baking Powder
- 1/2 Teaspoon Active Dry Yeast
- 1 Teaspoon Salt
- About 1 1/2 Cups Water
- Coconut Oil, to Cook
Instructions
- Prepare the tamarind sauce first. In a skillet, add the coconut oil, green onion, and garlic. Sauté for three minutes, until aromatic. Transfer to a mortar and pestle and pulverize along with the cilantro. Add the rest of the ingredients and mix well. Taste and adjust seasonings as desired.
- Place all of the ingredients for the filling into a food processor and grind into a rough mash. Set aside.
- In a large bowl, whisk together the flour, baking powder, yeast, and salt. Add water and mix together with a spoon until the dough becomes too thick to stir. Use your hands to finish combining the ingredients. Use just enough water to form a ball and knead gently for a few minutes, until smooth. Cover dough with a clean kitchen towel and let rest for at least 1 hour.
- Divide the dough into 10 equal pieces. Form each piece into a ball and then roll into a small circle. Add about 1/10th of the garbanzo mixture and wrap the dough around it, much like you would for a dumpling. Pinch the dough closed, cover once more, and let rest for another hour.
- Place a griddle or large skillet over medium heat and brush liberally with coconut oil. Roll each ball into a flat, thin circle. Place the dough on the skillet and brush the top with more coconut oil. Cook for 1 minute before flipping. Cook for another minute, flip again, and cook for 1 minute longer. Repeat with all the remaining dough.
Recommended Products
Please note that some of the links above are affiliate links, and at no additional cost to you, I will earn a commission if you decide to make a purchase after clicking through the link. I have experience with all of these companies and I recommend them because they are helpful and useful, not because of the small commissions I make if you decide to buy something through my links.


Nutrition Information:
Yield:
10Serving Size:
1Amount Per Serving: Calories: 265Total Fat: 4gSaturated Fat: 2gTrans Fat: 0gUnsaturated Fat: 1gCholesterol: 0mgSodium: 637mgCarbohydrates: 49gFiber: 5gSugar: 9gProtein: 8g
All nutritional information presented within this site are intended for informational purposes only. I am not a certified nutritionist and any nutritional information on BitterSweetBlog.com should only be used as a general guideline. This information is provided as a courtesy and there is no guarantee that the information will be completely accurate. Even though I try to provide accurate nutritional information to the best of my ability, these figures should still be considered estimations.
Yes, Peas
“Congratulations San Francisco, you’ve ruined pizza!”
Harsh words for an innocent little slice. The catalyst for this outburst was a pie topped with verdant green broccoli florets. A perfectly reasonable addition, in my opinion, but far from the kid-approved standard menu that one might expect. If you too find unconventional vegetables adorning the typical thin-crust construction wholly offensive, I’d suggest you shield your eyes. Click away, don’t scroll any further, and let’s pretend like this never happened.

Are you still with me? Good! I knew we were friends for a reason.
Pea-zza, a springy seasonal variant on the classic, is lavished with tender sweet peas, of course, as well as crisp raw snap peas. Delicately nuanced and herbaceous cashew spread joins the party, rather than a gooey mozzarella that might otherwise smother such subtle flavors. If we’re going to put peas on pizza, we might as well change the whole game, right? Elevated to the status of gourmet fare with that simple substitution, you could easily serve this to the most discerning gourmet without batting an eyelash.
That’s not the final twist, though. Creamy coconut yogurt, flecked with lemon zest, lends brightness, lightening the whole affair in ways that defy its underlying richness. All yogurt is not created equal, and I have to admit, the stuff that Cultured Kitchen makes was largely the inspiration for this whole culinary experiment. Thicker than sour cream, completely unsweetened, just a tiny dab will satisfy. I found myself using it more like a whipped topping to accompany fresh berries than anything else.

It tortures me that it has such a limited release! There’s not even information about it online, and it’s unlikely I’ll encounter such a treat in regular grocery stores. If you’re in the same boat, all is not lost. In the case of this fresh flatbread, simply opt for a non-dairy yogurt without any added sugar or flavor, and omit the lemon juice, doubling down on the zest instead to prevent the drizzle from becoming too watery.

Please, give peas a chance. If it helps you wrap your mind around this crazy combination, think of it more as a seasonal flatbread, piled high with the best that nature has to offer. Your average onions, mushrooms, and olives can wait; this limited edition novelty is one to savor right away, while those lush green peas are still perfectly plump.
Pea-zza (Pea Pizza)

Pea-zza, a springy seasonal variant on the classic, is lavished with tender sweet peas, of course, as well as crisp raw snap peas.
Ingredients
Pizza Crust:
- 1 Pound Prepared Pizza Dough
- All-Purpose Flour (As Needed)
- 1 Tablespoon Olive Oil
- 3 Tablespoons Minced Garlic
- 1/4 Cup Nutritional Yeast (Optional)
Pizza Toppings:
- 1/2 Cup Herbed Cashew Cheese
- 1 Cup Fresh Peas, Blanched or Frozen Peas, Thawed
- 1/2 Cup Sugar Snap Peas, Sliced into 1/2-Inch Lengths
- 2 Tablespoons Toasted Pistachios
- 2 Scallions, Thinly Sliced
- Flaky Sea Salt
- Ground Black Pepper
Lemon Yogurt Drizzle:
- 1/3 Cup Unsweetened Vegan Yogurt
- 1 – 2 Tablespoons Lemon Juice
- 1 Teaspoon Lemon Zest
Instructions
- Preheat your oven to 500 degrees and lightly grease a large baking sheet or pizza stone.
- Press the pizza dough out roughly into a flat round, lightly dusting both sides with flour. Pull and toss by hand or use a rolling pin to stretch it out to approximately 10 inches in diameter. Brush the entire surface with olive oil and sprinkle evenly with the garlic and nutritional yeast, if desired.
- Bake for 5 to 7 minutes, until dough is thoroughly browned all over.
- While it’s in the oven, prepare the yogurt drizzle by simply mixing up all the ingredients in a bowl. Set aside for the moment.
- When you crust is hot and ready, slather it generously with the cashew spread and top with the peas, snap peas, pistachios, and scallions. Season with salt and pepper to taste. Drizzle with the yogurt sauce, slice, and serve immediately.
Recommended Products
Please note that some of the links above are affiliate links, and at no additional cost to you, I will earn a commission if you decide to make a purchase after clicking through the link. I have experience with all of these companies and I recommend them because they are helpful and useful, not because of the small commissions I make if you decide to buy something through my links.


Nutrition Information:
Yield:
4Serving Size:
1Amount Per Serving: Calories: 594Total Fat: 14gSaturated Fat: 3gTrans Fat: 0gUnsaturated Fat: 10gCholesterol: 8mgSodium: 656mgCarbohydrates: 95gFiber: 10gSugar: 8gProtein: 22g
All nutritional information presented within this site are intended for informational purposes only. I am not a certified nutritionist and any nutritional information on BitterSweetBlog.com should only be used as a general guideline. This information is provided as a courtesy and there is no guarantee that the information will be completely accurate. Even though I try to provide accurate nutritional information to the best of my ability, these figures should still be considered estimations.
Sending Home the Bacon
What do you get for the man who has everything? More importantly, what do you make for the man who isn’t particularly thrilled by birthday cake, lives on the opposite side of the country, and would never so much as drop a hint about any particular wants or needs? This is the conundrum I face every time my dad’s birthday rolls around. Proving that the ones who give the most are terrible at accepting the same kindness, he’s notoriously impossible to shop for, even when it comes to the most basic necessities. Appreciative of the gesture, he will always accept the typical gifts of shirts, books, and ties with grace, but really, you shouldn’t have. Really.

The only thing I know for sure is that my dad loves music, obscure movies, and ever-so-slightly burnt popcorn to enjoy with both. I have strong memories of working diligently upstairs in my room, only to smell the distinct aroma of toasted, vaguely blackened kernels wafting through the air, and I’d know it was time to take a break. That meant it was 9:00, our designated TV hour, which always came with a heaping handful of his homemade snack mix. Crowning this simple blend was a generous shake of bacon salt, the curiously vegetarian seasoning with a smoky, savory edge. It was a comforting routine, and one that I still miss almost three years since moving out.
If I can’t be there to share the flicks and snacks in person, then I had to find a way to send an edible understudy.

Vegans are making everything into bacon these days, from eggplant to coconut, but my unique blend goes back to a classic mixture of meaty tempeh and deeply umami mushrooms. It’s a simple yet remarkably satisfying seasoning that adds an extra punch to any dish, not just freshly popped corn. Think french fries, avocado toast, veggie burgers, roasted Brussels sprouts, corn on the cob, bar nuts, and so much more. It could quickly become the new savory staple that you suddenly can’t live without, even if you’ve never tasted the “real” thing.
Birthdays come and go, but the opportunity to treat loved ones to a special delicacy is fleeting. This successful, universally appealing formula may just be an ideal gift for equally discerning recipients in your life, too.
Bacon Salt

A savory sprinkle of tempeh and mushrooms that's simple to make yet remarkably satisfying tor seasoning any dish.
Ingredients
- 3 Tablespoons Soy Sauce
- 1 Tablespoon Liquid Smoke
- 1 Tablespoon Maple Syrup
- 1 Tablespoon Olive Oil
- 1 Tablespoon Nutritional Yeast
- 1/4 Teaspoon Smoked Paprika
- 1/8 Teaspoon Ground Black Pepper
- 1 8-Ounce Package Tempeh
- 1/2 Cup Sliced Cremini Mushrooms
- 1/4 Cup Dried, Sliced Shiitake Mushrooms
- 1/4 Cup Coarse Sea Salt
Instructions
- Preheat your oven to 300 degrees and set aside an 8 x 8-inch baking pan.
- Stir together the soy sauce, liquid smoke, maple syrup, oil, nutritional yeast, paprika, and pepper in a large mixing bowl. Crumble the tempeh as finely as possible and toss it in, along with the mushrooms. Mix thoroughly, coating the pieces.
- Pour everything, including the excess marinade into your waiting pan. Bake for 2 1/2 – 3 hours, stirring every 15 – 25 minutes or so to keep the entire batch cooking evenly and preventing it from burning. The edges can go from soft to scorched surprisingly quickly, so standby and keep a close eye on it the entire time it’s in the oven.
- Cook until brown all over, dry to the touch, and highly aromatic. Be aware that your kitchen may smell like bacon for the rest of the day, but I would hardly consider that a problem.
- Let cool completely before transferring to your blender or food processor along with the salt. Pulse until the pieces are completely broken down. Strain through a fine mesh sieve if you would like a particularly even grind and re-blend any remaining large pieces. Store at room temperature in an airtight container.
Nutrition Information:
Yield:
1Serving Size:
1Amount Per Serving: Calories: 683Total Fat: 40gSaturated Fat: 10gTrans Fat: 0gUnsaturated Fat: 26gCholesterol: 0mgSodium: 30965mgCarbohydrates: 39gFiber: 3gSugar: 13gProtein: 54g
Cake of a Different Color
Sneaking vegetables into desserts has long been a practice of conniving parents, trying to feed their children a daily dose of greens by any means necessary. “Cauliflower cake” sounds like yet another attempt at disguising the trendy brassica as a sweet treat, smothered in chocolate or coated in sprinkles, perhaps, but it’s actually a delight for the dinner table.

Inspired by a recipe from Plenty More by Yotam Ottolenghi, what this mad genius calls a cake could really qualify as a highly vegetative frittata. Heavy on cheese and savory fresh herbs, such a universally appealing combination could make even the pickiest eaters open up and ask for seconds. My interpretation of the concept is a radical departure from the original, however, utilizing a green pea-based batter to replace the eggs, continuing the color scheme with green cauliflower, and punching up the flavor with a more spring-y punch of dill.

The tantalizing taste of this unconventional entree is matched only by its versatility. Need a make-ahead breakfast? Prepare it the day before and you can have it on the table first thing in the morning. Casual lunch, or fancy brunch for a crowd? Serve slices with a leafy green salad and plenty of mimosas on the side. Romantic dinner for two? Bake single servings in ramekins to really impress your date. Leftovers are just as satisfying if eaten cold- If you have any, that is.
Green Cauliflower Cake

Akin to a highly vegetative frittata, this vegan version is heavy on cheesy and herbal flavors. Green pea-based batter replaces the eggs, continuing the color scheme with green cauliflower, and punching up the flavor with a more spring-y punch of dill.
Ingredients
- 5 Tablespoons Olive Oil, Divided
- 1 Medium Yellow Onion, Diced
- 2 Clove Garlic, Minced
- 1 Pound Green Cauliflower, Finely Chopped
- 1/2 Cup Fresh Dill, Chopped
- 1 3/4 Cup Green Pea Flour
- 1 Teaspoon Baking Powder
- 1/2 Teaspoon Kala Namak or Plain Salt
- 1/4 Teaspoon Ground Black Pepper
- 1 (7-Ounce) Package Follow Your Heart Garden Herb Cheese or Any Mozzarella-Style Vegan Block Cheese, Finely Diced
- 2 1/2 Cups Vegetable Broth
- 1 Tablespoon Wholegrain Mustard
- Fresh Parsley, Minced (Optional)
Instructions
- Preheat your oven to 350 degrees and lightly grease an 8-inch springform pan.
- Place 2 tablespoons of the oil in a medium skillet and set over medium heat. Add in the onion and sauté until softened and aromatic. Add the garlic and cauliflower next, cooking until very lightly browned. Turn off the heat and let the vegetables cool for about 10 minutes.
- Meanwhile, combine the dill, green pea flour, baking powder, kala namak, and black pepper, stirring well to evenly distribute all of the ingredients. Toss in the cubes of cheese, ensuring that they’re thoroughly coated in the dry mixture to make sure that they stay suspended in the cake, rather than just sink to the bottom. Add in the cooked vegetables next, tossing in the same fashion. Whisk together the broth, mustard, and remaining olive oil before pouring the liquid mixture into the bowl, stirring well to incorporate.
- Transfer to your prepared springform pan, smoothing out the top and tapping it lightly on the counter to release any air bubbles. Place the pan in the center of the oven and bake for 45 – 50 minutes, until lightly golden brown on top. Let rest for at least 20 minutes before serving; it’s best enjoyed warm or at room temperature, rather than hot.
- Slice and garnish with fresh parsley, if desired.
Nutrition Information:
Yield:
10Serving Size:
1Amount Per Serving: Calories: 128Total Fat: 9gSaturated Fat: 2gTrans Fat: 0gUnsaturated Fat: 6gCholesterol: 5mgSodium: 492mgCarbohydrates: 9gFiber: 3gSugar: 4gProtein: 5g