One Thrifty Treat

One of the most obvious perks of working as a food photographer is the bounty of delicious edibles left over after a shoot. From little nibbles of the “hero” dish to the vast number of extras that aren’t quite perfect enough to make the cut, there’s always something good to eat in this business, and rarely does one leave the set hungry.

Just the other day, a huge amount of dried fruits and nuts was dropped off at the office, to be used as background pieces and props. And when I say huge, I’m not kidding- There was enough to cover the entire kitchen table, and then some. A bit old and no longer at prime freshness, each individual bag was marked “DO NOT EAT” in bold sharpie, multiple times, in no uncertain terms.

Reluctant to toss anything out though, I covertly snuck in a few bites between shots- Just to test the waters, you see. Turns out that despite the warnings, all of these dried pears, cherries, and mangoes were perfectly fine, and still quite tasty! Easily talking my way into taking the whole bundle home with me after work, it was then a matter of what to do with so much dried fruit… Where to store it is still an issue, too!

Sad to say, mangoes, which made up the bulk of this haul, are my least favorite of any dried fruit selection, tough and leathery with mostly just an astringent bite in the way of flavor. Simmered in a flavorful liquid, however, they quickly turned into a pleasantly tart, summery treat. Pureeing that mixture, it quickly became obvious that it was destined to be baked into something sweet, so who was I to resist?

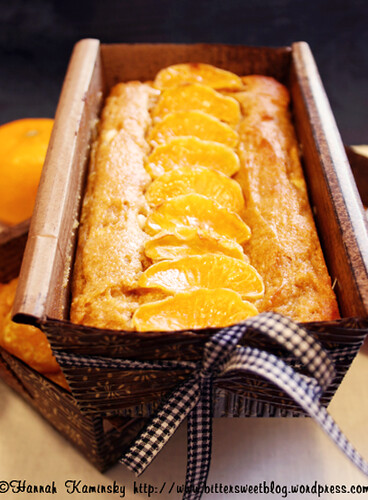
Blended with non-dairy white chocolate chips and topped with sweet segments of little clementines, this impromptu cake was a gratifying exercise in recycling ingredients. Those clementines were also on their last legs, becoming drier every day they sat in the fruit drawer of the fridge, begging to be eaten. Creating a cake with satisfying density and a ridiculously moist crumb, just a very small piece should be enough to sate your sweet tooth. I baked mine into cute little disposable loaf pans, making them delightful little gifts, but you could easily use a large 9 x 5 inch loaf pan, or muffin tins instead. Just increase the time to 1 – 1 1/2 hours for the large loaf, and start checking on the muffins after 20 minutes have elapsed.

Yield: Makes 9 - 12 Servings

Thrifty Mango Bread

Thrifty Mango Bread

Tropical mangoes and white chocolate chips join forces in this thrifty quick bread.

Prep Time 15 minutes
Cook Time 1 hour
Total Time 1 hour 15 minutes

Ingredients

  • 6 Ounces Dried Mango Pieces
  • 1 3/4 Cups Orange Juice
  • 3/4 Cup Granulated Sugar
  • 1/3 Cup Olive Oil
  • 1 Teaspoon Vanilla Extract
  • 2 Cups White Whole Wheat Flour
  • 1 1/2 Teaspoons Baking Powder
  • 1/2 Teaspoon Baking Soda
  • 1/4 Teaspoon Salt
  • 3/4 Cup Vegan White Chocolate Chips
  • 3 - 4 Clementines, Peeled and Segmented

Instructions

  1. Preheat your oven to 350 degrees and lightly grease or line three 3 x 6 inch loaf pans.
  2. Place the mango pieces and orange juice in a small sauce pan, and bring it up to a simmer over medium-low heat. Let it bubble away gently for 15 – 20 minutes, until the mango is significantly softened and dehydrated. Remove the pot from the heat, and cool before moving the mixture into a food processor or blender. Puree thoroughly until completely smooth.
  3. Move the puree into a large bowl, and stir in the sugar, oil, and vanilla until smooth. Separately, whisk together the flour, baking powder and soda, salt, and white chocolate chips. Slowly incorporate the dry goods into the wet, and stir just enough to combine.
  4. Distribute the batter between your prepared pans, and top with the clementine segments. Bake for 30 – 40 minutes, until a toothpick comes out of the center clean. Let cool completely before slicing.

Recommended Products

Please note that some of the links above are affiliate links, and at no additional cost to you, I will earn a commission if you decide to make a purchase after clicking through the link. I have experience with all of these companies and I recommend them because they are helpful and useful, not because of the small commissions I make if you decide to buy something through my links.


Take It Outside

Settling into June and now coming dangerously close to summer, we’re in for quite a few beautiful days in the next couple of months, so it’s time to prepare for one of my favorite warm weather past times: Picnics! My article on sweet picnic ideas will be appearing in the July/August issue of VegNews, so short of spoiling the whole piece, I thought I’d give you one little taste of it. You may have already seen it in the VegNews Recipe Club Newsletter if you’re a subscriber, but if not, I would hate for anyone to miss out on this dessert that’s ideal for outdoor dining.

Although I’m not normally a fan of sheet cakes, I’ll make an exception for this one. Bursting with fresh berries and citrus, it packs a serious punch of flavor that can stand up to any amount of heat, be it from the sun or a spicy meal. It’s perfect for a picnic because after baking, you can just leave it in the pan to cool, cover it with plastic wrap, and bring the whole thing with you, no muss, no fuss. Big enough to feed a crowd, there would be plenty to go around for a potluck party, too.

Yield: Makes 12 - 16 Servings

Raspberry Lime Sheet Cake

Raspberry Lime Sheet Cake

Bursting with fresh berries and citrus, this easy cake packs a serious punch of flavor that's perfect for any summertime party.

Prep Time 15 minutes
Cook Time 30 minutes
Total Time 45 minutes

Ingredients

Raspberry Lime Sheet Cake

  • 3/4 Cup Plain Non-Dairy Milk
  • Zest of 2 Key Limes
  • 1 Tablespoon Lime Juice
  • 1/2 Cup Olive Oil
  • 1/4 Cup Vegan Sour Cream or Pureed Silken Tofu
  • 1 Teaspoon Vanilla Extract
  • 2 3/4 Cups All Purpose Flour
  • 1 1/2 Cups Granulated Sugar
  • 1 1/2 Teaspoons Baking Powder
  • 1 Teaspoon Baking Soda
  • 1/2 Teaspoon Salt
  • 2 Cups Fresh Raspberries

Lime Icing:

  • 1 Cup Confectioner’s Sugar
  • 1 – 3 Tablespoons Lime Juice

Instructions

  1. Preheat your oven to 350 degrees and lightly grease and flour a 9 x 13 inch baking pan.
  2. Combine the non-dairy milk, lime zest, and juice together in a medium bowl and let the mixture sit for about 5 minutes before proceeding to allow it to curdle slightly.
  3. Add in the oil, sour cream or tofu puree, and vanilla, and whisk thoroughly until smooth.
  4. In a separate bowl, mix together the flour, sugar, baking powder and soda, and salt so that all of the ingredients are well-distributed. Add in the raspberries, and toss them briefly to coat them with flour so that they don’t sink to the bottom of the cake.
  5. Pour the wet ingredients into the dry, and mix just until mostly incorporated- A few lumps are just fine here.
  6. Pour the batter into your prepared pan, and bake for 28 – 36 minutes, until a toothpick inserted into the center of the cake comes out clean. Let cool completely before icing.
  7. To make the icing, simply whisk the confectioner’s sugar and lime juice together, adding in juice 1 tablespoon at a time until it reaches your desired consistency.
  8. Drizzle over the cake and serve.

Recommended Products

Please note that some of the links above are affiliate links, and at no additional cost to you, I will earn a commission if you decide to make a purchase after clicking through the link. I have experience with all of these companies and I recommend them because they are helpful and useful, not because of the small commissions I make if you decide to buy something through my links.

Nutrition Information:

Yield:

16

Serving Size:

1

Amount Per Serving: Calories: 266Total Fat: 8gSaturated Fat: 2gTrans Fat: 0gUnsaturated Fat: 6gCholesterol: 1mgSodium: 201mgCarbohydrates: 45gFiber: 2gSugar: 27gProtein: 3g

All nutritional information presented within this site are intended for informational purposes only. I am not a certified nutritionist and any nutritional information on BitterSweetBlog.com should only be used as a general guideline. This information is provided as a courtesy and there is no guarantee that the information will be completely accurate. Even though I try to provide accurate nutritional information to the best of my ability, these figures should still be considered estimations.

Go Max, Go!

Coming to the end of yet another grocery shopping mission, having avoided temptation for the most part, the final destination is still fraught with danger. It’s those darned impulse buys so cleverly lined up by the check-out line, inviting you to add just one tiny sweet something to the tally. Yes, I’m definitely an impulse buyer when the mood strikes, so those offerings in and of themselves wouldn’t be so frustrating, if it weren’t for the content. Often lacking in proper labels, or full of unsavory ingredients, these temptations are merely eye-candy at best. Vegan candy bars are still incredibly hard to come by, and they usually turn out to be nothing more than glorified granola bars; Delicious, but a far cry from the decadent chocolate, caramel, and nougat treats available to the rest of the population.

Finally, there is a solution! Go Max Go, a vegan-owned and operated business, has developed a line of four candy bars that are impressive by any standards. By sourcing high-quality ingredients, there’s no trans-fats or HFCS to worry about, so there’s less to feel guilty about when you indulge. Imitating the familiar flavor combinations that certain nation-wide brands have made popular, these bars will satisfy your craving for nostalgia, and a sweet treat.

If a Snickers bar sounds like the peanuty indulgence you desire, grab a Jokerz instead. Composed of “caramel, peanuts, nougat, rice-milk chocolatey coating,” this bar is truly no joke. Packed full of chewy, sticky caramel sprinkled with ample amounts of fresh-tasting peanuts, one bite is an intense taste sensation. A good hit of salt brings out the high notes in those crunchy nuts and rounds out the whole flavor profile. The chocolate coating definitely keeps the sweetness in check and provides an appealing exterior, but it’s definitely not the focus here.

One of my childhood favorites was the Milky Way, and it was always the first to be eaten out of my Halloween stash every year. Now, I can indulge in the Twilight, which boasts “caramel, chocolatey nougat, rice-milk chocolatey coating” all under one wrapper. The dense, chewy, almost creamy nougat is very sweet, but still possess a good chocolate flavor. Coated in smooth, milky chocolate, this outer layer a more prominent role, and is sure to please chocolate lovers all around. Married harmoniously with the deep, burnt sugar notes of the caramel, it’s one incredibly satisfying snack.

“Some times you feel like a nut…” and at those times, don’t reach for an Almond Joy; Grab a Mahalo bar! “Coconut, almonds, rice-milk chocolatey coating” lends a tropical taste to this candy. Three solitary almonds line the top, and although that appeared to be a scant offering at first, they proved to be just enough to add delightful crunch to the whole concoction, and were perfectly fresh in flavor. The body was a firm piece of shredded coconut, reminding me somewhat of coconut-packed marzipan. A light shell of creamy chocolate perfectly compliments the interior without overshadowing any of the other components.

Finally, for those who want a more straightforward and simple chocolate treat, the Buccaneer is guaranteed to please. Simply made of “chocolatey nougat, rice-milk chocolatey coating” the 3 Musketeers impostor is the plainest of the pack. Somewhat top-heavy on the chocolate coating, the thick exterior gives way to an intensely sweet and chocolatey nougat. Absolutely delicious, but akin to taking straight frosting shots, this bar is for the serious sweet tooth only!

Easily addictive, each bar is absolutely spot-on for the candies that they’re “imitating,” although I would be tempted to say they’ve all surpassed the originals in just about every respect. If we could only get these babies into grocery store check-out lines, then boy, would I ever be in trouble- They’re pretty much impossible to resist!

[Written for Go Dairy Free]

Lazy Sunday

Shining brightly, the sun stretches over the landscape as far as the eye can see, with only an errant, fluffy whisp of a cloud or two passing by; This final day of the weekend could hardly be more perfect. The temperature is downright summery, and yet that awful seasonal humidity has yet to settle in, so there’s nothing by dry warmth to enjoy. The familiar urge to leave the oven off is returning, and meals have become simpler as a result. Especially today, on this lovely Sunday, it’s tough to summon the ambition just to peel yourself out of your lawn chair and go fetch a new reading book.

So what’s there to eat? A perfect day would be incomplete without something delicious, if you ask me, so of course there must be something simple and satisfying to accompany the laid-back mood.

Grazing contentedly through piles of chilled, fresh veggies and fruits (bring on the watermelon!), one of my favorite new discoveries finally adds a bit of balance to my lazy day diet. Dukkah, a crunchy mix of coarsely chopped hazelnuts and spices, is not only an excellent quick-fix snack, but also a fantastic party nibble, or it can even be incorporated into a more elaborate meal. For me, I’m happy to set out a big basket of different breads, a bowl of good olive oil, and start dipping away, but the possibility are endless. Think about a dukkah-encrusted tofu cutlet, or dukkah-laced salads. That’s not even getting into all of the different ideas for combining different spices and nuts (chickpeas are sometimes used, too)- The sky is the limit!

I don’t measure to make my dukkah these days, but here’s a great recipe to get you started. The hardest thing you’ll have to do is decide its final destination, I promise!

A Winner, and A Winning Frosting

Every past giveaway I’ve hosted, a random number generator has picked the winner for me. Although that was the plan for this one as well, one particular comment snuck in right before the entry period closed and I just couldn’t ignore how skillfully and thoughtfully written it was. This creative writer submitted a whole poem, and a really cute one at that! So Allison, you’ll be hearing from me soon because you’re the winner of the BabyCakes cookbook!

And Allison’s winning poem is as follows…

Oh, baby, BabyCakes!
What would I mix up?
What would I make?

Well…

Back when I was small
And could eat anything at all
(Or thought so!)
Before the days of xanthan gum,
Brown rice flour, millet, sorghum,
I’d stir eggs & softened butter
Into bowls of fine white flour,
Add chocolate chips & dark vanilla.
Our mother warned, “Raw eggs will kill ya!”
But sis & I still licked the spoon.
Those cookies could have won the moon.

It’s been three years since Doctor said,
“No more gluten, no more bread,
Or eggs, or milk, or cheese, or dairy.”
Which made me truly sad, and wary.
These days I couldn’t eat that batter
If it were served by the Mad Hatter
With pots of tea and a drenched Dormouse.
(I’d get so sick, I’d be stuck in the house.)

So if I were to win this book,
I know I’d make the cookies first—
The chocolate chip cookies, that is.
I’d lick the spoon, I’d taunt the moon,
I’d send you a batch, I’d sugar-crash,
I’d invite my friends, I’d make amends
For these relentless rhymes
With chocolate chip (gluten-free, dairy-free, egg-free!) cookies, and tea, oh my!

Thanks for making this giveaway so much fun!

And for everyone who didn’t win, don’t worry, because I still have a fantastic prize for you as well…

Remember that frosting recipe that was the biggest disappointment of all?  Well, I went back and reworked it, until it actually came out as advertised: Creamy, silky, and very lightly sweetened so that it might top any sort of cake perfectly, without inducing a sugar coma.  One of the best frostings I’ve ever had- And I don’t say that sort of thing lightly- This is one definitely a keeper. I can see why frosting shots would be so popular if this was on the menu!

Coconut Oil Frosting
Adapted from BabyCakes

3/4 Cup Plain Soymilk
3/4 Cup Plain Powdered Soymilk
5 Tablespoons Light Agave Nectar
1 Tablespoon Vanilla Extract
1 1/2 Cups Coconut Oil, Melted
1 1/2 Tablespoons Fresh Lemon Juice
1/4 Cup Instant Clear Gel
3/8 Teaspoon Xanthan Gum
1/4 Teaspoon Salt

In your food processor, pulse together the soymilk, soymilk powder, agave, and vanilla to combine. With the motor running, very slowly drizzle in the coconut oil, as if you were making a salad dressing. Add in the lemon juice next. Very slowly sprinkle in the instant clear gel and xanthan gum with the motor still going, followed by the salt, and let the machine run for about a minute. Scrape down the sides and pulse once more. The mixture will seem rather loose at the point, so don’t panic.

Place the whole bowl of the food processor in your fridge, and let it chill for about 2 hours. The frosting will seem a bit hard afterward. Reinstall the bowl on the machine, scrape down the sides, and let it run for about 5 minutes. The mixture may look chunky or curdled for a brief period, but just let the machine continue to work and it will eventually smooth out. Scrape down the sides as needed.

Apply to your cake(s) as desired, and keep the frosting in a cool place. Do NOT put it back in the fridge, as it will become hard, and don’t let it stand in the hot sun for too long or it will melt.

When “Flaky” is a Compliment

Homey, hearty, and jam-packed full of fruits, the strudels that I’ve come to know throughout the years could hardly be described as delicate, or even the least bit elegant. Heavy with gooey apples and thick pastry to hold it all together, they certainly classified as comfort food, but it would be generous to describe these desserts as “rustic.” That’s why this latest Daring Baker challenge had me a bit puzzled at first… Until I realized that this recipe produced an entirely different sort of beast.

The May Daring Bakers’ challenge was hosted by Linda of make life sweeter! and Courtney of Coco Cooks. They chose Apple Strudel from the recipe book Kaffeehaus: Exquisite Desserts from the Classic Cafés of Vienna, Budapest and Prague by Rick Rodgers.

With pastry so paper-thin that purists insist you can “read a newspaper through it,” this was much more similar to phyllo dough than the thin pie crust I typically encounter. Seeing that is what got me thinking of baklava, pretty much the best thing anyone could ever do with phyllo, in my opinion.

Merging these two sweet treats, a rich filling of walnuts and spices is encased in that flaky dough, and brushed with ample amounts of agave nectar while it’s still piping hot. Much easier to cut and serve than traditional baklava, it was definitely neater to eat, although I’ll admit right away that I could have definitely rolled the dough much thinner. Not quite perfect, but still a delicious treat that I would have never tried to make without this challenge. Served alongside a quenelle of vanilla ice cream and topped with a light dusting of powdered sugar, however, any number of imperfections can be easily overlooked.

For this variation, simply mix together the following in a large bowl…

2 Cups Chopped Walnuts
1/2 Cup Unsweetened Apple Sauce
1/2 Cup Granulated Sugar
1 Tablespoon Cornstarch
1 1/2 Teaspoons Ground Cinnamon
Pinch Cardamom
Pinch Salt

Spoon it onto the dough in a straight line, wrap, and bake just as written in the original recipe. Best eaten warm!