Sometimes, You Feel Like a Nut…

And sometimes, you feel like a peanut. A peanut butter cookie, to be more specific. Announcements of new national food “holidays” seem to be getting a bit out of control lately, but this one, National Peanut Butter Cookie Day, gets an easy thumbs up from me. Such a classic treat yet so terribly underappreciated, I’m glad this snack time staple is finally getting a moment in the spotlight. Chewy, crunchy, crispy, creamy, chocolatey, salty, spicy, or even savory, there’s no possible way to go wrong when concocting your own. As a peanut butter lover, I have a considerable cache of recipe options myself.

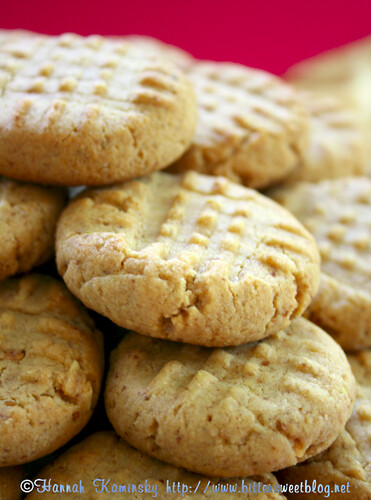
In a rare doubleheader recipe post, I’ve offered contrasting approaches to the same nutty morsel: a buttery, chocolate-flecked shortbread and thick, bakery-style crosshatched beauties

Way back in 2009, I devised a way to get the maximum peanut flavor out of a minimum of ingredients and effort. Thus, the easiest cookie ever was born! You probably have all of the components in your pantry right now, just waiting to join forces and create instant sweet tooth gratification. 1-2-3 Peanut Butter Cookies are a fool-proof option for both the baker and the eater.

If you’re in the mood for a dessert with a bit of bonus protein and fiber, look no further than these Gluten-Free Peanut Butter Cookies (but PLEASE do look beyond those dreadful old photos.) Red lentils add an unexpected nutrition boost without detracting from the peanut buttery goodness.

What’s your favorite type of peanut butter cookie? Do you have a secret formula, or trusted source? How are you celebrating today?

Rolling in Doughnuts

Health food seekers and whole food eaters: avert your eyes. For the rest of us, there’s more to veganism than oil-free, salt-free, sugar-free kale salads, to the relief and rejoicing of foodies everywhere. You can bake a cake in the shape of a ring to make a mighty tasty dessert, as I’ve also done without shame, but the fact of the matter is that it will never be a doughnut.

Deep fried to a golden brown, grease-less finish, the sheen of warm icing moments away from fully solidifying, nothing can match the pure bliss of that first bite. A true, top-notch doughnut is a rare delicacy, and not just for the indulgence it represents. There’s only so often that one can justify the mess and potential safety hazard of a giant pot of bubbling oil on the stove, and then there’s the trouble of what to do with a batch of a dozen doughnuts or more. They don’t keep beyond a day, so unless you’ve got a party of pastry-lovers coming over, your efforts are doomed to go largely uneaten.

Vegan Donut Gelato is here to help. It’s the kind of shop that seems too good to be true, which undoubtedly was a factor in deciding on such a straight-forward, unpretentious name. Yes, it’s all vegan and yes, they’ve got all your sweet cravings covered. The classics are present of course, simple glazed and sprinkled little numbers that live up to the highest standards of childhood nostalgia, to more inventive flavors like matcha, blueberry, maple “bacon,” or cookies and cream. Don’t get me started on the apple fritters, which are the size of a dinner plate and loaded with soft, spiced apple chunks.

It’s hard to restrain yourself from ordering one of everything, especially because they really are cheaper by the dozen. Besides, when was the last time you had a bear claw? Or a maple bar? Or a Boston cream doughnut? Further complicating the final order is the incredibly kind owner, always at the counter, who’s liable to throw in a free doughnut hole or two to reward such enthusiasm.

Though it’s impossible to resist the colorful magnetism of the front display, don’t gloss over the other half of the shop’s name. Soy-based gelato is made in house with rotating seasonal flavors, offered by the scoop or wedged into an outrageous doughnut sandwich assembly. I can only speak for the eggnog flavor which is of course long gone at this point, but I truly hope it makes an early come back. The flawlessly smooth, creamy texture is better than almost all prepacked options scooped out of a carton, and possibly one of the best in the bay. It may get overshadowed by the deep fried delights, but you won’t regret topping off your treats with an extra frozen spoonful… Well, unless you’ve already eaten your weight in cinnamon twists. Not that I’d know anything about that.

Vegan Donut Gelato
411 E 18th St
Ste B
Oakland, CA 94606

Pot of Gold

Tell the truth: How many times have you purchased a new product based largely on the container it came in? There’s no judgement here since it’s a marketing ploy I’ve fallen prey to more often than any reasonable shopper should, and I have shelves full of various empty jars to prove it. Insidious yet obviously effective, product packaging is a considerable factor for success in businesses both big and small. It conveys quality, makes a brand memorable, bolsters its presence on the shelf by setting it apart from the pack. For many years, that’s precisely why I knew about Petit Pot, enviously eyeing those shapely glass bottles stacked high in refrigerated cases. I know, you should never judge a book by its cover, but I had nothing else to go on since all of the luxuriously decadent contents were all dairy-based. Until now.

In a radical departure from the original line of French pot de creme offerings, the brand new Riz au Lait Coco is their very first non-dairy and fully vegan treat on offer.

Loosely set, erring much more on the side of a lightly thickened sauce than rich custard, this very quality lends it a deceptively light texture on the palate. For such a heavy, typically fatty main ingredient, this is both a marvel and a rarity. Tender grains of rice swim in a pool of coconut milk, accompanied only by a hint of cane sugar and salt. Dainty, unexpectedly delicate, the thinner texture creates a delightfully refreshing overall experience.

Coconut-forward but not aggressively so, each spoonful bears a lightly toasted tropical flavor but keeps things very simple. Perfectly fitting the definition of comfort food, there are no challenging flavors or surprises concealed in these attractive little containers. What you see is what you get, delivering on the high quality such packaging has always conveyed. Serve them absolutely chilled, straight out of the fridge and unadorned, for an ideal summer snack or dessert.

Locally made in San Francisco and sadly limited in availability nationwide, I’d like to think that this is just the start for a blossoming young company. After all, there’s clearly ample demand for more non-dairy desserts; the proof is in the pudding.

Crumby, Not Crummy

I love coffee cake, but I take issue with the false promises it makes right from the start. It strikes me as disingenuous to lure in the under-caffeinated with such a title, only to deliver a cinnamon-infused experience. I’ve heard the old argument that it’s simply suggesting how well it pairs with a cup of Joe, but that sounds like a poor excuse for deceptive branding, like “juice” that’s never seen a fruit in its short squeezed life. Coffee cake was an evolution, not an invention, derived from many other styles of baked confections in the early days of sugar cravings all across Europe, which can partially explain the indistinct, ambiguous definition of the form.

Some coffee cakes had fruits, others nuts, some were fashioned as loaves while others rose into towering rings and bundts; the one common factor that united them was the uncanny ability to eat them during a coffee break. Bearing out that logic, there would be some fresh hell to pay if we started calling all types of cookies “snack biscuits.” Can you imagine the anger and confusion that would result from the hangry sweet-toothed eaters receiving dry wafers when they were expecting rich, decadent brownies? That’s not a world I want to live in, quite frankly.

Steering clear of the controversy all together, I much prefer a more accurate headline. for my coffee complement: Crumb cake or struesel cake are equally appropriate. No one can deny that coarse, buttery topping, no matter the flavor nor format, for lack or abundance of additional mix-ins. The issue is far from black and white, contrary to this unconventional expression of the concept.

Inspired by the jar of black tahini remaining in my fridge after a fortuitous visit to the Living Tree Community Foods offices, this particular coffee-free spin on the classic fully embraces and celebrates the very best part of its namesake. Living up to its moniker, unlike so many cakes of yore, the struesel topping is thick, bold and unmistakable.

While we’re disrupting the usual routine anyway, why should cinnamon have all the crumb fun? A touch of cardamom and a hint of lemon complement the nutty notes of sesame throughout, subtle yet unmistakable nuances against the tender crumb.

A strong cup of spiced Turkish coffee would certainly be a welcome accompaniment, but as we’ve established, far from mandatory for maximum enjoyment. Whether you serve your slices with tea, lemonade, or nothing else at all, they will always make good on the promise of a delicious sweet treat.

Yield: Makse 9 - 12 Servings

Black and White Sesame Streusel Cake

Black and White Sesame Streusel Cake

Welcome to the dark side, with a thick slice of coffee cake topped with dense, dark, black sesame crumbs leading the way. A touch of cardamom and a hint of lemon complement the nutty notes of sesame throughout, subtle yet unmistakable nuances against the tender crumb.

Prep Time 20 minutes
Cook Time 1 hour
Total Time 1 hour 20 minutes

Ingredients

Black Sesame Streusel:

  • 1/2 Cup Black Sesame Tahini
  • 2 Tablespoons Vegan Butter, Melted
  • 1/2 Cup Dark Brown Sugar, Firmly Packed
  • 1/2 Cup All-Purpose Flour
  • 1/4 Cup Black Sesame Seeds
  • 1/4 Teaspoon Salt

White Sesame Cake:

  • 1/2 Cup Raw Sesame Tahini
  • 1/4 Cup Vegan Butter, at Room Temperature
  • 3/4 Cup Granulated Sugar
  • 1/4 Cup Plain Vegan Yogurt
  • 2 Cups All Purpose Flour
  • 1 Teaspoon Baking Powder
  • 1/2 Teaspoon Baking Soda
  • 1/4 Teaspoon Salt
  • 1/4 Teaspoon Ground Cardamom
  • 1/4 Teaspoon Ground Cinnamon
  • 1 Cup Plain Non-Dairy Milk
  • 1 Tablespoon Lemon Juice
  • 1 Teaspoon Vanilla Extract

Instructions

  1. Preheat your oven to 350 degrees and lightly grease a square 8 x 8-inch baking pan; set aside.
  2. Begin by preparing the streusel topping. In a large bowl, stir together the black tahini, melted vegan butter, and brown sugar until smooth. Add in the flour, sesame seeds, and salt, mixing with a fork to create coarse, chunky crumbs. Set in the refrigerator to chill while focusing on the cake batter next.
  3. Place the raw tahini, vegan butter, sugar, and yogurt into the bowl of your stand mixer and thoroughly cream everything together using the paddle attachment. Pause to scrape down the sides of the bowl as needed, making sure that all the ingredients are incorporated into a homogeneous blend before proceeding.
  4. Sift the flour, baking powder, baking soda, salt, cardamom, and cinnamon together into a separate bowl, whisking to combine. In a small pitcher, stir the non-dairy milk, lemon juice, and vanilla together as well. Add about half of the dry goods into the stand mixer, blending until mostly incorporated. Introduce half of the liquids, continuing to mix at a low speed. Repeat the procedure until both are smoothly blended in. Be careful not to over-beat the batter though; a few errant lumps are perfectly fine.
  5. Smooth the batter into your prepared baking dish. Break up the crumbs with a fork and sprinkle them evenly all over. It may seem like a lot, but you want full coverage here, so don’t hold back.
  6. Bake for 55 to 60 minutes, until toothpick inserted in center comes out clean. Cool completely in pan before slicing and serving.

Recommended Products

Please note that some of the links above are affiliate links, and at no additional cost to you, I will earn a commission if you decide to make a purchase after clicking through the link. I have experience with all of these companies and I recommend them because they are helpful and useful, not because of the small commissions I make if you decide to buy something through my links.

Nutrition Information:

Yield:

12

Serving Size:

1

Amount Per Serving: Calories: 371Total Fat: 18gSaturated Fat: 3gTrans Fat: 1gUnsaturated Fat: 14gCholesterol: 2mgSodium: 205mgCarbohydrates: 46gFiber: 2gSugar: 21gProtein: 8g

All nutritional information presented within this site are intended for informational purposes only. I am not a certified nutritionist and any nutritional information on BitterSweetBlog.com should only be used as a general guideline. This information is provided as a courtesy and there is no guarantee that the information will be completely accurate. Even though I try to provide accurate nutritional information to the best of my ability, these figures should still be considered estimations.


A Flurry of Inspiration

Winter is in full force, or at least, so I’m told. Forecasts filled with snow and ice threaten large swaths of the US, while records show that this year’s Superbowl was the coldest on record, crushing previous predictions with an icy flourish. Temperatures ranking just above negative numbers boggle my mind; a sensation so unthinkable, so impossible, it’s almost painful to imagine. That’s because beautiful California remains a shining beacon of eternal summer, setting records pushing the mercury up in the opposite direction. Basking in the sunshine on a brilliant 75-degree day, I have to remind myself that this is still February. Somehow, this is still winter.

Although that does make it less appealing to crank up the oven, those longer days of bright natural light inspire an endless stream of photo shoots, and with them, new recipes galore. In homage to the flurries still blanketing the rest of the northern hemisphere with frozen white fluff, my mind went to memories of clean, pure, white snow, freshly fallen and immaculate. So delicate were those perfectly formed crystals, which I examined closely on gloved hands as they landed, that they seemed as if they were formed individually by some master craftsman in the sky.

These particular snowflakes are cut from the same cloth, but as a handmade treat, still retain personalities all their own. Celebrating simplicity, they’re merely the best vanilla cookie you’ve ever tasted. Boldly infused with powder from the whole bean, they’re not shy about shouting this warm, classic flavor from the rooftops- Or wherever else they may settle. Mochiko is the secret to keeping each bite soft and tender, while remaining firm enough to resist spreading in the oven. Do not confuse this with regular rice flour, as the texture is very different.

Whether your snow day involves making snowmen or spending an unseasonably sweltering afternoon in the kitchen, may the end results always be as sweet!

Yield: Yield is variable, depending on size of cookie cutter

Ultimate Vanilla Bean Cut-Out Sugar Cookies

Ultimate Vanilla Bean Cut-Out Sugar Cookies

Celebrating simplicity, they’re merely the best vanilla cookie you’ve ever tasted. Boldly infused with powder from the whole bean, they’re not shy about shouting this warm, classic flavor from the rooftops- Or wherever else they may settle.

Prep Time 20 minutes
Cook Time 14 minutes
Additional Time 1 hour
Total Time 1 hour 34 minutes

Ingredients

  • 1 Cup Vegan Butter
  • 1 1/4 Cups Granulated Sugar
  • 2 3/4 Cups All-Purpose Flour
  • 1 Cup Mochiko
  • 1/4 Cup Arrowroot Powder
  • 1 1/2 Teaspoons Vanilla Bean Powder
  • 1/2 Teaspoon Salt
  • 1/2 Teaspoon Baking Powder
  • 1/3 Cup Plain Non-Dairy Milk

Instructions

  1. Use your stand mixer to thoroughly cream the butter and sugar together. In a separate bowl, sift the flour, mochiko, arrowroot, vanilla powder, salt, and baking powder, stirring well to combine. Add about half of these dry ingredients into the mixing bowl, processing it until fully incorporated. Pour in the non-dairy milk along with the remaining flour mixture. Continue to mix until it forms into a smooth, homogeneous dough. Form the dough into two balls, flatten them out a bit, wrap separately in plastic and chill for at least one hour before proceeding.
  2. After the dough has had time to rest in the refrigerator, start heating your oven to 350 degrees.
  3. On a lightly floured surface, roll out the first ball of dough to about 1/8th of an inch in thickness. Use your favorite cookie cutters to shape the cookies, and place them on baking sheets lined with silicone baking mats or parchment paper. Brush any excess flour off the cookies, but don’t go crazy if it still has a light coating; most of it will bake in seamlessly.
  4. Bake for about 8 – 14 minutes, depending on the size of your cookies, until no longer shiny and the edges are firm. Don’t wait for them to brown because they will become overcooked and dry by the time they cool.
  5. Cool completely on a wire rack before storing in an airtight container at room temperature.
  6. Yield is variable, depending on size of cookie cutter

Recommended Products

Please note that some of the links above are affiliate links, and at no additional cost to you, I will earn a commission if you decide to make a purchase after clicking through the link. I have experience with all of these companies and I recommend them because they are helpful and useful, not because of the small commissions I make if you decide to buy something through my links.

Nutrition Information:

Yield:

36

Serving Size:

1

Amount Per Serving: Calories: 109Total Fat: 5gSaturated Fat: 3gTrans Fat: 0gUnsaturated Fat: 2gCholesterol: 14mgSodium: 78mgCarbohydrates: 14gFiber: 0gSugar: 7gProtein: 1g

All nutritional information presented within this site are intended for informational purposes only. I am not a certified nutritionist and any nutritional information on BitterSweetBlog.com should only be used as a general guideline. This information is provided as a courtesy and there is no guarantee that the information will be completely accurate. Even though I try to provide accurate nutritional information to the best of my ability, these figures should still be considered estimations.

Sweeter by the Dozen

They say it’s your birthday
It’s my birthday too, yeah

As I struggle to stitch together the right combination of words on yet another post, I find that The Beatles sum up the general premise quite nicely in just a few simple words. My biological birthday was last month, but today is the day that BitterSweet turns twelve years old, an implausible, unbelievable milestone that I find myself celebrating with an even greater fervor. This humble little corner of virtual space has become so inextricably linked with my identity over the years, growing and contracting, morphing and evolving, persisting against all odds, that it really is my own birthday, too.

Let’s not get too mushy here, but there is a deep debt of gratitude that I do owe to you, every last one of you, that has dropped by to comment, like, pin, tweet, re-gram or re-post. That encouragement, reassuring me that I wasn’t just blogging in a vacuum, that there genuinely was interest in my crazy experiments and rambling thoughts- That is what allowed BitterSweet to not only survive, but thrive. It’s because of you that I found my true passion in life, made a career out of it, and continue striving to create and circulate all those adventures (and misadventures) along the way.

It’s given me the opportunity to make friends all across the globe, to connect with people I would otherwise never meet, to share some of my favorite things and find many more. It’s on that note that I’d like to introduce you to one more incredible small business poised to make a big splash…

Noosh turned out to be the sleeper hit on my list of new brands showcasing their wares at the Winter Fancy Foods Show last month. Hidden in a small enclave off to the side of the main floor, wedged into a tiny booth among many, I almost walked right on by without a second glance. How many different types of almond butter do we really need, after all? Just like granola bars and protein powders, isn’t the market already saturated with more options than we know what to do with? Yet somehow I was charmed, drawn in by the slick packaging and straightforward ingredient list. It’s pure, creamy almond butter, but so silky smooth and naturally sweet that you could almost call it almond nectar. In fact, I’ve taken to drizzling it liberally over my morning oatmeal instead of using maple syrup. Since that fateful encounter, I’ve grown increasingly smitten with the stuff, packing my bags with the single serving pouches in case of almond butter emergencies on the go.

As marvelous as the original and chocolate are, this is just the start. Not yet on the market but previewed at the show, I’m not kidding when I say that the Birthday Cake Almond Butter might just be life-changing. Yes, it is THAT good. It’s a challenge to slowly ration out my current supply until it officially hits the market, opening up the flood gates to unimpeded nut butter-based cake indulgence. Whereas many snacks promise a cake-like flavor, doomed to fall terribly short by comparison to the real thing, Noosh actually delivers. I don’t know how they do it, and quite frankly, I don’t want to. There’s a certain magic in that delicious mystery.

Inspired by that fresh-baked flavor and determined to stretch my limited stock just a little bit further, I couldn’t help but turn it into another cake facsimile. Rich, soft, melt-in-your-mouth bites of fudge both look and taste so much like the genuine article, you could easily get away with serving these at your next big party. Comprised of little more than almonds, coconut, and maple syrup, these adorable miniatures will satisfy your sweet tooth without inciting a sugar coma, even if you do indulge in seconds- or thirds.

Mercifully, the tortuous wait for a fresh supply of that ambrosial almond elixir is almost over. After much needling and prodding, I’ve been assured that this incredible flavor will finally be ready for purchase within the coming month. Stock up ASAP to always have a quick sweet fix close at hand.

Yield: Makes 20 – 22 Cupcake Fudge Truffles

Cupcake Fudge

Cupcake Fudge

Rich, soft, melt-in-your-mouth bites of fudge both look and taste so much like the genuine article, you could easily get away with serving these at your next big party. Comprised of little more than almonds, coconut, and maple syrup, these adorable miniatures will satisfy your sweet tooth without inciting a sugar coma, even if you do indulge in seconds- or thirds.

Prep Time 15 minutes
Cook Time 5 minutes
Additional Time 2 hours
Total Time 2 hours 20 minutes

Ingredients

Cupcake Fudge Base:

  • 1/2 Cup Noosh Birthday Cake Almond Butter
  • 1/4 Cup Melted Coconut Butter
  • 2 Tablespoons 100% Grade B Maple Syrup
  • 1/2 Teaspoon Vanilla Extract
  • 1/4 Teaspoon Salt

Chocolate Fudge Frosting:

  • 1/2 Cup Noosh Chocolate Almond Butter
  • 3 Tablespoons Melted Coconut Butter
  • 2 Tablespoons 100% Grade B Maple Syrup
  • 1 Tablespoon Cocoa Powder
  • 1/4 Teaspoon Vanilla Extract
  • 1/4 Teaspoon Salt

Garnish (Optional):

  • Edible Glitter and/or Shimmer Spray

Instructions

  1. Begin with the cupcake fudge base: Simply mix together all of the ingredients in a large bowl until smooth. Spoon the liquid fudge into small fluted cup silicone truffle molds. Let sit for at least 30 – 45 minutes, until completely solidified. Pop them out of the molds and keep them in the freezer.
  2. Meanwhile, prepare the frosting by going through the same process of blending together all the ingredients, spooning the mixture into spiral (as pictured) or small dome silicone truffle molds and place on a flat surface in the freezer. Let rest for 10 – 15 minutes until they begin to set but are not yet entirely firm.
  3. Take the finished cupcake fudge bases and gently pressure them into the soft frosting fudge. Return the molds to the freezer to allow them to finish solidifying. After 30 – 60, they should be ready to pop out all in one cohesive piece.
  4. Garnish with edible glitter(s) if desired. Store in an airtight container in the fridge for up to a week, or in the freezer for up to a month… If you can manage to stay essertaway from them that long, that is.

Recommended Products

Please note that some of the links above are affiliate links, and at no additional cost to you, I will earn a commission if you decide to make a purchase after clicking through the link. I have experience with all of these companies and I recommend them because they are helpful and useful, not because of the small commissions I make if you decide to buy something through my links.

Nutrition Information:

Yield:

22

Serving Size:

1

Amount Per Serving: Calories: 92Total Fat: 7gSaturated Fat: 4gTrans Fat: 0gUnsaturated Fat: 3gCholesterol: 5mgSodium: 69mgCarbohydrates: 7gFiber: 2gSugar: 4gProtein: 1g

All nutritional information presented within this site are intended for informational purposes only. I am not a certified nutritionist and any nutritional information on BitterSweetBlog.com should only be used as a general guideline. This information is provided as a courtesy and there is no guarantee that the information will be completely accurate. Even though I try to provide accurate nutritional information to the best of my ability, these figures should still be considered estimations.