Nogada or Nothing

It took me years to work up the nerve to make chiles en nogada for the first time. Embossed into my old notepad of recipe ideas and dream dishes, the mark remained indelible and untouched, surviving the migration to a digital file. It’s not that the procedure is terribly difficult, and even in my self-deprecating humility, I know I’m reasonably capable in the kitchen. It is, however, no quick-fix meal. The time commitment is as daunting as the list of ingredients that scrolls on longer than your average CVS receipt. Between the four components (roasted peppers, picadillo, walnut sauce, and garnish), you’re looking at an all-day affair.

Was tackling such a behemoth worth the effort, anguish, and wait? Absolutely. Is this going to be an everyday staple from here on out? Absolutely not.

Proudly Mexican, Through and Through

Thankfully, chiles en nogada traditionally grace the dinner table but once a year, in celebration of Mexican Independence Day on September 16th. Arriving at the height of summer harvests, when fresh walnuts and ruby red pomegranates overlap with poblano pepper season, the recipe is as much a celebration of the land’s abundance as it is of the nation’s independence.

The dish is widely believed to have originated in Puebla in 1821, where legend tells of Augustinian nuns preparing it to honor Agustín de Iturbide after he signed the Treaty of Córdoba, securing Mexico’s independence from Spain. Whether every detail of the story is fact or folklore is still debated, but one thing remains undisputed: the recipe proudly wears the colors of the Mexican flag. Emerald green poblanos and parsley, creamy white walnut sauce, and brilliant red pomegranate arils dress the plate as an edible symbol of national pride.

Essential Ingredients

Chiles en nogada is built on contrasts, with every ingredient playing against another.

Tart green apples, juicy peaches, and the concentrated pops of sweetness from raisins contrast with the savory richness of the filling, grounded by meaty oyster mushrooms and good old fashioned TVP for protein. Tomatoes, onions, garlic, and spices, leaning more on warming cinnamon than scalding heat, bring everything into balance, melding what sound like discordant components into a harmonious array of flavors.

The walnuts in particular deserve special attention. Fresh walnuts are noticeably milder and softer than what you’ll find commonly sold year-round, lacking much of the bitterness that develops with age. If you can find them, they’re worth seeking out. Otherwise, soaking conventional walnuts before blending helps mellow their sharper edge into the silky, luxurious nogada that gives the dish its name.

When it comes to picking poblanos, size matters. I prefer medium chiles for more reasonable portions, and making more servings that can be augmented with a side salad for the truly ravenous, but the tradeoff is that you’ll need to dedicate more time to roasting and peeling.

Hot Tips for Painless Prep

Dispatching the poblanos is easily the most annoying part of the whole procedure. My favorite method is tossing them over the open flame on my gas range, turning them with tongs until the exteriors are thoroughly charred and blackened. You could use the same technique on the grill if you’d got it fired up, or roast them in the oven or air fryer. Once they look like proper burn victims, let them steam in a covered bowl or paper bag to help separate the skin from the flesh. Peeling them under cool water helps remove any sticky spots, if you’re struggling. The peppers can be prepped up to three days in advance when stored in an airtight container or zip top baggie in the fridge.

Likewise, the walnut sauce can be blended hours or days ahead and refrigerated until needed. Bear in mind that it will continue to thicken as it sits, so you may need to add more vegetable broth to achieve a pourable consistency.

Of all the components, the picadillo actually benefits from a little time to rest, allowing the fruit, spices, and aromatics to meld. I’d wager you can make it up to a week in advance when stored properly, or, if you’re feeling particularly industrious on a random afternoon, frozen for a much later date.

Chiles en nogada are much more enjoyable when you haven’t spent the whole day in the kitchen laboring over them.

Pick Your Picadillo

“Picadillo” simply means “minced” or “finely chopped,” but beyond that, the possibilities are nearly endless. Every region, and every family, has their own interpretation. Some versions lean heavily into warm spices, others feature dried fruit or olives, while potatoes and carrots make an appearance in others.

This version stays true to the spirit rather than the letter of tradition, replacing the typical ground beef with hearty mushrooms and textured vegetable protein while preserving the signature interplay of savory aromatics and fresh fruit. The result is substantial enough to satisfy on its own, if the complete package becomes too overwhelming to wrap up. There’s nothing wrong in serving picadillo as an entree alongside rice, any day of the week.

Putting the Pieces Together

After all the chopping, roasting, and simmering, putting together the pieces is almost as satisfying as taking your first bite. Walnut sauce cascades over supple stuffed peppers, reminiscent of chiles rellenos stripped down to their most elegant form. A final shower of jewel tone pomegranate arils and parsley adds brightness, crunch, and the iconic color palate that transforms a humble stuffed pepper into a dish worthy of celebration.

Worthy of a Celebration

It’s embarrassing, almost shameful, how long this recipe languished on the “maybe” pile. Make no mistake, it’s an undertaking not to be underestimated, but a scalable culinary summit rather than an impossible feat. Most importantly, the experience of finally taking a forkful out of a plush stuffed pepper genuinely measures up to the effort it took to make it. As a truly festive centerpiece worthy of a special occasion, it’s one I’d consider recreating for Christmas, too. It’s not simply beautiful, though it certainly is that. It’s a celebration of fleeting seasons, regional traditions, and the joy of sharing something made with care. If you’ve been keeping your own list of dream recipes, consider this your sign to finally cross one off.

Continue reading “Nogada or Nothing” →

No Surprises

Leaping to her feet instantly, arms outstretched and swinging wildly, happy exclamations filled the previously quiet room. Lipstick kisses imprinted our cheeks as the hubbub slowly died down, the birthday girl was genuinely delighted by her unexpected brunch guests and party in her honor. It may have been a surprise party for my grandma, but honestly, I was the most surprised; No one told me we weren’t expected!

No matter, even without the full details there’s no way I’d arrive at any celebration empty-handed. Far from it; The 3-layer, chocolate-smothered tower weighed quite a bit more than calculated, and I was relieved to have it out of my hands upon arriving. Knowing me, you might imagine that some wonderful, unexpected twists must be lurking inside. Some crazy flavor or bizarre ingredient, unusual preparation, funny shape, anything! But no, the surprises ended after our dramatic entry, as this is just a chocolate cake.

No, I take that back- It most certainly is not just a chocolate cake, but in fact the chocolate cake. The chocolate cake I’ve been searching for before I even knew what good chocolate cake was, when I would have been just as thrilled by a half-price grocery store cupcake as a fine French gateaux. All it took to get there was of coarse endless experimentation over the years, but also a bit of humbling. That’s because I had to enlist some help from an ingredient previously reviled and downright banned from this household… Mayonnaise.

Way back when I was 10 years old, from the time I took a bite of a croque monsieur at the Charles de Gaulle Airport on a tedious layover to Italy, I was convinced that mayo was nothing but evil in condiment form. Shocked to find this pasty, fatty white sludge lining the limp bread, it was everything wrong with airport food, and everything wrong with mayonnaise. It was the worst thing I had ever eaten in my young life, and may still hold that illustrious title today, if I cared to think of all those terrible meals past. Though that was our first chance meeting, I was done with mayonnaise forever, and very vocal about my passionate animosity. That’s why it was even harder to reach for the glass jar, and admit that this substance may actually have a place in my kitchen.

This is one accidental re-introduction that I’m blaming squarely on Dreena Burton. Yes, the wholesome sweetheart behind a string of fool–proof cookbooks. It was her fault that I needed a dab of mayo to photograph her rocking veggie burgers, her advice to get Vegenaise instead of the other gloppy stuff that’s almost worse than the original, and thus her fault that I had almost a full jar of the stuff to contend with afterwards.

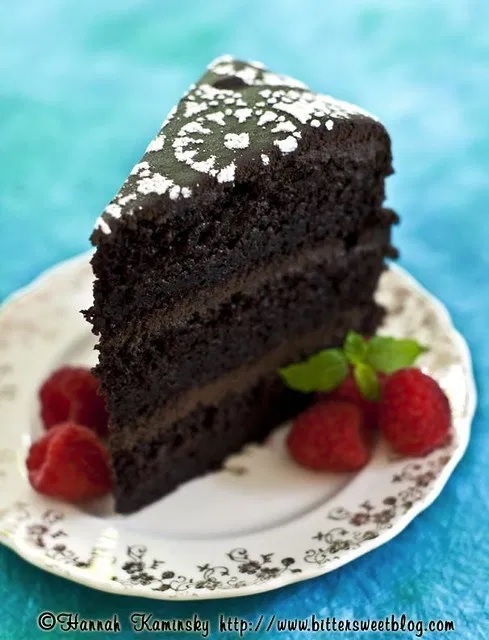
Without the mayo, this cake couldn’t happen, so I’m trying to accept that painful reality. However, the cake itself isn’t hard to swallow; it practically melts in your mouth, despite its impressive density. So moist, in fact, that I could only think to name it the first thing that popped into my head, “Ultra-Moist Amazing Chocolate Layer Cake.” Not just under-baked or painfully gummy like so many other “moist” cakes, this one holds itself together with a nearly fluffy crumb, which dissolves into pure chocolate fudge in moments. Creamy bittersweet chocolate frosting is the luscious glue that holds together this tower of three tender cake rounds together, and though no further decoration is needed, a light dusting of confectioner’s sugar really seals the deal. Nothing short of a show-stopper, it may not be a surprise, but it’s sure not your average cocoa birthday cake.

Yield: Makes 12 - 18 Servings

Ultra-Moist Amazing Chocolate Layer Cake

Ultra-Moist Amazing Chocolate Layer Cake
No Ratings

Creamy bittersweet chocolate frosting is the luscious glue that holds together this tower of three tender cake rounds together, and though no further decoration is needed, a light dusting of confectioner's sugar really seals the deal. Nothing short of a show-stopper, it may not be a surprising choice, but it's sure not your average cocoa birthday cake.

Prep Time 30 minutes
Cook Time 45 minutes
Total Time 1 hour 15 minutes

Ingredients

Chocolate Fudge Frosting:

  • 1 1/2 Cups Plain Non-Dairy Milk*
  • 1 Pound Semi-Sweet Chocolate, Finely Chopped
  • 1 Cup Vegan Butter
  • 1 1/2 Teaspoons Vanilla Extract

Rich Chocolate Cake:

  • 3 Cups All Purpose Flour
  • 2 Cups Granulated Sugar
  • 1 Cup Dutch-Processed Cocoa Powder, Sifted
  • 2 Tablespoons Whole Flax Seeds, Ground
  • 1 1/2 Teaspoons Salt
  • 2 1/2 Teaspoons Baking Powder
  • 2 1/4 Teaspoons Baking Soda
  • 1 1/2 Cup Plain Non-Dairy Milk
  • 1 1/2 Cup Brewed and Cooled Coffee
  • 2 Tablespoons Apple Cider Vinegar
  • 2 Teaspoons Vanilla Extract
  • 1/2 Cup Vegan Mayonnaise
  • 3/4 Cup Olive Oil

To Garnish:

  • Confectioner's Sugar (Optional)

Instructions

    1. Unlike most standard cake-making procedures, you’ll want to start by preparing the frosting first, since it takes some time to cool and set.
    2. Place the non-dairy milk in a medium sauce pan, and bring just the the brink of boiling. You only want to scald it, so quickly take the pan off the heat, and add in the chopped chocolate. Let sit for a few minutes to melt, and then stir the mixture thoroughly until smooth. Cut the butter into tablespoon-sized pieces, and add them into the melted chocolate, stirring until completely melted and mixed in. Incorporate the vanilla, and let sit at room temperature until cool. Transfer into the fridge to chill. It may take as long as 2 – 3 hours to fully cool, but bear in mind that it will not thicken to the point of being pipe-able; This is a very soft, silky frosting, more like ganache than buttercream. Once it’s merely spreadable, it’s ready to use.
    3. Meanwhile, preheat your oven to 350 degrees and lightly grease and flour 3 8-inch round cake pans. You can also do this successfully with just two pans, as long as you measure your batter carefully and have patience.
    4. In the bowl of your stand mixer or just a large bowl, whisk together the flour, sugar, cocoa, ground flax seeds, salt, baking powder, and soda. Make sure that all of the dry goods are evenly distributed throughout.
    5. In a separate bowl, combine the non-dairy milk, coffee, vinegar, and vanilla, and let sit undisturbed for about 5 minutes. At that point, add in the secret ingredient here, the vegan mayo, as well as the oil, and mix well.
    6. Add the liquids into the bowl of dry ingredient, and slowly mix, just until the batter is mostly smooth and homogeneous. A few lumps are fine, as long as you don’t over-mix. That would cause your cake to come out very tough and chewy, which is not what we’re looking for! Don’t worry if the mixture seems excessively soupy- That is indeed the correct consistency.
    7. Divide your batter evenly between your three prepared baking pans. [If you're only using two, measure out the full amount of batter, and divide by three. You should end up with somewhere around 2 1/2 of batter in each pan. Reserve the remaining third in your fridge while the first two cakes bake, and allow the cakes to cool completely before turning them out onto a large plate. Quickly rinse and dry one of the pans, re-grease and flour, and bake the final amount of batter in the same manner.]
    8. Bake for 35 – 45 minutes, until a toothpick inserted into the center comes out cleanly, with perhaps a few moist crumbs clinging to it. Let cool completely before assembling and frosting.
    9. To achieve the decorative pattern on top of the cake as pictured above, first chill the frosted cake thoroughly so that chocolate frosting can set slightly. Take a large doily and gently place it on top, without pressing down, and sprinkle powdered sugar all over. Lift the doily straight up without shaking it, which will remove the excess and leave a lovely, lacy design in its place.

Notes

*Chose a full-fat, richer variety for the best results; I prefer almond milk that’s slightly on the thicker side. Coconut milk would also be a good choice here.

Recommended Products

Please note that some of the links above are affiliate links, and at no additional cost to you, I will earn a commission if you decide to make a purchase after clicking through the link. I have experience with all of these companies and I recommend them because they are helpful and useful, not because of the small commissions I make if you decide to buy something through my links.

Nutrition Information:

Yield:

18

Serving Size:

1

Amount Per Serving: Calories: 556Total Fat: 32gSaturated Fat: 13gTrans Fat: 0gUnsaturated Fat: 16gCholesterol: 30mgSodium: 528mgCarbohydrates: 67gFiber: 3gSugar: 45gProtein: 6g

All nutritional information presented within this site are intended for informational purposes only. I am not a certified nutritionist and any nutritional information on BitterSweetBlog.com should only be used as a general guideline. This information is provided as a courtesy and there is no guarantee that the information will be completely accurate. Even though I try to provide accurate nutritional information to the best of my ability, these figures should still be considered estimates.