Around the World in 80 Plates: Colonia del Sacramento, Uruguay

This is it: The final stop on our edible adventure. It’s been quite a journey, tasting our way through nearly a dozen unique cuisines, and racking up just as many recipes as souvenirs.  Converting a different palate of flavors into a vegan plated dessert every week has proven more difficult than I initially envisioned, but it’s impossible to imagine having approached the challenge any other way. To think, that I would have once considered adding savory dishes into the mix! I guess that’s just not what comes most naturally to my sweet-toothed disposition. So, for a grand finale to cap off a feast of world travel, we’ve arrived at last in Colonia del Sacramento, Uruguay.

While I’d like to say that I’m well acquainted with the culture and the fine nuances in the indigenous edibles, the truth is that I spent about 15 minutes just trying to pronounce “Uruguay” correctly. Sure, it doesn’t seem so complicated, but for some reason I could just not wrap my tongue around all of those consecutive vowels. Luckily, it turns out that one of the most popular desserts there is much easier to swallow.

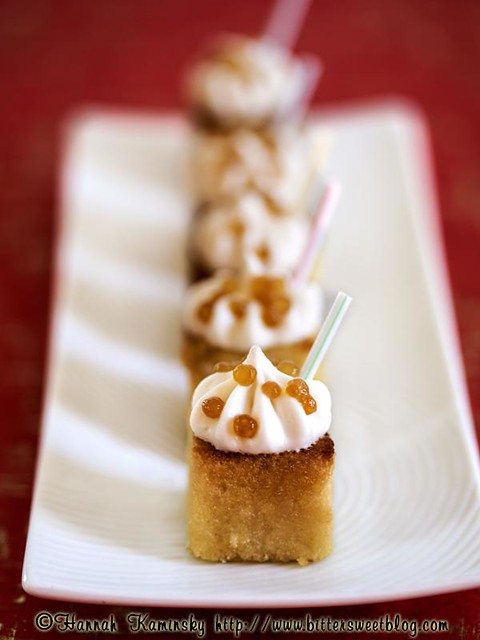
Postre chajá, a layered affair involving sponge cake, peaches, whipped cream, and meringue is actually named after a type of bird. Somehow the fluffy dessert made its inventor think of this feathered creature, however inexplicably, and the name has remained intact since. Though the combination of flavors and textures immediately grabbed me, inspiration for my final dessert didn’t come until the last minute. Rather than simply creating an elegant, bite-sized version of the original, it suddenly became clear that I had all the components here for a baked Alaska to remember.

Tender rounds of vanilla cake are topped with a dome of creamy peach ice cream. The whole stack is smothered in my foamy eggless meringue, doused in high-octane spirits, and promptly set ablaze. Admittedly, I hit a snag at this stage and had to resort to the trusty kitchen torch for a more even browning, but the little cakes can easily be tossed into a fast oven should the meringue need a bit more of a crisp. The quickly melting interior is revealed after slicing each snowy peak in half, and the plate is completed with slices of soft peaches and a simple fresh peach sauce. In fact, the sauce is so simple that I didn’t measure a thing. Two whole, ripe peaches went into the blender along with agave to taste, and just enough non-dairy milk to puree. It’s a fittingly sweet note to end this series on.

The final episode of Around the World in 80 Plates airs this Wednesday at 10/9c on Bravo. Who will win, and what will they cook? Don’t miss the culmination of this whirlwind trip across the globe!

Postre Chajá Baked Alaska

Vanilla Cake
Peach Melba Ice Cream, Minus Raspberry Ripple (Vegan a la Mode, page 164)
Meringue (Vegan Desserts, page 191)

80-Proof or Greater Rum, Brandy, or Vodka
Sliced Fresh Peaches
Lightly Sweetened Peach Puree, if Desired

To put the baked Alaska together, freeze the freshly churned and still soft peach ice cream into silicon hemisphere molds. Let them set up solidly in the freeze; at least 4 hours. Meanwhile, slice out rounds of cake with 2 3/4-inch circular cookie cutters. Line the pieces up on a small tray, and chill thoroughly in the fridge.

When you’re ready to serve, top each round of cake with a hemisphere of ice cream, and smooth a generous coating of meringue all over. Make sure that you seal the edge where the cake meets the plate, to prevent heat from getting in and melting the ice cream too soon. Sprinkle each meringue-covered dessert with alcohol, and use a long match to set each on fire. Once the flames burn out, quickly slice the towers in half, and plate each half with a few fresh peach slices and a smear of peach puree, if desired. Eat immediately!

Makes about 6 Servings

For participating in this competition, Bravo has compensated me for my time, but all recipes and opinions are solely my own.

Around the World in 80 Plates: Hong Kong, China

Every culture can lay claim to many edible innovations, and would like to believe themselves to be the original “foodies,” but that title should arguably be handed over to people of Hong Kong, China. No where else in the world do more inhabitants share this collective obsession with such a fervor. More than just a melting pot of outside influences, but a true stew of culinary concepts, the cuisine is a well-seasoned mixture of both Asian and Western flavors, each component blending harmoniously into the mix while still retaining its original integrity. In such a diverse cauldron of mouthwatering options, how does one begin to ladle out the goods? What are the best bits to search for when it all looks so delicious?

Luckily, opinionated as ever, there are many locals who have taken it upon themselves to counsel poor lost souls like myself, who don’t know a thing about the most fundamental eats to experience when in town. Though wildly varied in suggestions, one dish in particular seemed to pop up on every single list, whether it was on a brief overview, a top 40 account, or an exhaustive itinerary mapped out for maximum gustatory pleasure. Hong Kong Toast, a variation on what we know as French Toast, was the exceptional edible that had everyone raving. Much thicker and richer than our flabby, sandwich bread renditions, HK toast is much more like bread pudding all condensed into a single slice. Lavished with butter and drowned in sweetened condensed milk, it’s a breakfast fit for dessert, especially when stuffed with peanut butter as it often is found. Frequently referred to simply as “toast,” such a humble title conceals a heavy-hitter to remember. As per usual, those in the know got this pick right.

Paying homage to the cafe culture and another favorite beverage, bubble (or boba) tea, my miniature toast bites are topped with a snowy peak of whipped coconut creme and “milk” tea-infused caviar. By steeping the tapioca pearls in the tea itself, these tiny flavor bombs remove the need to guzzle down a full glass of liquid to achieve the same flavor sensation. That’s not to say that they’re suitable only as sprinkles, though- Leftover milky spheres can be popped effortlessly into a different type of drink for added effect! Imagine lightly green tea with delightfully toothsome black tea boba tumbling about the bottom. Why not give the same old drink an extra dose of delicious?

Finishing off my toast bites with colorful coffee stirrer straws rather than toothpicks, they’re easy to eat with your fingers, and the visual should remind eaters of the thick straws typically wedged into tall glasses of bubble tea. Though my rendition was straight-forward toast, each tiny cube could easily be injected with peanut butter using a piping bag, much like a hot doughnut would be filled with jelly. Insert the piping tip into the bottom to hide the hole, and dip carefully!

How many other top 10 dishes will the chefs hit when they visit Hong Kong? Tune in to Around the World in 80 Plates, this Wednesday 10/9c on Bravo to find out.

Hong Kong Toast Bites

“Milk” Tea Bubbles:
Adapted from What the Hell Does a Vegan Eat Anyway?

1/4 Cup Small Tapioca Pearls
1 Cup Water
1 Tablespoon Chinese Black Tea
2 Tablespoons Granulated Sugar
1/3 Cup Plain Soy or Coconut Creamer

Sweet Pan de Mie:

1 Cup Vanilla Soy or Coconut Creamer
2/3 Cup Granulated Sugar
1 1/4-Ounce Packet (2 1/4 Teaspoons) Active Dry Yeast
3 – 4 Cups Bread Flour
3/4 Teaspoon Salt
3 Tablespoons Non-Dairy Margarine, Melted

Toast Dip:

1 Cups Water
1/3 Cup Raw Cashew Pieces
1/4 Cup Light Agave Nectar
1 Teaspoon Nutritional Yeast
1 Teaspoon Vanilla Extract
Pinch Salt

To Finish:

Peanut Butter (Optional)
Melted Non-Dairy Margarine
Coconut Whipped Creme
Coffee Stirrer Straws (or Toothpicks)

The tea bubbles should be prepared first, because they’ll need to sit at least overnight and ideally for an entire day for the fullest flavor.

First, soak the tapioca in warm water for at least 20 minutes, an set aside. Seperately, place the tea leaves in a strainer and add that to the water in a small saucepan. Heat to a boil, and then remove from the stove. Stir in the sugar to dissolve, and let steep for 15 minutes, covered. This is technically over-steeping the tea, but you want a more concentrated flavor than usual in this case.

Meanwhile, after the tapioca pearls have soaked, strain thoroughly and heat a medium pot of water on the stove. Keep the pearls in a strainer for easier maneuvering, and once the water boils, dip them into the water for 45 seconds. Remove the whole strainer-full and quickly run them under cold water. Repeat this process of blanching the bubbles as many as 6 – 8 more times, until the tapioca pearls are all translucent, and there are no more traces of white in the centers. This incremental method of cooking will prevent them from getting gummy and overdone on the outside.

Remove the tea strainer from the pot of water, and mix in the cooked tapioca, along with the “creamer.” Cover and let infuse for 16 – 24 hours.

To make the bread, see my original recipe posting for instructions, substituting the “creamer” for soy milk and sugar for agave. Let cool completely before cutting with a serrated bread knife into 1-inch thick slices. Remove the crusts, and slice each piece into 1-inch cubes.

The dip couldn’t be simpler- Just toss all of the ingredients into a high-speed blender and puree until smooth. Strain if needed, and transfer to a medium saucepan. Cook just until bubbles begin to break on the surface, and the liquid has slightly thickened. Let cool completely before using.

Finally, we’re ready to assemble the toast bites! Now is when you should fill the cubes with peanut butter if desired. Preheat your oven to 350 degrees, and line a baking sheet with a silpat or piece of parchment paper. Toss each square of bread briefly into the dip, being sure to coat each side. Move the dipped cubes over to the prepared baking sheet, and repeat until all the pieces are assembled. Bake for 25 – 30 minutes, until golden brown all over. Depending on your oven, you may want to rotate the sheet halfway through baking (I didn’t and paid the price. Burnt toast is never a treat, even when it is soaked in a rich custard.) Brush each piece lightly with melted margarine for extra buttery richness. Let cool for at least 15 minutes before topping with a dollop of coconut creme and a thoroughly drained spoonful of “milk” tea caviar. Trim coffee stirrers by an inch or so if too long, and insert firmly into each piece of toast. Enjoy warm, or chill and eat cold later on!

Makes Approximately 1 1/2 – 2 Dozen Toast Bites

Printable Recipe

For participating in this competition, Bravo has compensated me for my time, but all recipes and opinions are solely my own.

Around the World in 80 Plates: Chiang Mai, Thailand

From so many years ago, a blur of dazzling colors remains imprinted on my retinas, a full rainbow of garments and glittering jewelry reflected the fading sunlight, from each of the multitude of hawker stalls crowding the streets. Tidal waves of chatter, music, blaring car horns, all ebbed and flowed together, underscoring each scene with a certain frenetic energy. Sensory overload was the name of the game, with every last merchant competing fiercely to capture your undivided attention. Most memorable, however, was that oppressive heat. Covered by fabric tents and makeshift wooden plank ceilings, the sun was not the culprit- The humidity was unlike anything I had ever known. It felt as if the whole city was underwater, and we swam from place to place through the thick, hot air, much like the moist breath of a dragon, breathing down your neck. This was Bangkok, Thailand, my one and only experience with the country, and it was only a six-hour layover at that. If simply flitting about a nearby market left such an impression, I can only imagine what it would be like to explore deeper into the heart of the country. Thanks to my sweet culinary expedition, I can at least get a small taste, as we’re destined for Chiang Mai, Thailand today.

Thailand doesn’t have nearly the same sort of dessert culture as European countries, but that’s not to say that there’s not a sweet tooth to be found. Rather, sugary snacks are more common instead of an after dinner aperitif. A bounty of exotic fruits are always close at hand, so many of those more traditional treats put them to good use. In this case, it was the simple mango that captured my heart; a tender, tangy, and juicy topping to the rich coconut-infused sticky rice known as Khao Neeo Mamuang.

A tropical take on the rice pudding I already know and love, mango sticky rice is comfort food, straight and simple. Though something I’d gladly shovel down with gusto on a normal day, that wouldn’t quite cut it for this sweet challenge. Digging into my drawer of baking tricks, I found a long forgotten bottle of pandan extract and jumped at the opportunity to finally put it to use. Admittedly, because I can be nothing but brutally honest with you, my dear readers, this is a horrible representation of the flavor. I’ll be the first to say that I was not a fan. That artificial neon green is just part of the package, but it needn’t be so lurid with a fresher source. Next time, I would gladly go a different route and try making a more refreshing mint-flavored gelee instead, by steeping a big handful of fresh mint leaves in the water before setting it with agar. A green tint could always be added with a splash of spinach juice, if you really need the visual cue.

Although I really didn’t get a chance to experience true Thai culture, I’m looking forward to seeing it through the eyes of the chefs on Around the World in 80 Plates, coming up this Wednesday 10/9c on Bravo.

Mango Sticky Rice Parfaits

Pandan Gelee:

2 1/4 Cups Water
1/2 Cup Granulated Sugar
2 Teaspoons Agar Agar Powder
1 1/2 – 2 Teaspoons Pandan Extract

Coconut Sticky Rice:

1 1/2 Cups Uncooked Glutinous Rice
2 Cups Water
1/2 Teaspoon Salt
1 14-Ounce Can Full-Fat Coconut Milk
1/2 Cup Light Agave Nectar

Coconut Sauce:

2/3 Cup Full-Fat Coconut Milk
1 Tablespoon Light Agave Nectar
Pinch Salt
1 Tablespoon Cornstarch
1/2 Teaspoon Ground Ginger
1 Tablespoon Coconut Oil
1/2 Teaspoon Vanilla Extract

Sesame Brittle:

1 Cup Granulated Sugar
1/2 Cup Light Corn Syrup or Light Agave Nectar
1/4 Cup Water
1/3 Cup Toasted White Sesame Seeds
1 Tablespoon Black Sesame Seeds
1 Tablespoon Non-Dairy Margarine or Coconut Oil

Topping:

2 Ripe Mangos, Peeled and Diced Small

Begin with the gelee so it has time to set. Simply with the water, sugar, agar, and extract together in a medium saucepan until there are no lumps or clumps remaining, and set it over medium heat. Bring it up to a lively boil, whisking frequently as it comes up to temperature, and turn off the heat. Carefully pour the hot liquid mixture into the bottoms of 8 – 10 4-ounce glasses, distributing it evenly between them, to fill about a centimeter up the glass. To achieve the slanted gelee layer as photographed, lean the glasses between two stacks of heavy plates or books, like so:

Make sure that they’re securely wedged and not liable to roll around at all before proceeding. No matter what angle you set the gelee at, prepare the glasses in a place where they won’t be disturbed for at least an hour while the agar works its gelling magic. Let cool completely at room temperature until the gelee is firmly in place.

Meanwhile, you can prepare the sticky rice. Another easy affair; just combine the rice, water, and salt in a medium saucepan and set over moderate heat on the stove. Once the water comes up to a boil, reduce the heat all the way down to low, cover, and let cook for 15 – 20 minutes, until all of the liquid has been absorbed. If the pot threatens to bubble over, move it so that it’s only partially over the flame, and periodically rotate it so that all areas get direct heat at one point or another. Once cooked, mix in the coconut milk and agave, cover again, and let it cool and absorb those new flavors.

For the sauce, vigorously whisk together the coconut milk, agave, salt, cornstarch, and ginger in a small saucepan, being careful to beat out any clumps of starch. Set over medium-low heat, and whisk gently until the mixture comes up to a boil. Turn off the heat before adding the coconut oil and vanilla, stirring until the oil melts and is thoroughly incorporated. Cool to room temperature before chilling thoroughly.

Finally, for the last component that needs preparation, set a silpat or piece of parchment paper off to the side of your stove for easy access. Place the sugar, corn syrup or agave, and water in a medium saucepan (I hope you’ve been washing the same one out; this would make for a whole lot of pans in the sink by now!) over moderate heat, and stir just to moisten all of the dry sugar. Do not stir from this point forward, but gently swirl the pan periodically to keep things moving. Once the mixture comes to a boil and the sugar has dissolved, insert a candy thermometer and cook until it reaches between 290 – 300 degrees. Working quickly, remove the thermometer and dump in both types of sesame seeds along with the margarine or coconut oil. Grab your spatula again and stir until the seeds are well incorporated and the margarine/oil has melted. Pour the liquid sesame-sugar mix onto the center of your prepared silpat or parchment, and let it spread out naturally. Cool completely before snapping into pieces.

To finish the parfaits, spoon sticky rice into the gelee-lined glasses, almost up to the top. Drizzle 1 – 2 tablespoons of the coconut sauce over the top, and mound a generous scoop of diced mango over that. Chill thoroughly before serving, and crown each serving with a piece of sesame brittle right before digging in.

Serves 8 – 10

Printable Recipe

For participating in this competition, Bravo has compensated me for my time, but all recipes and opinions are solely my own.

Around the World in 80 Plates: Bologna, Italy

Florence and Bologna may be separated by a mere 75 miles or so, but the cultural differences are truly worlds apart. Bologna, Italy, part of the Emilia-Romagna region is nicknamed as both “the learned one” (la dotta) and “the fat one” (la grassa) in reference to its eponymous university and rich cuisine, respectively. A telling indication of what’s to come, Bolognese food pulls no punches, and doesn’t hold back when it comes to meats, cheeses, and pastas. What does this mean for a vegan with a sweet tooth? …Very little. After briefly toying with the idea of a dessert ravioli, I decided to spare you that cutesy interpretation, and look deeper into traditional desserts of the area. Like any city worth visiting, it does have a number of tried-and-true, classic sweets all its own. Nuts, wine, and many eggs seem to color the dessert menu, but what caught my eye was the curiously named zuppa inglese.

You’d be forgiven for believing that you were ordering “English soup” based on the direct translation, but in fact the dish couldn’t be further from that description. Thought to be named after the inspiration of an English-style trifle, it’s actually more like tiramisu, but minus the coffee and plus a more powerful punch of alcohol. Cake or lady fingers are dipped into bright red liqueur known as alchermes, which gains its otherworldly hue from cochineal (beetles.) Luckily, many variations on the theme exist on this very popular Bolognese dessert, and the general consensus is that anything red will do. Rather than an insect infusion, a simple mixture of bright red maraschino cherry juice and ordinary rum fit the bill quite nicely. In the same “anything goes” mentality, some recipes call for vanilla custard, while others lavish their lady fingers with a rich chocolate pudding. Why choose when you can have both? The alternating layers keep each bite interesting, and blend beautifully with the boozy, fruity biscuits.

Tune in to Bravo this coming Wednesday at 10/9c to see how the chefs manage a second round of Italian inspiration!

Zuppa Inglese

1 Batch of Lady Fingers from Vegan Desserts (page 222)

Cherry Syrup:

1/2 Cup Liquid from Maraschino Cherries, or Grenadine
3 Tablespoons Rum

Vanilla and Chocolate Custard:

1/2 Cup Raw Cashews, or 1/3 Cup Raw Cashew Butter
2 1/2 Cups Plain Non-Dairy Milk
1/2 Cup Granulated Sugar
5 Tablespoons Cornstarch
2 Teaspoons Arrowroot
1/2 Teaspoon Nutritional Yeast
Pinch Salt
2 Tablespoons Non-Dairy Margarine
1 1/2 Teaspoons Vanilla Extract
2.5 Ounces Semi-Sweet Chocolate Chips or Finely Chopped Chocolate

Chocolate Curls or Shavings
Natural Maraschino Cherries
Dark Chocolate Crisps

You’ll want to prepare the lady fingers first so that they’re completely cool before you use them. Cut them so that the pieces are 2-inches long and will fit flush against the sides of your mold. For the dipping syrup, simply stir together the cherry juice and rum in a small bowl. Set aside.

Place two 2-inch square silicon ice cube trays on a sheet pan for easy maneuvering later on. Have the lady fingers and syrup nearby before beginning to make the custards.

If using a high-speed blender, toss in the cashews and grind them down to a coarse meal. If using a food processor or traditional blender, just plop in the cashew butter. Whole cashews should only be used if you have the horsepower to blend them completely smooth; otherwise, your dessert will be gritty. Gradually pour in the “milk” with the machine running to more easily combine the two. Pause to add in the sugar, cornstarch, arrowroot, nutritional yeast*, and salt. Blend on high until completely smooth. Pass the mixture through a strainer to ensure there are no remaining bits of nuts.

Pour the mixture into a medium saucepan and set over moderate heat. Whisk gently until it comes up to a full boil, and then remove the pot from the stove. Stir in the margarine and vanilla, whisking until the margarine has completely melted. Pour about 1/3 of the hot custard into a medium bowl, and to that bowl, add the chocolate. Let that sit for a moment so that the chocolate can melt, and then stir thoroughly until entirely smooth and perfectly chocolatey.

Working quickly, pour 1 – 2 tablespoons of the vanilla custard into the bottoms of each cube mold. Dip the cut lady fingers into the syrup, and press them gently into the molds to cover the bottom layer. Follow that with 1 – 2 tablespoons of the chocolate custard, and then another layer of dipped lady fingers. Finally, pour vanilla custard in to fill the molds to the top. Let cool for at least 30 minutes before moving the sheet pan of both molds into the freezer. By freezing them solid, they will be much easier to remove and handle. Let rest in the freezer for at least 3 hours.

Meanwhile, you can create a quick sauce from the leftover dipping syrup by cooking it over low heat, until it reduces down to a thicker consistency. Just keep a close eye on it and bear in mind that it will continue to thicken a bit as it cools. Set aside.

Once the custard stacks are thoroughly frozen, gently pop them all out onto the tray. The alcohol in the lady fingers won’t freeze, so those layers will have a tendency to separate. Just coax the whole thing back together as needed, and reassemble if necessary. Let the custards thaw at room temperature for at least 15 minutes before serving.

To serve, first drizzle a plate with the reduced cherry syrup, and place one cube of layered custard in the center. Top with a generous handful of chocolate curls or shavings, a chocolate crisp, and a maraschino cherry, to garnish.

Makes 10 – 12 Servings

Printable Recipe

For participating in this competition, Bravo has compensated me for my time, but all recipes and opinions are solely my own.

Around the World in 80 Plates: Florence, Italy

Talk about a wild ride- After gradually traveling towards warmer, more exotic destinations, the next logical stop was certainly not the one we made. In fact, my expectations couldn’t have been further from Florence, Italy, but that is precisely our destination this week! Back to Europe we go, to a cuisine that most Americans are not only well acquainted with, but can practically call their own. Rather than the heavy pastas and red sauces commonly thought of as generic “Italian food,” however, Tuscan cooking has a distinctly different flair. Harkening back to peasant cooking, there’s no room for fancy flourishes or haute gourmet dishes here. With great difficulty, I reigned in my plated dessert impulses, swearing up and down to keep this inspired recipe as simple as possible. Something without a half-dozen components, crazy ingredients, or labor-intensive preparations; No funny stuff allowed. Conjuring up faded memories of the graceful architecture and warm, gentle sunshine from my last visit nearly a decade ago, I could distinctly recall that the clean, bright, and unfussy flavors of the food itself was what made it so good.

Thrilled by the challenge, it was nonetheless a struggle. It would be so good with a sauce! What about a crunchy crumb topping? Oh, these should be individual, deconstructed presentations! Though enticingly aromatic fresh out of the oven, it just seemed so plain, so boring. The ideas kept flowing, tempting with different ways to dress it up should all else fail. But with one bite, those thoughts evaporated like the steam wafting from each warm slice. Simple was perfect.

Strawberries and tomatoes, though seemingly an odd couple, bring out the best in each other for both sweet and savory preparations. Just as comfortable together in a salad as this free-form pie, the savory, gently acidic bite of the tomatoes serves to accentuate the sweetness of the berries. Just like a pinch of salt can make any dessert pop, the combination of these apparently discordant tastes, in the right balance, creates a more complex and satisfying dish overall. Focused on featuring these key players and nothing else, I further intensified their basic flavors by first roasting them, concentrating their inherent sweetness and tartness, before baking the bright red jam into a flaky, sugar-sprinkled crust.

“Rustic” is one of my least favorite words in the English language, applied to everything from house decor to clothing, but especially food. One might be tempted to describe the humble galette as such, but first consider all of the love and care that goes into each pastry. They may not be fancy, but every single element is keenly attended to, making sure they taste their absolute best. Simple shouldn’t mean plain, dull, or forgettable. Especially when this unusual dessert is topped with finely shredded basil for the ultimate herbaceous finishing touch, it’s hard to top it- Except with a single scoop of creamy vanilla ice cream, perhaps.

Will the chefs also keep it simple when they visit Florence, Italy? Tune in to Bravo this coming Wednesday at 10/9c to find out!

Yield: Makes 6 - 8 Servings

Roasted Strawberry-Tomato Galette

Roasted Strawberry-Tomato Galette

Strawberries and tomatoes, though seemingly an odd couple, bring out the best in each other for both sweet and savory preparations. Just as comfortable together in a salad as this free-form pie, the savory, gently acidic bite of the tomatoes serves to accentuate the sweetness of the berries.

Prep Time 15 minutes
Cook Time 1 hour 25 minutes
Additional Time 15 minutes
Total Time 1 hour 55 minutes

Ingredients

Filling:

  • 1 Pound Fresh Strawberries, Hulled and Halved
  • 10 Ounces Whole Grape or Cherry Tomatoes
  • 1 Vanilla Bean, Split and Seeds Scraped
  • 1/2 Cup Granulated Sugar
  • 2 Tablespoons Olive Oil
  • 1/4 Teaspoon Salt
  • Pinch Freshly Ground Black Pepper
  • 4 – 6 Leaves Fresh Basil, Fine Chiffonade (Optional)

Instructions

  1. Preheat your oven to 350 degrees and pull out an 11 x 7-inch rectangular baking dish.
  2. Toss together all of the ingredients for the filling, saving the vanilla bean pods for another application. (Best use: Make some vanilla sugar!) Spread the sugared fruits out inside your baking dish, making sure that everything is in one even layer. Bake for 60 – 65 minutes, stirring every 15 minutes or so. After about 20 minutes, the mixture will become very juicy- Don’t panic, this is a good thing! Continue cooking until the excess liquid thickens, becoming syrupy, and the fruit is fairly jam-like in consistency. Cool completely before proceeding.
  3. To complete the galette, roll out the unbaked pie crust on a lightly floured surface to a thickness of about an 1/8th of an inch in thickness, as round as you can possibly make it. Don’t fret if it’s a bit misshapen; that will only add to the charm. Transfer the flat circle
    of crust to a silpat- or parchment paper-lined baking sheet, and pile your jammy roasted strawberries and tomatoes in the center. Spread the filling out evenly in the middle, leaving a border of about 2 inches clean. Fold over the sides to contain the filling, and lightly brush the exposed crust with you “egg” wash of choice. Sprinkle lightly with turbinado sugar.
  4. Bake in a preheated 350 degree oven for 30 – 40 minutes, until the crust is golden brown and the filling bubbly. Don’t fret if some of the juices spill out of the sides, as there will still be plenty within. Let cool for at least 15 minutes before topping with a light touch of fresh basil, if desired, and serve immediately while still warm.

Recommended Products

All nutritional information presented within this site are intended for informational purposes only. I am not a certified nutritionist and any nutritional information on BitterSweetBlog.com should only be used as a general guideline. This information is provided as a courtesy and there is no guarantee that the information will be completely accurate. Even though I try to provide accurate nutritional information to the best of my ability, these figures should still be considered estimations.

Nutrition Information:

Yield:

8

Serving Size:

1

Amount Per Serving: Calories: 230Total Fat: 10gSaturated Fat: 2gTrans Fat: 0gUnsaturated Fat: 7gCholesterol: 23mgSodium: 167mgCarbohydrates: 35gFiber: 2gSugar: 22gProtein: 3g

Please note that some of the links above are affiliate links, and at no additional cost to you, I will earn a commission if you decide to make a purchase after clicking through the link. I have experience with all of these companies and I recommend them because they are helpful and useful, not because of the small commissions I make if you decide to buy something through my links.

For participating in this competition, Bravo has compensated me for my time, but all recipes and opinions are solely my own.

Around the World in 80 Plates: Marrakech, Morocco

Synonymous with both tea and a blend of herbs and spices born from within its bustling marketplace, Marrakech, Morocco is a city that truly has its own distinct flavor. The entire continent of Africa remains largely a mystery to me, having never visited any corner of this huge section of the world, and yet I feel strangely connected to Morocco in particular, all thanks to its strong food culture. Two of the most amazing ladies I worked with, side by side for many years at Health in a Hurry, both hailed from this northern nation. So many of the recipes were infused with their unique palate of flavors, that they became a common, comforting taste, even in our sleepy little New England town.

Upon hearing that this was the next destination on our frenzied food tour, immediately my mind went to tagines. Perhaps the best known of all Moroccan dishes, most modern renditions aren’t even made in the vessels they’re named for- At least, on US soil, that is. Still, I fought the urge to take the easy way out. It may be a culture with a sweet tooth, but desserts are often that final course that American restaurants inevitably ruin. Delicate pastries somehow turn into soggy, leaden mush, and fruit salads leave me uninspired. Thus, with only the idea of Moroccan ingredients and sensibilities to guide me, I found my answer… With a more modern twist.

Plate provided by Steelite

Mourad, a cookbook that bills itself as “new Moroccan” cuisine and is derived from the fine dining establishment of Aziza in San Francisco, held the answer to my prayers. A startlingly Italian-sounding panna cotta got my wheels turning, and from there, everything simply fell into place. Delicate rose water perfumes the firm pudding itself, which is placed atop a shallow pool of pale pink hibiscus sauce. Lightly spiced almond brittle is the crown to this humble tower, with orange supremes, pomegranate arils, and fresh mint leaves accenting with their fresh, bright, fruity flavors. Incredibly, it all came together in the eleventh hour, bringing this exotic yet curiously familiar palate of sweet seasonings back into my kitchen again at last.

Be sure to tune in to Bravo this coming Wednesday at 10/9c to see what Moroccan delights the chefs come up with, too!

Rose Water Panna Cotta

Panna Cotta:

2 Teaspoons Agar Agar Powder
2/3 Cup Plain Non-Dairy Milk
6 Tablespoons Granulated Sugar
2/3 Cup Vegan “Sour Creme”
2 6-Ounce Containers Greek Coconut Yogurt
2 Teaspoons Rose Water
1/2 Teaspoon Vanilla Extract

Hibiscus Sauce:

2 Cups Cold Water
3 Bags Hibiscus Tea
1/2 Cup Granulated Sugar
1 Teaspoon Orange Zest
2 Tablespoon Cornstarch

Almond Brittle:

1 Cup Granulated Sugar
2 Tablespoons Water
2 Tablespoons Light Corn Syrup
1/8 Teaspoon Ground Cinnamon
Pinch Salt
1 Cup Sliced, Toasted Almonds

To Serve:

Pomegranate Arils
Orange Supremes
Fresh Mint Leaves

Lightly grease six 3 1/2-Inch fluted mini tart or brioche molds and place them on a sheet pan for easier maneuvering. Set aside.

In a small saucepan, vigorously whisk together the agar, “milk,” and sugar until there are no lumps remaining. Set the pan over medium-low heat, and gently whisk until the mixture begins to bubble and thicken. Take the pan off the stove to stir in both the “sour creme” and coconut yogurt, mixing until smooth, and then return it to the heat very briefly. Cook the mixture just until bubbles begin to slowly break on the surface, whisking the whole time. Add in the rose water and vanilla, whisk to incorporate, and quickly transfer the contents of the saucepan to your prepared molds. Gently tap each one on the counter to knock out any air bubbles before smoothing out the tops with a spatula. Let cool completely at room temperature before thoroughly chilling.

For the hibiscus sauce, plunk the tea bags into the water in a small saucepan. Place it on the stove over medium heat, and bring to a boil. Immediately turn off the heat and cover, allowing the tea to steep for 20 – 30 minutes. Once deeply rose red in hue, remove the tea bags and allow the excess liquid to drip out, but do not squeeze them- This will cloud the mixture. Separately, stir together the sugar, orange zest, and cornstarch until thoroughly combined, and add these dry goods into the saucepan. Return it to the heat, and cook, stirring occasionally, until the sugar is dissolved and the liquid bubbling and fully thickened. Let cool before chilling in the fridge.

To make the almond brittle, begin by combining the sugar, water, corn syrup, cinnamon, and salt in a medium saucepan over moderate heat. Resist the urge to stir, and gently swirl the pan to mix the contents instead. Bring the mixture up to a boil, and continue to cool until the sugar caramelizes and turns a pale amber color. Meanwhile, set out a silpat or piece of parchment paper nearby where the brittle can come to rest. Once the sugar syrup has reached the right shade of golden brown, quickly stir in the sliced almonds to coat them evenly in the mixture, and waste no time in pouring everything onto your prepared silpat or parchment. Smooth out the brittle into as thin a layer as possible. Let cool completely before breaking it into pieces.

To serve, spoon about 1/4 – 1/3 cup of the hibiscus sauce onto the plate, and turn out one panna cotta on top. Wedge a piece of the almond brittle into the crest of the panna cotta, fan out three citrus surpremes alongside, and sprinkle pomegranate arils on top. Finish it all off with a few mint leaves to garnish. Repeat for the remaining plates.

Makes 6 Servings

Printable Recipe

For participating in this competition, Bravo has compensated me for my time, but all recipes and opinions are solely my own.