
Egg? What egg? Of course I was born this cute and fuzzy!
Chick adapted from Anna Hrachovec‘s adorable tiny chicken pattern.

Sweet Musings with a Bitterly Sharp Wit
Egg? What egg? Of course I was born this cute and fuzzy!
Chick adapted from Anna Hrachovec‘s adorable tiny chicken pattern.
“Keeping a well stocked pantry” would be a very generous way of describing my penchant for collecting odd ingredients. A certifiable food-shopaholic, any interesting spices, unusual beans, new strains of rice that catch my eye are destined for the cart, no questions asked. Entirely new dishes could be unlocked with that one secret ingredient, and I’ll be damned if I let it slip through my fingers, just because I couldn’t see the final results right then and there. Vegan “skallops“? Sounds crazy, so I’ll take a can! Asafoetida? Translated roughly as “devil’s dug,” that’s simply too enticing to walk away from. And thus, the pantry shelves at home groan beneath the weight of my bizarre, allegedly edible treasures, a collection of odds and ends that inspire, but fail to make it into the daily rotation.
Come spring, my inner neat freak pops back out of hibernation, and is horrified at the stock pile that’s been accumulating, slowly but steadily, for years. Living in the same home for nearly two decades allows one to hold on to many more possessions of dubious value than you’d think, as I’m now learning. Though the Skallops continue to mystify, horrify, and intrigue me, this latest round of pantry purging still failed to find a proper use for them. Instead, it seemed like a more worthwhile venture to tackle the easy stuff, the pantry staples that have simply overgrown their allotted space. Prepared for either an unannounced party of 30 or the coming apocalypses, whichever comes first, there are plenty of perfectly good foods buried beneath the oddities, and it’s a shame to let them gather dust.
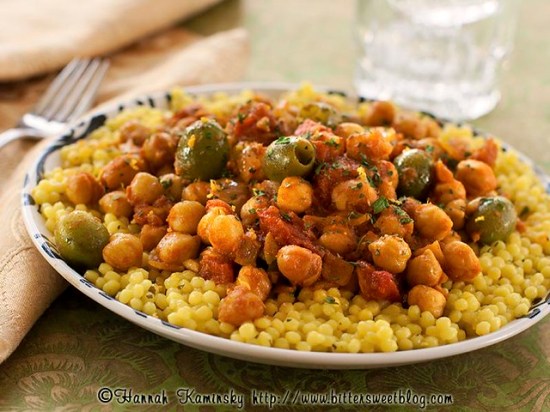
Taking out numerous canned goods and both dried beans and pasta in one dish, my Moroccan-inspired chickpea creation turned out to be the best thing I ate all week. Rather than merely an easy way to “take out the trash,” so to speak, and clear out the pantry, this was a genuinely delicious surprise. Spicy, but more warmly flavored and highly aromatic than merely hot, this is the kind of recipe that a well stocked pantry and spice drawer was made for. A study in contrasting flavors, the salty, briny olives pair beautifully with the gently acidic tomatoes, all blanketed in a thermal blanket of paprika, cumin, and coriander. In such a simple dish, the star players matter immensely, so make sure you have excellent green olives that can pull their weight in this jovial riot of flavors.


Spicy, but more warmly flavored and highly aromatic than merely hot, this is the kind of recipe that a well stocked pantry and spice drawer was made for. A study in contrasting flavors, the salty, briny olives pair beautifully with the gently acidic tomatoes, all blanketed in a thermal blanket of paprika, cumin, and coriander.
Please note that some of the links above are affiliate links, and at no additional cost to you, I will earn a commission if you decide to make a purchase after clicking through the link. I have experience with all of these companies and I recommend them because they are helpful and useful, not because of the small commissions I make if you decide to buy something through my links.
All nutritional information presented within this site are intended for informational purposes only. I am not a certified nutritionist and any nutritional information on BitterSweetBlog.com should only be used as a general guideline. This information is provided as a courtesy and there is no guarantee that the information will be completely accurate. Even though I try to provide accurate nutritional information to the best of my ability, these figures should still be considered estimations.
Sticky Fingers Bakery has long been a sweet sensation within the vegan community, serving up pastries and other delights in the Washington, DC area since 2002, accumulating numerous awards over the years. Most remarkable of all was when chef and owner Doron Petersan broke into the mainstream, not only showing up on Food Network’s Cupcake Wars, but stealing the whole show; Her vegan cupcakes won by a landslide against the butter- and egg-based competition. Now, while the bakery that has always been held in high esteem, it’s become a runaway hit sensation, and everyone wants a piece of the pie (or, cake, as it may be.) Luckily, Doron has recently released the secrets to her baking success in a cookbook chronicling the bakery’s most popular recipes, Sticky Fingers’ Sweets.

Upon receiving my copy, I wasted no time and flipped straight to the famed Cowvin Cookies (page 110) I had already heard so much about. Deceptively simple oatmeal cookies, every time I heard these gems mentioned it was breathlessly, typically accompanied by the words “incredible,” or “addictive,” so I couldn’t resist the temptation. However, it was clear that something was amiss when the instructions led me to form the cookies into individual rounds, rather than bars, as they’re found in the bakery. Pleasantly crisp on the outside and soft on the inside, they made for fine oatmeal cookies… But didn’t quite live up to the hype. Particularly sweet when paired with the frosting-like filling, an additional hit of salt may have helped balance the whole assembly, and brought out a bit more flavor. I can’t say I would make them again as written.

Undeterred, I charged straight ahead to a breakfast treat in the form of Orange Cranberry Scones (page 175). Fashioned into a heart shape for Valentine’s Day, they held their shape admirably throughout their time in the oven. Utilizing the creaming method to bring ingredients together, rather than cutting in to make flaky layers, the resulting scones are more like cookies in texture. No matter, as they’re still plenty tender and bursting with bright citrus flavor. Accented by tart pops of dried cranberries, this sweet and tangy combo is an invigorating start to the day. Sweetened with restraint, the optional sugar topping really pulls the whole pastry together, and should not be skipped.
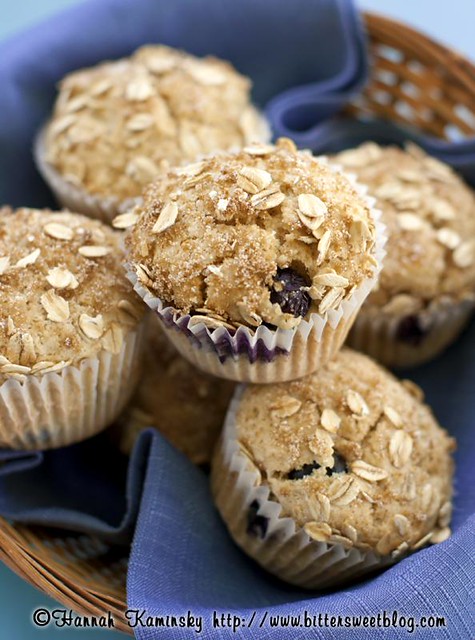
Suddenly finding myself with quickly perishing blueberries on hand, Sticky Fingers’ Sweets rescued the day (and the fruits) with classic Blueberry Muffins (page 155.) A sturdy but soft crumb gives way to polka dots of blueberries, lightly sprinkled with a crunchy oat topping. A perfectly respectable muffin, it certainly fit the bill, but may have been more successful with a double dose of berries, at least.

The real crowning jewels to this particular tome are, unsurprisingly, the cupcakes. Now I’m kicking myself for not starting there in the first place. Sure, vegan cupcakes are a dime a dozen these days, but how many times do you come across a George Caramelin Cupcake (page 90)? One of their winning offerings on cupcake wars, a rich chocolate cinnamon cake carried the weight of vanilla bean bourbon frosting, bourbon caramel sauce, and candied pecans with grace. Rising to impressive, perfect domes, the cakes themselves would have been perfectly tasty unadorned, but how could you say no to the suggestion of bourbon caramel? Boozy in a good way, the sauce came together easily and thickened beautifully after cooling, becoming the ideal consistency for delicate drizzling. The whole is so much greater than the parts, as incredible as they may sound alone, and I found myself compelled to “taste test” these beauties repeatedly before I felt satisfied with my assessment. Yes, all in the name of the cookbook review; I really took a hit for you guys on this one. It’s a tough job, but someone had to do it.
Rest assured, this book would be worth purchasing just for the cupcake section. Be prepared to use your kitchen scale though, because while there are mercifully weight and volume measurements included when possible, the difficulties of scaling down bakery-sized quantities leaves the standard American baker with a few fiddly measurements to contend with. Ultimately Sticky Fingers’ Sweets is a well thought-out compilation and homage to the DC bakery that started it all, and while all the recipes aren’t runaway hits, the ones that truly are make trying everything else worthwhile.
If rhubarb were playing on a team, would anyone actually cheer for it? A sad, unloved vegetable with an identity crisis, rhubarb is always paired up with the show-stealing strawberry, smothered by sweetness, and thrown into the game more as an afterthought than a star. You’d think that after years of strawberry-rhubarb pies and strawberry-rhubarb crumbles, more bakers would take a chance on letting the red stalks stand alone for once, but no, perish the thought! Rhubarb is bitter, unpalatable, and unable to carry a proper dessert without help from something more flavorful.
In fact, this silent player is hardly even a staple for standard grocery stores. Upon asking a produce department worker if they had any early season rhubarb yet, I was looked at as if I had requested a vegan angel food cake. Forget about having never heard of it, this person (who specializes in fresh fruits and vegetables, mind you) couldn’t even decipher what I was saying. Rubbage? Rubar? Well, I’ll take that as a “no,” then.

But rhubarb isn’t some awful ingredient to be either avoided or covered up, like an embarrassing pet stain on the living room carpet. When treated with respect, it makes for perfectly delicious desserts, as is evidenced by these bright, springy cupcakes. Luck would have it that I eventually found a bag of frozen rhubarb, of all things, and so I set right to work redeeming this misunderstood plant.
Topped off with a simple vanilla bean frosting so as not to take over and cover that delicate rhubarb flavor, these little numbers are further beautified by candied violets. Incredibly hard to find and even harder to transport intact, I had been saving up these precious edibles for quite some time now, so it’s a good thing they’re well-preserved by sugar. Such an ornate garnish is far from necessary though- The rhubarb really does sell these treats all by itself.

Rhubarb gets the spotlight in this citrus-soaked little cakes, topped off by fluffy vanilla bean buttercream frosting.
Please note that some of the links above are affiliate links, and at no additional cost to you, I will earn a commission if you decide to make a purchase after clicking through the link. I have experience with all of these companies and I recommend them because they are helpful and useful, not because of the small commissions I make if you decide to buy something through my links.
All nutritional information presented within this site are intended for informational purposes only. I am not a certified nutritionist and any nutritional information on BitterSweetBlog.com should only be used as a general guideline. This information is provided as a courtesy and there is no guarantee that the information will be completely accurate. Even though I try to provide accurate nutritional information to the best of my ability, these figures should still be considered estimations.
A curious craze if there ever was one, kelp noodles have gained popularity in leaps and bounds, going from unheard oddity to pantry staple for many overnight. Though still a more difficult ingredient to procure, ever since I discovered one fateful package at a local international market, rather than an expensive specialty shop, they’ve been showing up on my plate more often.

Finding them mixed amongst the bottles of soy sauce and bean paste was inspiring, not only due to the substantially lower price. Despite their typically raw preparations, these chewy, translucent seaweed strands are a perfectly tasty ingredient for cooked dishes, and in fact, may be more palatable warm. A brief sauté seems to relax the tightly wound noodles, making them more like starch-based cellophane noodles or sweet potato dangmyeon. With this realization, it became crystal clear that these particular kelp we destined to become japchae.

Switching out the traditional beef for thinly sliced seitan, the dish came together in a snap. Packing in the fresh vegetables for a lighter rendition, this is the perfect dish for bridging the gap between winter and spring. Bright and colorful, the sheer variety of flavors and textures makes for a highly satisfying eating experience. There are no hard and fast rules when it comes to japchae, so consider my instructions more as guidelines. The best additions are what’s in season and what’s on hand. Consider switching in some sliced asparagus and fresh snow peas to really celebrate spring, or give chopped kale a shot rather than the standard spinach. Of course, if kelp noodles still elude you, the traditional dried and cooked cellophane noodles are always a welcome swap.


Packing in the fresh vegetables for a lighter rendition, this is the perfect dish for bridging the gap between winter and spring. Bright and colorful, the sheer variety of flavors and textures makes for a highly satisfying eating experience. There are no hard and fast rules when it comes to japchae, so consider my instructions more as guidelines.
Please note that some of the links above are affiliate links, and at no additional cost to you, I will earn a commission if you decide to make a purchase after clicking through the link. I have experience with all of these companies and I recommend them because they are helpful and useful, not because of the small commissions I make if you decide to buy something through my links.
All nutritional information presented within this site are intended for informational purposes only. I am not a certified nutritionist and any nutritional information on BitterSweetBlog.com should only be used as a general guideline. This information is provided as a courtesy and there is no guarantee that the information will be completely accurate. Even though I try to provide accurate nutritional information to the best of my ability, these figures should still be considered estimations.
…And it may have something to do with the fact that it’s National Peanut Month! It’s true, March has been designated as the official time to celebrate the humble peanut, in all of its goober glory. Rather than just enjoying the standard peanut butter sandwich, or baking up some ordinary peanut butter cookies, I craved a different sort of peanut sensation. It was a stroke of luck that Betty Lou’s presented the opportunity to test drive their latest creation, Powdered Peanut Butter.

Yes, dry peanut butter that rehydrates with a drop or two of water! Sweetened with coconut sugar and significantly lower in fat than the ordinary nut butter, it’s even a healthier option than many spreads currently on the market. A strong peanut aroma wafted from the jar as soon as the lid came off, and all signs pointed in a good direction, right through the initial reconstitution. Mixing easily and smoothly back to a spreadable consistency, I was genuinely impressed how it instantly became thick and sticky, just as I would hope for with any peanut butter.
Admittedly, the flavor is different than I’m accustomed to, but every brand has their own unique flavor profile; this choice is no different. Nice and salty while not being too sweet, it strikes a fine balance between the two, accompanied of course by the roasted, nutty notes of peanuts at all times. Perhaps slightly less satisfying due to the lack of fat, it’s still plenty rich, and perfect for those seeking a lighter peanut fix.
Rather than just slather it on toast and call it a day, what really got me excited were the new possibilities such a unique ingredient could unlock. Immediately my mind wandered to my famed macarons, found in Vegan Desserts. Replacing the almond meal with peanut butter powder should be a snap, right? Paired with a creamy chocolate ganache, I was already daydreaming about the end results before the oven had fully preheated.

Unfortunately, this wild experiment wasn’t exactly a success, as is evident by the abundance of cracks and lack of feet. Perhaps too finely ground for this delicate cookie, it simply took on more moisture than almond meal, and didn’t produce the desired results. It was a good idea, but not recommended. Save your precious peanut powder for something easier and more rewarding, like a walk on the savory side with crispy tofu.

Seasoning the peanut butter powder lightly and dusting the tofu triangles to coat each piece, the results were spectacular. Not only did the quick dredge create some of the crispiest bean curd I’ve ever crunched on, but the added flavor put it light years ahead of the standard plain starch or flour approach. Served on a bed of sauteed kale and caramelized onions, it was the kind of quick, comforting meal that will no doubt see many repeat performances. Best of all, nothing goes to waste- The peanut butter powder leftover from dredging the tofu is effortlessly rehydrated into a creamy peanut sauce. Drizzled on top or used as a dip on the side, this nutty dish is a delight even to those not wild about tofu.

Seasoned peanut butter powder creates some of the crispiest tofu you'll ever crunch into, and the added flavor way better tasting than the standard plain starch or flour approach.
Please note that some of the links above are affiliate links, and at no additional cost to you, I will earn a commission if you decide to make a purchase after clicking through the link. I have experience with all of these companies and I recommend them because they are helpful and useful, not because of the small commissions I make if you decide to buy something through my links.
All nutritional information presented within this site are intended for informational purposes only. I am not a certified nutritionist and any nutritional information on BitterSweetBlog.com should only be used as a general guideline. This information is provided as a courtesy and there is no guarantee that the information will be completely accurate. Even though I try to provide accurate nutritional information to the best of my ability, these figures should still be considered estimations.


