Pumped for Pumpkin Season

Throughout all of the seasonal upheaval, one thing that cooks and connoisseur both look forward to with a certain child-like glee is the return of the pumpkin. Like clockwork, the blogosphere will be inundated with pumpkin soups, pumpkin cakes, and pumpkin smoothies and in no time at all, the sting of losing summer will begin to fade. Or at least, that’s how it’s supposed to work. For the past couple of years though, mother nature has thwarted this comfortable transition, finding new ways to wipe out the current crop of pumpkins and create mass panic amongst foodies everywhere. This year it’s the devastation of hurricane Irene that’s driving shoppers to wipe grocery store shelves of canned pumpkin clean, stock piling for the inevitable shortage – Mostly caused by other people stuffing their pantries as well, rather than any actual scarcity.

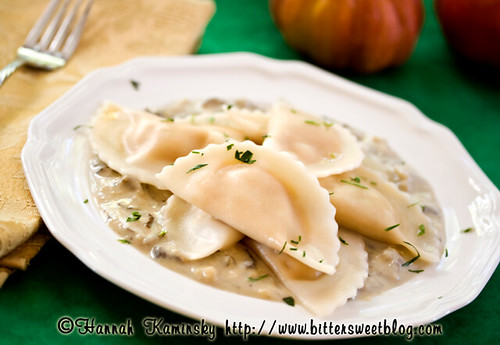
Very reluctantly using one of my last remaining and so very precious cans of the orange squash puree, I set out to ease the pain of entering into full fledged autumn and create something special. Pumpkin ravioli, each delicate envelope of thin pasta packed with savory, slightly cheesy pumpkin goodness, sounded like the perfect option. The good news and bad news is that the pumpkin element ended up being pushed out of the spotlight, upstaged by the unassuming supporting actor; the sauce. Yes, it was all about the sauce.

A simple “cream” sauce enriched with chopped mushrooms for that extra umami umph, it’s a versatile accompaniment that wears many hats. Pairing beautifully with all sorts of autumnal dishes, you could also pour a generous dollop over fluffy, homemade biscuits and call it gravy, and it takes on that extra role without missing a beat. It may not be particularly innovative, but with so much seasonal upheaval, sometimes classic comfort food really is best.

So the ravioli were a bit disappointing, but by no means bad. The good news in this situation is that since the pumpkin didn’t stand out, you could seamlessly substitute pureed butternut squash, sweet potato, parsnips, or pretty much any slightly sweet winter squash or root vegetable. Just mix 1 cup of puree with 1/4 cup of vegan parmesan, plus a pinch of salt, pepper, and nutmeg, and stuff about 1 – 2 teaspoons between two wonton wrappers, dabbing the edges with water to seal. Simmer the ravioli very gently for just 2 – 3 minutes, until the wontons are al dente. Toss with mushroom creme sauce, and forget all about that awful pumpkin shortage.

Yield: Makes 3 - 4 Servings

Mushroom Creme Sauce or Gravy

Mushroom Creme Sauce or Gravy

A simple “cream” sauce enriched with chopped mushrooms for that extra umami umph, it’s a versatile accompaniment that wears many hats. Pairing beautifully with all sorts of autumnal dishes, you could also pour a generous dollop over fluffy, homemade biscuits and call it gravy, and it takes on that extra role without missing a beat.

Prep Time 5 minutes
Cook Time 25 minutes
Total Time 30 minutes

Ingredients

  • 2 Tablespoons Olive Oil
  • 1 Medium Yellow Onion, Chopped
  • 2 Cloves Garlic, Finely Minced
  • 16 Ounces Cremini or Button Mushrooms, Roughly Chopped
  • 2 Cups Unsweetened Non-Dairy Milk
  • 1/2 Teaspoon Dried Thyme
  • 1/4 Cup Vegan Parmesan
  • 2 Tablespoons Chickpea Flour
  • Salt and Pepper, to Taste

Instructions

  1. Set a large skillet with high sides or a medium saucepan over moderate heat. Allow the oil to get nice and hot before adding in the onion, and sauteing it for 8 – 10 minutes so that it softens and begins to barely take on color.
  2. Add in the minced garlic along with the chopped mushrooms, and continue to cook, stirring frequently, for 5 – 6 minutes. The mushrooms should reduce significantly in size.
  3. Separately, whisk together the “milk” of your choosing, thyme, “Parmesan,” and chickpea flour until smooth. Pour this mixture into the skillet or saucepan, and stir well. Be sure to scrape the bottom and sides of the pan frequently to ensure that nothing burns.
  4. Cook for another 6 – 8 minutes, or until the liquid thickens and bubbles begin to break on the surface. Turn off the heat, season to taste with salt and pepper, and serve while hot!

Nutrition Information:

Yield:

4

Serving Size:

1

Amount Per Serving: Calories: 166Total Fat: 10gSaturated Fat: 3gTrans Fat: 0gUnsaturated Fat: 7gCholesterol: 10mgSodium: 135mgCarbohydrates: 15gFiber: 3gSugar: 10gProtein: 7g

Make Room for Mesquite

Wrapped up in soft long sleeves and knee-high socks, the night air still felt unseasonably harsh. Pumpkins and butternut squash looked like aliens in the produce department, suddenly materializing out of nowhere. Have they always been quite so orange, or so large? A year is a long time to go without seeing a close friend, and any small change (or constant, for that matter) seems magnified to outlandish proportions. Considering that it’s now mid-September, the annual shift in temperatures and available vegetables is right on schedule, but it’s me that is behind the times.

Nightfall comes to earlier, too, and the air is much too dry. Autumn is no doubt a beautiful time of year with many good aspects to look forward to, but I’m just not ready to embrace it yet. There are still cherry tomatoes ripening in the garden, for crying out loud!

But fall waits for no one; an impatient and demanding guest at best. Unwilling to dive into the deep end right away, a gentle dip into the season sounded like a more comfortable approach. One toe at a time, feeling out the waters, trying hard to settle in no matter how swift the current. Passing the squash for now, I moved on to a long-forgotten bag of flour in my pantry that seemed like an easier way to greet autumn. Yes, flour: Mesquite flour, to be precise.

Mesquite flour isn’t seasonal per se, but it has cooler weather written all over it if you ask me. Mesquite reminds me of autumn because it has a warm, toasty flavor, reminiscent of a crackling, smokey wood fire in the fireplace. That rich, earthy scent that fills the air as the smoke rises up through the chimney and is whisked away with the brisk breeze; That’s what I think of every time I open up that bag of flour and inhale deeply. Just like that, I’m feeling warmer and lighter in spirit already.

Turning on the oven never felt more satisfying. After nearly record breaking stretches of silence over the summer, it creaked grumpily back to life before returning to a contented purr. Something simple and comforting was in order, and I knew just the thing. Muffins, inspired by those made by Amanda Chronister (previously of Vegan Core) as part of a swap practically a lifetime ago, sounded like a tender and sweet vehicle for this dark, warm flavor.


Click to see the original recipe at full size

Continuing to tweak as I went, the muffins became anything but the simple crumb-topped treats I had first envisioned. Coffee took the place of soymilk and cacao nibs made a crunchy companion to the chocolate chips, further enhancing the roasted essence of the mesquite. Ending up with something entirely different from the inspiration, I was happy nonetheless to still have found the original recipe, still as cute and carefully drawn out as ever.

While mesquite may not be an everyday sort of ingredient, it’s worth the pantry space when it can deliver such a unique and satisfying flavor as this.

Yield: Makes 10 Muffins

Chocolate Chip Mesquite Muffins

Chocolate Chip Mesquite Muffins

Mesquite flour imparts a warm, woodsy, smoky, almost malty flavor to these jumbo muffins, stuffed with chocolate chips and crowned by a crisp topping of turbinado sugar.

Prep Time 15 minutes
Cook Time 15 minutes
Additional Time 15 minutes
Total Time 45 minutes

Ingredients

  • 1 Cup + 2 Tablespoons All Purpose Flour
  • 1/3 Cup Mesquite Flour
  • 3/4 Cup Granulated Sugar
  • 2 Teaspoons Ground Flaxseeds
  • 2 Teaspoons Baking Powder
  • 1/2 Teaspoon Salt
  • 1/8 Teaspoon Ground Cinnamon
  • 1/2 Cup Semi-Sweet Chocolate Chips or Chunks
  • 1/4 Cup Cacao Nibs
  • 1/3 Cup Olive Oil
  • 3/4 Cup Brewed Coffee, Chilled
  • Turbinado Sugar, to Top

Instructions

  1. Preheat your oven to 375 degrees, and either lightly grease or line 10 standard muffin tins with cupcake papers. Set aside.
  2. In a large bowl, whisk together the both flours, sugar, ground flax, baking powder, salt, and cinnamon. Toss in the chocolate and cacao nibs, and mix lightly to coat the pieces with flour.
  3. Separately, stir together the oil and coffee before pouring both into the bowl of dry goods. Stir just enough to combine and create a mostly smooth batter. Distribute the batter equally between your prepared muffins tins, and lightly sprinkle the tops with turbinado sugar.
  4. Bake for 15 – 18 minutes, until a toothpick inserted into the center pulls out clean. (Make sure that gooey chocolate chips don’t trick you into over-baking the muffins!) Let cool in the pan for at least 15 minutes before letting them come to room temperature on a wire rack.

Recommended Products

Please note that some of the links above are affiliate links, and at no additional cost to you, I will earn a commission if you decide to make a purchase after clicking through the link. I have experience with all of these companies and I recommend them because they are helpful and useful, not because of the small commissions I make if you decide to buy something through my links.

Nutrition Information:

Yield:

10

Serving Size:

1

Amount Per Serving: Calories: 209Total Fat: 12gSaturated Fat: 4gTrans Fat: 0gUnsaturated Fat: 8gCholesterol: 0mgSodium: 206mgCarbohydrates: 27gFiber: 1gSugar: 20gProtein: 2g

All nutritional information presented within this site are intended for informational purposes only. I am not a certified nutritionist and any nutritional information on BitterSweetBlog.com should only be used as a general guideline. This information is provided as a courtesy and there is no guarantee that the information will be completely accurate. Even though I try to provide accurate nutritional information to the best of my ability, these figures should still be considered estimations.

Plate to Pixel

Like awaking suddenly from a deep sleep, disoriented but instantly frantic to pop out of bed and get started, I find myself smack-dab in the middle of fall festivities and obligations, with a workload heavy enough to topple the Tower of Pisa once and for all. It’s a strange time of year, where the end of summer always comes far earlier than the calendar states, further confused by the influx of winter holiday articles and photos requested for future publication. Regardless, vacation is over, school is back in session, and it’s back to the daily grind; Homework done, I’m ready to present to the class a report on my summer reading.

Plate to Pixel: Digital Food Photography & Styling by friend and inspiration, Helene Dujardin, is quite frankly a must-read for any budding food photographer. Especially applicable to the food blogger but also general photo enthusiast, there are few options on the market with this specialized knowledge in such an approachable and easily digested format. Consider it a cookbook for concocting the most delectable pictures possible, including all of the critical ingredients in a successful shot, and thorough instructions on how to bring that scene to life in a still image.

Needless to say, the photos are plentiful and every last one stunning, illustrating each point eloquently. Helen writes in a friendly, personable tone, that makes each lesson feel more like chatting with a friend than taking a class on photography. She covers not only the technical basics including f/stops, white balance, plus lighting considerations and so forth, but also dives into composition and styling, explaining why some photos just work, while others miss the mark. Everything that goes into one of Helen’s highly sought after photos is detailed here, almost like a cheat sheet for the rest of us still figuring out the art. Not just for the beginner either, Helen lays it all out on the table, including EXIF data for each image and advice on improving workflow.

In short, Plate to Pixel is a reference book that won’t spend too much time on your shelf, because you’ll want to look back over it time and again. In fact, it’s such a helpful tool to anyone passionate on the subject, I made sure I requested a second copy from the publisher to give out to one lucky reader. If you’d like a chance at winning this book, just leave me one comment below with accurate contact information filled out for your email address, and tell me: What kind of camera do you use? Be sure to enter before Monday, September 19th, Midnight EST, at which point a winner will be drawn at random.

The Biggest Food Issue Ever!

VegNews‘ annual food issue is always packed to the brim with the stuff I love most- recipes, restaurant reviews, new products, and more- and the September/October 2011 issue does not disappoint. For this particular two-month stretch, I had the tasty task of photographing quite a few of the featured foods as well. Seeing my work in print a few days early at Vida Vegan, via the generous free magazines being doled out to entice new subscribers, I was especially delighted at how well these particular images were reproduced in paper and ink. On the menu for these two months are…

Kati rolls by Terry Hope Romero, otherwise titled Chile Potato Wraps for a more straight-forward approach when the relatives give you strange looks at the diner table. Consider essentially bundling up spicy and fragrant mashed potatoes in soft, freshly handmade flat bread, and it’s easy to imagine that this as an Indian version of comfort food. It may take a bit more effort than a pile of plain old buttery spuds, but the flavors and varied textures are completely incomparable.

Gobi Manchurian by Robin Robertson, a dish new to me this time around, proved to be the sleeper hit of the batch. Crispy-fried cauliflower dressed up in a mouth-tingling hot tomato sauce with Asian inspirations? Yes please, and leave room for seconds! Traditionally chopped up into florets, this version is served up as whole cauliflower “slabs” to make it into more of a meal or side dish, rather than a mere bar snack.

Classic but always welcome when done right, French Onion Soup by Allison Rivers Samson is incredibly rich for having such humble beginnings. The key, of course, is slow simmered caramelized onions to make up the savory base- Time is your most important ingredient on this heart-warming soup.

Time for dessert! What could be better than Gluten-Free Trail Mix Cookies by Beverly Lynn Bennett? Taking a more controlled approach to the “kitchen sink” concept, each bite brings new fruits and nuts into the mix, making every cookie unique and delicious. Although this particular photo was mislabeled, I assure you, I was the photographer (and baker!) of this short stack.

Finally, one of the simpler but more fun photo shoots of the bunch, I got to set a whole bunch of marshmallows on fire with a torch! Dandies marshmallows to be specific, all stacked up in toasty, gooey s’mores. If you haven’t gotten your s’more on over a summer campfire yet, VegNews is here to remind you that it’s never to late for some mallow-and-chocolate action come colder months.

Food Styling 101: Burritos

When I put out the call for your food styling stumbling blocks after a quick primer on ugly foods, the responses were greatly varied, but a few particular dishes stood out from the pack.  Burritos caught my eye first, as more than one or two people named them as particularly uncooperative photography subjects. For good reason, these tortilla torpedoes are notoriously difficult to photograph in an appealing light; Packed with generally brown, red, and maybe yellow components, they’re not exactly bright rainbows of fresh ingredients. It’s easy for them to look tired, droopy, sloppy, or just plain greasy.

The good news is, there’s no need for them to ever appear that way through the lens! Although I would never suggest that I compose burritos like this for an everyday meal, special considerations do need to be made when they’re the “hero” of a shot.

As I was styling and photographing this particular specimen, I tried to think of tips and tricks that helped bring it into the world looking like a glamorous movie star, and not a second rate stand-in. Here’s what I came up with so that others might be able to fix their burrito blemishes…

  • Bear in mind which side you want to be “up” as you build a burrito. If you want the top to be smooth tortilla, then What you lay down first will end up on top. If you don’t mind a “flap” from the tortilla edges on top, then you can build it right-side up.
  • Try to keep mushier components to the bottom, so that when you slice it, they don’t smear through all of the following layers. This means guacamole, re-fried beans, hummus, and the like are better placed near the base of your assembly.
  • Include a good number of greatly varied layers, but don’t go overboard. 4 – 5 different things is about the maximum before it starts to just look like a mess of everything you had leftover in the fridge.
  • Be generous, but don’t over-stuff. A burrito blow out is never attractive.
  • Make sure you include something green, somewhere. Herbs, grilled zucchini, avocado chunks, anything! Green evokes the feeling of freshness, which helps to prevent the burrito from looking like a sad, reheated gas station offering. It also adds pops of contrasting color to create interest.
  • Strain salsa and other “wet” condiments to prevent a watery, mushy mess. Likewise, dab sliced tomatoes on a paper towel to remove some of the excess liquid before adding them to a burrito (or sandwich, for that matter.)
  • Save small amounts of every ingredient, to “fluff up” filling later. This is most noticeable in the beans- I like to show half of the sliced pieces to give it a more realistic look, but add in a few more whole ones to give it more texture and variety. Be sure to toss those whole beans in just a dab of oil to keep them shiny, or brush on a very thin layer with a clean paintbrush once they’re in place.
  • Use toothpicks to keep the roll intact. I usually start with one at each end, and break off the excess so that they’re not sticking out and visible. Then, as I cut and rearrange the pieces, I may add more in as needed. Just don’t forget that they’re there when you go to eat it later!
  • To cut your burrito, use a sharp knife, and apply gentle pressure while using a sawing motion. Don’t just smash the blade down and crush the fragile ingredients within.

Then, when it comes to capturing your burrito masterpiece…

  • Think about the “meal” as a whole to fill out the rest of the set. Consider including a beverage, sliced citrus, chips, dip, fresh herb garnish, and other simple, colorful, or graphic elements to add interest surrounding the subject.
  • Keep the colors light, bright, and clean. A burrito tends to look heavy by nature, so you want to balance that out with contrasting elements.
  • Use a mirror to direct a “spotlight” right onto the filling. Since I prefer a back light for most of my photos (just place the plate in front of the window, easy as that), the cut sides have a tendency to go dark unless otherwise highlighted.
  • Shoot from a low angle so you can see all of that glorious filling!

That concludes this class on burrito styling. Are there any more questions before we move on to the next? Raise your hand, speak up, and I’d be happy to go on! Don’t be afraid to suggest the next subject either, because if everyone enjoyed this, you can count on the Food Styling 101 series to become a regular feature here!

It’s What’s Pho Dinner

Would a noodle soup by any other name be less soul-soothing? Pho may be a relative newcomer to the American melting pot, but a craving for those distinctive flavors paired with slippery rice noodles has quickly taken hold of the nation’s appetite. Redolent of exotic spices with a certain savory richness ever-present in the background, it’s traditionally meat that brings the umami element to the party, but vegan alternatives abound. The largest stumbling block for recreating this unfamiliar flavor profile in my own kitchen was one simple spice: Anise. A lovely, licorice-like, naturally sweet warmth, by no means is it a despised ingredient in my eyes, but I can’t help but approach it with great hesitation. A powerful component of any dish, it can quickly overwhelm, even when added with the lightest hand. No matter how I tried to trust the plentiful online recipes, I couldn’t bring myself to attempt them faithfully.

For the pho-fearing, there is at last an easy, approachable answer. Pacific Natural Foods, purveyor of a whole world of soups and stocks, has just unveiled their new Vegetarian Pho Soup Base, a blank canvas for your very own Vietnamese noodle soup masterpiece. Built upon a foundation of mushroom broth, it has savory flavor to spare, with comforting, familiar undertones capable of supporting any combination of toppings and hearty additions.

What really makes most servings of pho, however, is the myriad condiments that you choose to complete your bowl. Aside from noodles and tofu, chilies, hot sauce, lime juice, beansprouts, mint, basil, cilantro, green onions, and/or shallots are all fair game, depending only on a matter of taste. Taking a more sparing route to better taste the broth in question, there was nothing to obstruct the unique seasoning of this surprising soup. Immediately struck by the clear anise essence, at first, it was just as I had feared. Within a few worrisome moments however, it transformed into something entirely new to my palate, a highly nuanced and complex amalgamation of both sweet and hot spices. Not for the timid, it was somewhat sharp upon my initial slurp, but still nothing to dive into a bucket of non-dairy milk over. Impressively fearless for a commercially available packaged offering, regardless of authenticity, I was thrilled to get such a bright, bold kick right from the first spoonful.

Forget about that plain Jane “chicken” noodle next time you’re craving comfort; Pho delivers all that heart-warming familiarity, plus an exciting bouquet of delicate but highly flavorful Vietnamese seasoning all in the same bowl.