Shameless Self-Promotion

Temporarily overshadowed by the frozen delight that was my ice cream feature in the most recent issue of VegNews magazine, I completely failed to mention the other delicious recipes I contributed photos for. How such stellar recipes could slip my mind, I can’t begin to explain!

Do you have tons of excess summer produce rolling around on your counter? Try pickling them! These approachable formulas from Jesse Miner are quick and easy, with novel flavor combinations to boot. Can you say “Spicy Indian Cauliflower Pickles”? Golden-hued, warmly spiced, and invigoratingly tangy, they were easily my favorite of the three.

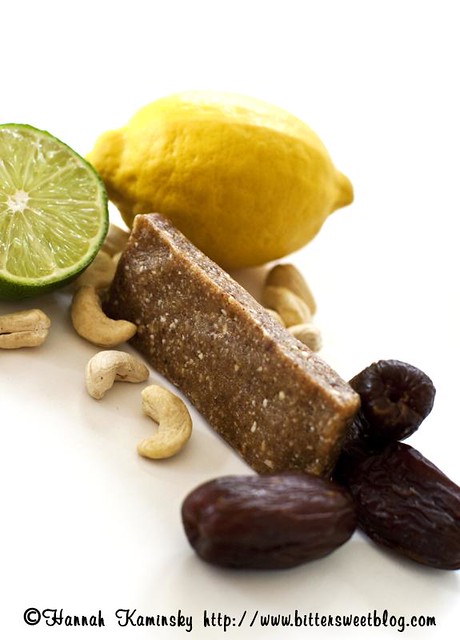
Fans of Gena Hamshaw likely not only know about her Raw Energy Bars, but have already made and devoured them. For everyone else, consider this your extra push: With only two ingredients, you really can’t get a more wholesome sweet snack.

Speaking of VegNews, their annual Veggie Awards have just opened as of yesterday. Nominated in three categories, I would like to think that there’s a decent chance of at least one of them pulling through, but I’m up against some seriously stiff competition. The best names in Veganism are all there, so I’m seriously going to need all the help I can get! Cast your vote today, and I’d be forever grateful if you could check the ballots for me under the following options:

Favorite Cookbook Author
Favorite Blog (BitterSweet)
Favorite VegNews Column (My Sweet Vegan)

Now I won’t stoop to such desperate measures as bribery… But do keep your eyes peeled for some fun and delicious giveaways soon to come to the blog!

Oldie but Goodie

Recipes come and go as the years pass, but coconuts are forever. At least, the latest coconut craze seems like its a trend that could last until the end of eternity. Looking back on older posts where I declared 2009 the “year of the coconut,” I have to wonder what that made 2010, and now 2011, too, because that tropical fruit was still king of the health food castle last time I checked.

Not everything is the same since that original review though. Branding has become more dangerous, a fine line between enticing and deceiving customer, and wording on packages more careful. You’ll no longer find coconut kefir in the marketplace, but “cultured coconut beverages” instead. Same thing, new name. Perhaps it was deemed a more accurate description of the opaque bottles’ contents, or just a more approachable label for those intimidated by fermented edibles, but I can’t say for sure. All I do know is that it can still make a mean stack of pancakes.

Though these pancakes originally showed up around the same time as that review post, I never shared the recipe. Unsurprisingly, the no-bake “kefir” cheesecake stole the spotlight at the time. It’s a damn shame, because these are some of the fluffiest pancakes to escape my frying pan, and the added nuance of subtle coconut flavor adds an irresistible element of salty, savory goodness. Their naturally tropical flavor makes them the perfect fit for a summer breakfast or brunch, but still every bit as tasty served up in any season.

If you can’t find the cultured coconut beverage in your area, you could very happily substitute 1 cup of plain coconut yogurt plus 1/2 cup of plain coconut beverage (or any non-dairy milk) instead. To really bump up the coconut flavor if you want more than a gentle hint, add a splash of coconut extract.

Yield: 3 - 4 Servings

Fluffy Coconut Pancakes

Fluffy Coconut Pancakes

Light and fluffy pancakes with a subtle coconut flavor, adding an irresistible element of salty, savory goodness. Their naturally tropical flavor makes them the perfect fit for a summer breakfast or brunch, but still every bit as tasty served up in any season.

Ingredients

  • 1 Cup All Purpose Flour
  • 1/2 Cup Coconut Flour
  • 1 Tablespoon Granulated Sugar
  • 2 Teaspoons Baking Powder
  • Pinch Salt
  • 1 1/2 Cups Cultured Coconut Beverage or 1 Cup Unsweetened Coconut Yogurt + 1/2 Cup Plain Coconut Beverage
  • 1/3 Cup Water
  • 1 Tablespoon Olive Oil
  • 1/2 Teaspoon Vanilla Extract

Instructions

  1. Like most pancakes, these couldn’t be easier to whip up. Just combine both flours, sugar, baking powder, and salt in a large bowl, and whisk to distribute all of the dry goods. Separately, stir together the coconut beverage, water, oil, and vanilla, and then pour these liquids into the large bowl as well. Whisk just to combine; a few lumps are just fine here, so don’t over-mix.
  2. Place a large (preferably non-stick) skillet over medium heat, and very lightly grease. Use about 3 – 4 tablespoons of batter for each pancake, and cook on the first side for 4 – 6 minutes, until bubbles burst on the top and they feel sturdy enough to flip.
  3. Flip, and cook on the second side for an additional 2 – 5 minutes, until golden and fully cooked through in the center.
  4. Serve immediately, or keep warm in an oven preheated on the “warm” setting.

Notes

For a treat that combines the best of breakfast and dessert, try a short stack of these babies with a generous scoop of coconut ice cream on top!

Nutrition Information:

Yield:

4

Serving Size:

1

Amount Per Serving: Calories: 519Total Fat: 30gSaturated Fat: 24gTrans Fat: 0gUnsaturated Fat: 5gCholesterol: 3mgSodium: 437mgCarbohydrates: 58gFiber: 9gSugar: 23gProtein: 8g

Christmas in July

Sleigh bells are most certainly not ringing on this sweltering day, but in a summer state of mind, the ice cream truck’s cheerful jingle could happily suffice. Christmas in July is a phenomena that has not yet truly caught on in the US, typically reserved as a poor excuse to go on shopping sprees or drink a few too many cocktails by the beach. The lack of decent holidays through the hottest months of the year has me searching high and low for new events to celebrate, anything to shake up the monotony of one hot and busy day after another, so I say it’s high time we start getting into the spirit. Build a “snowman” on out of sand, string lights onto a palm tree, make gingerbread baked inside oranges over the campfire! If you can find an indoor rink, now is the best time to go ice skating, too; shockingly empty of other skaters, it’s the perfect chilly respite from a 100-degree afternoon.

Better yet, serve up some peppermint-mocha whoopie pies.

Though they do require quick use of the oven, the sweat will be worthwhile, since the end results are satisfyingly sweet and cooling. A spinoff on my Peppermint Mocha Trifles from Vegan Desserts, this hand-held version is ideal for speedy baking and on-the-go eating. Just make a half batch of everything, adding 3/4 cup of flour to the cake portion. Instead of pouring the cake batter into a baking dish, scoop it out onto a silpat-lined baking sheet, using a small cookie scoop for consistent shapes. Bake for 10 – 15 minutes at 350 degrees, until just lightly browned around the edges, and let cool completely. Spread your chilled chocolate custard between two cookies, and then roll the edges in crushes candy canes. Voila, a miniature, portable trifle- With a touch of summery Christmas spirit!

This will make you approximately 36 individual cookies, and thus 18 finished whoopie pies. Store the cake-like sandwiches in the fridge for maximum refreshment, or in the freezer to make mock-ice cream sandwiches. Be sure to eat them quickly once the peppermint candies have been added- As evidence by my photo, the can melt quickly due to the moisture and heat. Plus, I can’t imagine anyone being able to resist chowing down for that long!

Savor Olive Life

Ever since that fateful day so many years ago, when I discovered the snack platter at a “grown-up” party, and found that pitted olives fit perfectly like little hats on my fingertips, I’ve been an unabashed fan. What’s not to love? Compact morsels of briny, salty, and rich flavor, they’re just as suitable as a condiment as they are an hors d’oeuvre.

Picky eater that I was though, my appreciation for olives was not all-inclusive; my love was reserved only for black olives, while the green variety received only the cold shoulder. Another nonsensical food prejudice for sure, this one had to be tackled head-first, which is why the offer to review a small selection of Lindsay Olives couldn’t have come at a better time. Having been independently buying the seasoned black olives for months already, I knew this would be the best shot I had at finding a place in my heart for green olives too.

It became quickly apparent that this wouldn’t be a difficult task. Mottled green with brown speckles, these shiny and earthy ovals have a very mildly briny flavor- Mellow, but with a certain smoothness and an unexpected buttery undertone. A very agreeable olive, it hits all the right salty and addictive notes, without being the least bit aggressive.

It pains me to have searched high and low for these olives ever since that first sample, to no avail. After trying another brand of green olives and being positively repulsed by those tasteless, unpleasantly crunchy marbles, I can definitely say that not all olives are created equal.

While still possessing an ample supply however, I couldn’t help but play a bit with my bounty. Lucking out on a small stash of eight-ball zucchini meant stuffed squash was on the menu, and olives sounded like the perfect accent flavor for the filling. Greek-inspired seasonings pull together this unusual combination of olives, white beans, artichokes, and spinach beautifully, and set these stuffed zukes apart from the rest. To lend more of a fresh, summery flavor, they would also be fantastic with a smattering of vegan pesto instead of my suggested spices. Don’t be afraid to play around with this one- It would also be quite excellent with black olives, if you haven’t yet found the green olive of your dreams.

Yield: Makes 6 - 8 Servings

Olive-Stuffed Eight Ball Zucchini

Olive-Stuffed Eight Ball Zucchini

Greek-inspired seasonings pull together this unusual combination of olives, white beans, artichokes, and spinach beautifully, and set these stuffed zukes apart from the rest.

Prep Time 15 minutes
Cook Time 30 minutes
Total Time 45 minutes

Ingredients

  • 6 – 8 Round (Eight-Ball) Zucchini*
  • 1 Cup Cooked White Beans
  • 1 Cup Pitted Green Olives
  • 1/2 Cup Chopped White Onion
  • 1/2 Cup Marinated Artichoke Hearts, Drained and Roughly Chopped
  • 2 Cups Packed Fresh Spinach
  • 2 Cloves Garlic
  • 1 Tablespoon Olive Oil
  • 1/2 Teaspoon Ground Cumin
  • 1/2 Teaspoon Ground Coriander
  • Pinch Ground Cinnamon
  • 1/2 Teaspoon Dried Dill
  • Salt and Pepper, to Taste
  • Marinara Sauce or Your Favorite Tomato Sauce, to Serve

Instructions

  1. Preheat your oven to 375 degrees, and line a rimmed baking sheet with aluminum foil.
  2. Cut a thin slice off the tops of the zucchini, including the stems, and either reserve for garnish or discard. Using a small spoon with a sharp edge (such as a grapefruit spoon) or a melon baller, scoop out the fleshy innards, being careful not to scrape the walls of the zucchini too thin, and toss it into your food processor.
  3. To the food processor, add in all of the remaining ingredients except for the salt, and give it a whirl. Don’t process it until completely smooth, but pulse slowly until everything is broken down and the mixture is pleasingly chunky. Give it a taste before adding salt; because the olives have so much salt to them already, you may not need it at all.
  4. Generously mound the stuffing in the hollow zucchini cups, and bake for 25 – 30 minutes, until the filling is lightly browned and the zucchinis themselves are fork-tender. They’re delicious served hot or at room temperature, alongside a smattering if your favorite tomato sauce.

Notes

*You could very happily use standard, long zucchini here, too. Just split them lengthwise, remove the interiors as before, and par-bake them, empty, for 10 – 15 minutes (depending on size) before filling and baking as previously instructed.

Recommended Products

Please note that some of the links above are affiliate links, and at no additional cost to you, I will earn a commission if you decide to make a purchase after clicking through the link. I have experience with all of these companies and I recommend them because they are helpful and useful, not because of the small commissions I make if you decide to buy something through my links.

Nutrition Information:

Yield:

8

Serving Size:

1

Amount Per Serving: Calories: 120Total Fat: 7gSaturated Fat: 1gTrans Fat: 0gUnsaturated Fat: 6gCholesterol: 0mgSodium: 715mgCarbohydrates: 12gFiber: 4gSugar: 2gProtein: 4g

All nutritional information presented within this site are intended for informational purposes only. I am not a certified nutritionist and any nutritional information on BitterSweetBlog.com should only be used as a general guideline. This information is provided as a courtesy and there is no guarantee that the information will be completely accurate. Even though I try to provide accurate nutritional information to the best of my ability, these figures should still be considered estimations.

PS, if you really want to up the olive ante, enjoy this meal with a dirty martini!

No Surprises

Leaping to her feet instantly, arms outstretched and swinging wildly, happy exclamations filled the previously quiet room. Lipstick kisses imprinted our cheeks as the hubbub slowly died down, the birthday girl was genuinely delighted by her unexpected brunch guests and party in her honor. It may have been a surprise party for my grandma, but honestly, I was the most surprised; No one told me we weren’t expected!

No matter, even without the full details there’s no way I’d arrive at any celebration empty-handed. Far from it; The 3-layer, chocolate-smothered tower weighed quite a bit more than calculated, and I was relieved to have it out of my hands upon arriving. Knowing me, you might imagine that some wonderful, unexpected twists must be lurking inside. Some crazy flavor or bizarre ingredient, unusual preparation, funny shape, anything! But no, the surprises ended after our dramatic entry, as this is just a chocolate cake.

No, I take that back- It most certainly is not just a chocolate cake, but in fact the chocolate cake. The chocolate cake I’ve been searching for before I even knew what good chocolate cake was, when I would have been just as thrilled by a half-price grocery store cupcake as a fine French gateaux. All it took to get there was of coarse endless experimentation over the years, but also a bit of humbling. That’s because I had to enlist some help from an ingredient previously reviled and downright banned from this household… Mayonnaise.

Way back when I was 10 years old, from the time I took a bite of a croque monsieur at the Charles de Gaulle Airport on a tedious layover to Italy, I was convinced that mayo was nothing but evil in condiment form. Shocked to find this pasty, fatty white sludge lining the limp bread, it was everything wrong with airport food, and everything wrong with mayonnaise. It was the worst thing I had ever eaten in my young life, and may still hold that illustrious title today, if I cared to think of all those terrible meals past. Though that was our first chance meeting, I was done with mayonnaise forever, and very vocal about my passionate animosity. That’s why it was even harder to reach for the glass jar, and admit that this substance may actually have a place in my kitchen.

This is one accidental re-introduction that I’m blaming squarely on Dreena Burton. Yes, the wholesome sweetheart behind a string of foolproof cookbooks. It was her fault that I needed a dab of mayo to photograph her rocking veggie burgers, her advice to get Vegenaise instead of the other gloppy stuff that’s almost worse than the original, and thus her fault that I had almost a full jar of the stuff to contend with afterwards.

Without the mayo, this cake couldn’t happen, so I’m trying to accept that painful reality. However, the cake itself isn’t hard to swallow; it practically melts in your mouth, despite its impressive density. So moist, in fact, that I could only think to name it the first thing that popped into my head, “Ultra-Moist Amazing Chocolate Layer Cake.” Not just under-baked or painfully gummy like so many other “moist” cakes, this one holds itself together with a nearly fluffy crumb, which dissolves into pure chocolate fudge in moments. Creamy bittersweet chocolate frosting is the luscious glue that holds together this tower of three tender cake rounds together, and though no further decoration is needed, a light dusting of confectioner’s sugar really seals the deal. Nothing short of a show-stopper, it may not be a surprise, but it’s sure not your average cocoa birthday cake.

Yield: Makes 12 - 18 Servings

Ultra-Moist Amazing Chocolate Layer Cake

Ultra-Moist Amazing Chocolate Layer Cake

Creamy bittersweet chocolate frosting is the luscious glue that holds together this tower of three tender cake rounds together, and though no further decoration is needed, a light dusting of confectioner's sugar really seals the deal. Nothing short of a show-stopper, it may not be a surprising choice, but it's sure not your average cocoa birthday cake.

Prep Time 30 minutes
Cook Time 45 minutes
Total Time 1 hour 15 minutes

Ingredients

Chocolate Fudge Frosting:

  • 1 1/2 Cups Plain Non-Dairy Milk*
  • 1 Pound Semi-Sweet Chocolate, Finely Chopped
  • 1 Cup Vegan Butter
  • 1 1/2 Teaspoons Vanilla Extract

Rich Chocolate Cake:

  • 3 Cups All Purpose Flour
  • 2 Cups Granulated Sugar
  • 1 Cup Dutch-Processed Cocoa Powder, Sifted
  • 2 Tablespoons Whole Flax Seeds, Ground
  • 1 1/2 Teaspoons Salt
  • 2 1/2 Teaspoons Baking Powder
  • 2 1/4 Teaspoons Baking Soda
  • 1 1/2 Cup Plain Non-Dairy Milk
  • 1 1/2 Cup Brewed and Cooled Coffee
  • 2 Tablespoons Apple Cider Vinegar
  • 2 Teaspoons Vanilla Extract
  • 1/2 Cup Vegan Mayonnaise
  • 3/4 Cup Olive Oil

To Garnish:

  • Confectioner's Sugar (Optional)

Instructions

    1. Unlike most standard cake-making procedures, you’ll want to start by preparing the frosting first, since it takes some time to cool and set.
    2. Place the non-dairy milk in a medium sauce pan, and bring just the the brink of boiling. You only want to scald it, so quickly take the pan off the heat, and add in the chopped chocolate. Let sit for a few minutes to melt, and then stir the mixture thoroughly until smooth. Cut the butter into tablespoon-sized pieces, and add them into the melted chocolate, stirring until completely melted and mixed in. Incorporate the vanilla, and let sit at room temperature until cool. Transfer into the fridge to chill. It may take as long as 2 – 3 hours to fully cool, but bear in mind that it will not thicken to the point of being pipe-able; This is a very soft, silky frosting, more like ganache than buttercream. Once it’s merely spreadable, it’s ready to use.
    3. Meanwhile, preheat your oven to 350 degrees and lightly grease and flour 3 8-inch round cake pans. You can also do this successfully with just two pans, as long as you measure your batter carefully and have patience.
    4. In the bowl of your stand mixer or just a large bowl, whisk together the flour, sugar, cocoa, ground flax seeds, salt, baking powder, and soda. Make sure that all of the dry goods are evenly distributed throughout.
    5. In a separate bowl, combine the non-dairy milk, coffee, vinegar, and vanilla, and let sit undisturbed for about 5 minutes. At that point, add in the secret ingredient here, the vegan mayo, as well as the oil, and mix well.
    6. Add the liquids into the bowl of dry ingredient, and slowly mix, just until the batter is mostly smooth and homogeneous. A few lumps are fine, as long as you don’t over-mix. That would cause your cake to come out very tough and chewy, which is not what we’re looking for! Don’t worry if the mixture seems excessively soupy- That is indeed the correct consistency.
    7. Divide your batter evenly between your three prepared baking pans. [If you're only using two, measure out the full amount of batter, and divide by three. You should end up with somewhere around 2 1/2 of batter in each pan. Reserve the remaining third in your fridge while the first two cakes bake, and allow the cakes to cool completely before turning them out onto a large plate. Quickly rinse and dry one of the pans, re-grease and flour, and bake the final amount of batter in the same manner.]
    8. Bake for 35 – 45 minutes, until a toothpick inserted into the center comes out cleanly, with perhaps a few moist crumbs clinging to it. Let cool completely before assembling and frosting.
    9. To achieve the decorative pattern on top of the cake as pictured above, first chill the frosted cake thoroughly so that chocolate frosting can set slightly. Take a large doily and gently place it on top, without pressing down, and sprinkle powdered sugar all over. Lift the doily straight up without shaking it, which will remove the excess and leave a lovely, lacy design in its place.

Notes

*Chose a full-fat, richer variety for the best results; I prefer almond milk that’s slightly on the thicker side. Coconut milk would also be a good choice here.

Recommended Products

Please note that some of the links above are affiliate links, and at no additional cost to you, I will earn a commission if you decide to make a purchase after clicking through the link. I have experience with all of these companies and I recommend them because they are helpful and useful, not because of the small commissions I make if you decide to buy something through my links.

Nutrition Information:

Yield:

18

Serving Size:

1

Amount Per Serving: Calories: 556Total Fat: 32gSaturated Fat: 13gTrans Fat: 0gUnsaturated Fat: 16gCholesterol: 30mgSodium: 528mgCarbohydrates: 67gFiber: 3gSugar: 45gProtein: 6g

All nutritional information presented within this site are intended for informational purposes only. I am not a certified nutritionist and any nutritional information on BitterSweetBlog.com should only be used as a general guideline. This information is provided as a courtesy and there is no guarantee that the information will be completely accurate. Even though I try to provide accurate nutritional information to the best of my ability, these figures should still be considered estimates.

We All Scream…

…For National Ice Cream Month! Did you know that since 1984, thanks to Ronald Reagan, July has been officially designated as National Ice Cream Month? Clearly there’s no better time than the present to share my latest VegNews magazine article, found in the fresh July/August issue, which just so happens to be a feature on vegan ice cream recipes that go way beyond just chocolate and vanilla.

Cool Contenders, Hot Off the Press

Craving a decadent frozen dessert to keep the summer heat at bay? Imagine Hot Chocolate Ice Cream, with a rich dark chocolate base littered throughout with bouncy vegan marshmallows, or Raspberry-Mint Truffle Ice Cream, a refreshing combination of fresh berries and herbs, with whole semi-sweet chocolate truffles to amp up the indulgence-factor. Don’t forget what might actually be the easiest ice cream ever churned up, the Purple Cow Ice Cream.

What’s Purple Cow Ice Cream?

Inspired by the traditional soda shop float made with grape soda and vanilla ice cream, I like to play a bit of role reversal and switch it up by creating a grape ice cream, with only two ingredients (three if you count salt.) Serve in a tall glass with thoroughly chilled cream soda for the full complement of tastes and textures.

Yield: Makes 1 1/2 Pints

Purple Cow Ice Cream

Purple Cow Ice Cream

Inspired by the traditional soda shop float made with grape soda and vanilla ice cream, I like to play a bit of role reversal and switch it up by creating a grape ice cream, with only two ingredients (three if you count salt.) Serve in a tall glass with thoroughly chilled cream soda for the full complement of tastes and textures.

Additional Time 3 hours 30 minutes
Total Time 3 hours 30 minutes

Ingredients

  • 1 3/4 Cups Plain Non-Dairy Milk
  • 3/4 Cup (1/2 of a 12-Ounce Can) Frozen 100% Concord Grape Juice Concentrate, Thawed
  • Pinch Salt

Instructions

  1. This is the best ice cream for beginners, as it genuinely could not be any easier to prepare. Just whisk everything together thoroughly in a medium-sized bowl until homogeneous, and chill for at least 30 minutes.
  2. Churn in your ice cream maker according to the manufacturer’s instructions, and transfer to an air-tight container before stashing in the freezer. Let rest in the freezer for at least 3 hours before serving, until solid enough to scoop.

Recommended Products

Please note that some of the links above are affiliate links, and at no additional cost to you, I will earn a commission if you decide to make a purchase after clicking through the link. I have experience with all of these companies and I recommend them because they are helpful and useful, not because of the small commissions I make if you decide to buy something through my links.

Nutrition Information:

Yield:

6

Serving Size:

1

Amount Per Serving: Calories: 61Total Fat: 1gSaturated Fat: 1gTrans Fat: 0gUnsaturated Fat: 0gCholesterol: 6mgSodium: 58mgCarbohydrates: 10gFiber: 0gSugar: 10gProtein: 3g

All nutritional information presented within this site are intended for informational purposes only. I am not a certified nutritionist and any nutritional information on BitterSweetBlog.com should only be used as a general guideline. This information is provided as a courtesy and there is no guarantee that the information will be completely accurate. Even though I try to provide accurate nutritional information to the best of my ability, these figures should still be considered estimations.