In the Eleventh Hour

Long before the word “vegetarian” had even entered my vocabulary or tofu occupied a place on my plate, Thanksgiving turkey nonetheless failed to excite any hunger in my young belly. I had yet to cultivate a true appreciation of any greener fare, and yet the side dishes were what always held the key to holiday dinner bliss. Anything starchy, buttery, and sweet was piled on with aplomb, moderation be damned. No matter how they were prepared, potatoes especially were key to a successful meal, often turning up in multiple forms to satisfy all family members. Mashed, roasted, scalloped, or fried, they all had equal billing on the menu, devoured far more enthusiastically than the obligatory bird.

Ironically, this habit has made the main dish beside the point, the backup singer rather than the star of the show. I’d gladly make space for another side dish or two than an extra serving of seitan roulade, no matter how delicious or painstakingly stuffed.

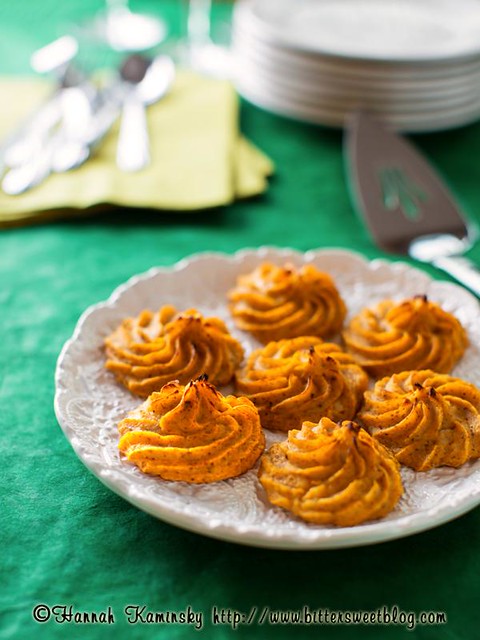
That’s why I have no compunctions about suggesting yet another starchy side, even in this eleventh hour of Thanksgiving prep. Inspired by my grandpa’s classic potato puffs, my rendition lightens the potato load with golden butternut puree. Pumpkin could effortlessly slip into that same role as well, if canned butternut is hard to come by. Crisp on the outside and creamy on the inside, these tiny mountains of mashed potatoes finally introduce the textural interest that plain old smashed spuds lack. Mercifully, their compact design allows for advance prep as well; bake them through as instructed, chill until dinner time, and them pop them back into a 400 degree oven for 5 – 10 minutes, just to heat them through.

Yield: Makes 1 1/2 – 2 Dozen Puffs

Butternut Potato Puffs

Butternut Potato Puffs

Inspired by my grandpa’s classic potato puffs, my rendition lightens the potato load with golden butternut puree. Pumpkin could effortlessly slip into that same role as well, if canned butternut is hard to come by. Crisp on the outside and creamy on the inside, these tiny mountains of mashed potatoes finally introduce the textural interest that plain old smashed spuds lack.

Prep Time 15 minutes
Cook Time 20 minutes
Additional Time 1 hour
Total Time 1 hour 35 minutes

Ingredients

  • 1 Pound Yukon Gold Potatoes, Peeled and Diced
  • 1 15-Ounce Can Butternut Squash Puree
  • 3 Tablespoons Non-Dairy Margarine or Coconut Oil, Melted
  • 1 Teaspoon Seasoned Salt
  • 1 Teaspoon Garlic Powder
  • 1 Teaspoon Onion Powder
  • 1/2 Teaspoon Poultry Seasoning
  • 1/4 Teaspoon Ground Black Pepper
  • 2 Tablespoons Cornstarch
  • 1 Tablespoon Whole Flax Seeds, Ground

Instructions

  1. Place your peeled and cut potatoes in a medium-sized pot of cool water. Set over moderate heat and bring up to a boil, reducing the heat to a lively simmer and cooking them until fork-tender. Drain thoroughly.
  2. Mash the potatoes as smoothly as possible before adding in all of the remaining ingredients, mashing and stirring to combine and beating out any lumps. Transfer the mashed mixture to a piping bag fitted with a large star tip and pipe the potatoes into small rosettes on two baking sheets lined with parchment paper or silpats. Aim for them to measure approximately 1 1/2 – 2 inches across the bottom, but there’s no need to break out a ruler here.
  3. Place the whole sheets in the freezer for about an hour, until solid. Once they’ve had ample time to chill out, preheat your oven to 450 degrees.
  4. Bake for 15 – 18 minutes, until golden brown all over. Serve right away while still hot.

Notes

To prepare in advance, bake through as instructed, chill until dinner time, and them pop them back into a 400 degree oven for 5 – 10 minutes, just to heat them through.

Recommended Products

Please note that some of the links above are affiliate links, and at no additional cost to you, I will earn a commission if you decide to make a purchase after clicking through the link. I have experience with all of these companies and I recommend them because they are helpful and useful, not because of the small commissions I make if you decide to buy something through my links.

Nutrition Information:

Yield:

24

Serving Size:

1

Amount Per Serving: Calories: 48Total Fat: 2gSaturated Fat: 1gTrans Fat: 0gUnsaturated Fat: 1gCholesterol: 0mgSodium: 66mgCarbohydrates: 7gFiber: 1gSugar: 1gProtein: 1g

All nutritional information presented within this site are intended for informational purposes only. I am not a certified nutritionist and any nutritional information on BitterSweetBlog.com should only be used as a general guideline. This information is provided as a courtesy and there is no guarantee that the information will be completely accurate. Even though I try to provide accurate nutritional information to the best of my ability, these figures should still be considered estimates.

Have a GRAIN Holiday!

Funny how the most open-ended requests are often the most challenging to fulfill. Narrow down the criteria to something incredibly specific, to what might be consider severely limited, even, and that’s where it’s easy to excel. The answer has almost been handed over, outlined in great detail about what it must or must not be, so it’s hard to go too far wrong. When tasked with creating something as vague as a “holiday dessert,” however, my mind goes blank. With endless paths to go down or ideas to explore, how can one determine what would be best?

Similarly, the concept of creating a recipe that simply must have flour as an ingredient left me just short of baffled. Flour, that ubiquitous ground wheat product, is so prevalent in this household that I’d swear I could sweep up all the dust on the shelves and bake a loaf of bread with it. After churning out hundreds of desserts over the past decade, it takes a deliberate effort not to start a recipe with flour.

That’s what made Hodgson Mill‘s call to arms equally enticing and perplexing. Mandating only that recipes include one or more of their whole grain flours, such an ambiguous lure proved impossible to resist. Surely I could make something with flour- What else do I do? And yet the concepts flew by, turning out only cakey, disappointing scones and a platter of cookies with an identity crisis, seeming more like little pies than discrete 2-bite confections. Given so much free rein, I didn’t quite know what to do with myself.

Until I focused my attention on chestnuts, that is. Gravely undervalued, these nuts have only a short window of availability, and rarely get the attention they deserve. Thinking more about the featured flavors than the construction allowed me to get around my baker’s block and create something truly prize-winning, if only amongst my taste testers.

Creating a hearty crumb that isn’t too dense, a blend of both whole wheat pastry flour and bread flour lends this sweet loaf a unique texture, slightly fluffier than your average pound cake. Chestnuts are blended to weave their unique essence into every bite, paired with sizable pieces for toothsome pops of nutty flavor. Though icing is typically an after though, something that could be listed as optional, this particular spicy topping is absolutely essential to contrast the hearty crumb. Don’t rush it either; the crunch and slight cooling sensation it provides after it hardens is critical to maximum enjoyment.

Yield: Makes 1 Loaf Cake; 8 – 10 Servings

Chestnut Pound Cake

Chestnut Pound Cake

Tender roasted chestnuts are woven into every bite of this wholesome cake. Warmly spiced icing set up to a crunchy contrast on top for maximum satisfaction.

Prep Time 20 minutes
Cook Time 1 hour
Additional Time 1 hour
Total Time 2 hours 20 minutes

Ingredients

Chestnut Pound Cake:

  • 1 Cup Whole Wheat Pastry Flour
  • 1/2 Cup Bread Flour
  • 1/2 Cup Confectioner’s Sugar
  • 1/4 Cup Cornstarch
  • 1/2 Teaspoon Baking Powder
  • 1/2 Teaspoon Baking Soda
  • 1/4 Teaspoon Salt
  • 1/2 Cup Olive Oil
  • 1/2 Cup Dark Brown Sugar, Firmly Packed
  • 10 Ounces (About 1 1/2 Cups) Whole Roasted and Shelled Chestnuts, Divided
  • 1/2 Cup Plain Non-Dairy Milk
  • 1 Teaspoon Ground Cinnamon
  • 1/2 Teaspoon Apple Cider Vinegar
  • 1 Teaspoon Vanilla Extract
  • 1/2 Teaspoon Almond Extract

Spiced Icing:

  • 1 Cup Confectioner’s Sugar
  • 1/2 Teaspoon Ground Cinnamon
  • 1/2 Teaspoon Ground Ginger
  • Pinch Ground Nutmeg
  • 1 – 2 Tablespoons Water

Instructions

  1. Preheat your oven to 350 degrees and lightly grease an 8 x 4-inch loaf pan.
    In a large bowl, sift together both flours along with the confectioner’s sugar, cornstarch, baking powder and soda, and salt. Roughly chop half of the chestnuts and toss them in, stirring to coat with flour to help prevent the pieces from all sinking to the bottom while baking. Set aside.
  2. Place the oil, brown sugar, and the remaining half of the chestnuts into the container of your blender or food processor and thoroughly puree. Pause to scrape down the sides if necessary, ensuring that everything is smoothly combined. Add in the “milk,” cinnamon, vinegar, vanilla, and almond extract, blending once more to incorporate.
  3. Pour the liquid mixture into the bowl of dry goods, and stir with a wide spatula just enough to bring the batter together. A few small lumps are far better than an overworked, tough cake. Pour the batter to your prepared pan and bake for 50 – 60 minutes, until amber brown all over an a toothpick inserted into the center pulls out cleanly. Let sit in the pan for about 5 minutes before transferring to a wire rack to cool completely.
  4. To prepare the icing, simply whisk together all of the ingredient, slowly adding water one drop at a time until it reaches your desired consistency. Drizzle generously over the top of the cake and allow it 1 – 2 hours to set and harden. Slice, serve, and enjoy!

Recommended Products

Please note that some of the links above are affiliate links, and at no additional cost to you, I will earn a commission if you decide to make a purchase after clicking through the link. I have experience with all of these companies and I recommend them because they are helpful and useful, not because of the small commissions I make if you decide to buy something through my links.

Nutrition Information:

Yield:

10

Serving Size:

1

Amount Per Serving: Calories: 400Total Fat: 13gSaturated Fat: 3gTrans Fat: 0gUnsaturated Fat: 10gCholesterol: 5mgSodium: 179mgCarbohydrates: 65gFiber: 4gSugar: 28gProtein: 6g

All nutritional information presented within this site are intended for informational purposes only. I am not a certified nutritionist and any nutritional information on BitterSweetBlog.com should only be used as a general guideline. This information is provided as a courtesy and there is no guarantee that the information will be completely accurate. Even though I try to provide accurate nutritional information to the best of my ability, these figures should still be considered estimations.

The Second Storm

“This is the worst winter ever!”

“You do realize it’s still early November, right?”

To that I could only groan, burying my frozen face as deeply into my wind-whipped hair as the paltry jacket hood would allow. Flecks of snow and tiny, sharp pieces of hail battered us head-on as we climbed uphill. It was a silly mistake, really, underestimating the power of the latest apocalyptic weather predictions while overestimating the strength of the car’s tires. Everything would have been just peachy if we had stayed inside, tending the pumpkin seeds in the oven and putting off our trip to the store until morning. We were just too ambitious.

Our grave error in judgement came into clear focus as the car slid slowly down hill, hugging the curves just fine but continuing along without consulting the driver. It was this very Curve of Death that got me last year, so my mom smartly stepped up to man the wheel. Thus, we were in this together, assessing the situation minute by minute with carefully chosen words, attempting not to alarm one another. Eventually the bottom of the slope met our gently free falling vehicle, and it was game over. Nothing could have convinced those wheels to grip and carry us home. The only choice was to set the hazard lights blinking, abandon ship, and trudge a mile home. There are certainly far worse outcomes, but I can’t say it’s exactly how I wanted to spend my evening, nor the most fun challenge to tackle in open high heeled shoes.

Naturally, the pumpkin seeds we left for “just a moment” were roasted to an extra-dark shade of doneness… Otherwise known as burnt.

So what was it that compelled me to suggest leaving the warm, safe house in the first place? Some matter of pressing urgency, a critical need that needed to be addressed immediately?

Oatmeal. Pre-cooked and frozen steel-cut oatmeal from Trader Joe’s, if I must be humiliatingly precise. I never meant to get so impossibly hooked on the stuff, regarding it as a novelty at first but now depending on it for a daily fix. Every single day for at least three years now, this is the stuff that gets me out of bed in the AM hours. Proper oatmeal cookery continues to elude me, and the time required for this morning meal would otherwise be prohibitive. At least, that’s what I tell myself as I reach for a 4 – 6

th and 5th box on my weekly Joe’s run.

No more. After this little incident, I’m determined not to be completely dependent on Joe to satisfy my craving. Better yet, I can make something that he can’t put in a box, something that can’t be bought, and will hardly take any additional time. It’s all thanks to my handy pressure cooker that it’s possible, and completely painless. Toss ingredients in, set the timer, and in mere minutes the oats are tender, pleasantly chewy, and creamy all at once. A crisp caramelized sugar topping puts standard steel-cut oats on a whole new level, perfect for a holiday breakfast, brunch, or just any day that a treat is in order. Straddling that fine line between healthy oats and indulgent custard, its far richer than the stuff from the freezer aisle, but still something to feel good about getting a second helping of. With or without the added thrill of a brûléed top crust, oats have never had it so good.

Yield: 4 - 6 Servings

Steel-Cut Oat Brûlée

Steel-Cut Oat Brûlée

Tender, pleasantly chewy, and creamy all at once, these decadent oats straddle that fine line between healthy breakfast and indulgent treat. A crisp caramelized sugar topping puts standard whole grains on another level, perfect for a holiday breakfast, brunch, or just any day that a hearty morning start is in order.

Ingredients

  • 1 3/4 Cups Plain Non-Dairy Milk
  • 1/4 Cup Raw Cashews
  • 1/2 Cup Quick-Cooking Steel Cut Oats
  • 1/4 Teaspoon Salt
  • 1/4 Cup Maple Syrup
  • 1 Teaspoon Vanilla Extract

Brûlée Topping:

  • 3 Tablespoons Dark Brown Sugar, Firmly Packed
  • 1 Teaspoon Water

Instructions

  1. First, place the non-dairy milk and cashews in your blender and thoroughly puree, until completely smooth. This will create a thicker, richer “milk” to cook the oats in. If you don’t have a high-speed blender, soak the cashews for 4 – 6 hours beforehand so that they break down more readily. Otherwise, you may also substitute 2 cups of full-fat coconut milk or vegan creamer for the two ingredients and skip this step altogether.
  2. In your pressure cooker, combine the blended cashew creme, oats, salt, and maple syrup, and stir well. Bring to high pressure and cook for 11 minutes, and then let the pressure fall naturally (natural release) until the seal is broken and the lid can be opened. Mix in the vanilla extract.
  3. Divide the cooked oats equally between 4 – 6 ramekins, and let cool to room temperature. The oatmeal can be refrigerated and stored for up to 5 days at this point, frozen for 3 – 4 months, or Brûléed right away. If using frozen oats, allow them to fully thaw first, and if using chilled oats, allow them to come back up to room temperature.
  4. Mix together the brown sugar and water to create a thick sugar paste. Spread 1 – 2 teaspoons over the tops of each ramekin filled with oats, to evenly coat the surface. Place the ramekins under a hot broiler set to high, and cook until the sugar bubbles and caramelizes. Serve immediately, with berries or sliced bananas if desired.

Nutrition Information:

Yield:

4

Serving Size:

1

Amount Per Serving: Calories: 185Total Fat: 6gSaturated Fat: 2gTrans Fat: 0gUnsaturated Fat: 3gCholesterol: 9mgSodium: 188mgCarbohydrates: 29gFiber: 0gSugar: 26gProtein: 5g

Failing at Preparedness

Blame it on an intoxicating emotional cocktail of stress, fear, and hunger, but there are no two ways around it: I deserve a big fat “F” in storm readiness. Like most people in the tri-state area, my time before Super Storm Sandy hit was spent frantically stocking up on food, gasoline, and low-tech entertainment like library books (remember those archaic things?) in case the hurricane truly was as bad as threatened. Furiously running at full capacity to not lose my shit in the middle of a swamped grocery store, my overloaded brain failed to consider each purchase in a truly rational light. Canned goods were fantastic, soups and dried meals could be heated over the gas range, but the double dip on washed, bagged greens? The attractively priced frozen puff pastry? The full case of almond milk Greek yogurt? Hate to ruin the suspense, but those hasty acquisitions proved poor purchases in short time.

Even without power, I held out hope that it would be a quick recovery. Wires came down right at the end of our sparsely populated dead end street and the damage was extensive, but we had been relatively lucky in past disasters. Keeping fridge and freezer doors tightly shut, it should have been easy to wait it out and return to normal life in no time. Days turned into the darkest nights imaginable, back into overcast days, rinse and repeat. The kitchen remained silent, without the comforting hum of appliances or crackling radiators. All that was left was the awful wind, whipping more gently now, but just as cruelly as ever.

Like a sick magic trick, those delicate, frilly salad greens transformed into a murky sludge pooling at the bottom of the bag. Many of the other well-meaning but badly executed purchases met similar fates; never before had I seen such a kaleidoscope of mold on a single cut lemon. With nothing left to cook, little that anyone cared to eat, and the days growing increasingly frigid, it was time to abandon ship.

Near the end of the nightmare, as temperatures dipped below freezing, we sought shelter with our incredibly generous, hospitable extended family a few towns away. Easily the best outcome of a bad situation, things certainly felt far less desperate when wrapped in a cloak of warm air, bright light, and wifi. There aren’t words enough to express just how grateful I am that they would unhesitatingly take in all four of us girls (myself, my sister, my mom, and my Isis.) Instead of fumbling through awkward and insufficient “thank you’s,” it was best to manifest that sentiment into something edible, of course.

Dangerously ripe bananas sitting on the counter were the catalyst, further fleshed out by available ingredients and the need for low-impact prep work in an unfamiliar kitchen. Fully enmeshed in all things pie thanks to the upcoming cookbook, that shallow glass pan was the first thing that made sense in so many painful days.

Bananas and chocolate, uncomplicated and unfussy, there would have been no recipe nor record if not for the rave reviews. Silky ganache lightened by the fruity accents and brightened with a light sprinkle of sea salt to finish, it seemed unremarkable at first, but now will never be forgotten. In fact, considering how the whole experience has forced us all to reevaluate the meaning of being thankful, I have a feeling that this may become our family’s new Thanksgiving pie for many years to come.

Yield: Makes 8 - 12 Servings

Frankenstorm Pie (AKA Banana Ganache Pie)

Frankenstorm Pie (AKA Banana Ganache Pie)

Bananas and chocolate, uncomplicated and unfussy, there would have been no recipe nor record if not for the rave reviews. Silky ganache is lightened by fruity accents and brightened with a light sprinkle of sea salt to finish.

Prep Time 15 minutes
Additional Time 3 hours
Total Time 3 hours 15 minutes

Ingredients

Graham Cracker Crust:

  • 1 1/2 Cup Graham Cracker Crumbs (About 12 Full Rectangle Sheets)
  • 6 Tablespoons Vegan Butter, Melted

Banana Ganache Filling:

  • 4 Medium-Sized Ripe Bananas
  • 3 Tablespoons Light Agave Nectar
  • 1 Teaspoon Vanilla Extract
  • 2 Tablespoons Vegan butter
  • 2 Cups (12 Ounces) Semi-Sweet Chocolate Chips
  • 1/4 Cup Vanilla or Plain Non-Dairy Milk
  • Coarse Sea Salt, as Needed

Instructions

  1. To make the crust, break up the graham crackers into smaller pieces before pulsing in a food processor until very finely ground. The resulting crumbs should be about the consistency of coarse almond meal. Pick out any larger pieces and re-process as needed.
  2. Drizzle the melted butter into the crumbs, and stir thoroughly to moisten the ground cookies. The mixture should be capable of sticking together when pressed.
  3. Transfer the mix to a 9-inch round pie pan, and use lightly moistened fingers to firmly press it down on the bottom and along the sides. Use the bottom of a flat measuring cup or drinking glass for smoother edges.
  4. For the filling, toss the peeled bananas into the food processor or blender, and thoroughly puree along with the agave and vanilla. Meanwhile, place the butter, chocolate chips, and non-dairy milk in a microwave-safe dish and heat for about 1 minute. Stir well to smooth out the mixture and allow any remaining chips to fully melt. Reheat at intervals of 20 seconds if necessary, stirring well after each one.
  5. Transfer the melted chocolate into the blender or food processor, and puree once more to fully integrate. Scrape down the sides of the bowl if necessary to ensure that everything is incorporated. Once completely smooth, pour the filling into your prepared crust, smooth out the top, and sprinkle very lightly with a pinch of coarse sea salt.
  6. Refrigerate for at least 3 hours before serving, or until set.

Notes

To make this recipe gluten-free, select gluten-free graham crackers or wafer cookies.

Recommended Products

Please note that some of the links above are affiliate links, and at no additional cost to you, I will earn a commission if you decide to make a purchase after clicking through the link. I have experience with all of these companies and I recommend them because they are helpful and useful, not because of the small commissions I make if you decide to buy something through my links.

Nutrition Information:

Yield:

12

Serving Size:

1

Amount Per Serving: Calories: 219Total Fat: 11gSaturated Fat: 7gTrans Fat: 0gUnsaturated Fat: 4gCholesterol: 22mgSodium: 169mgCarbohydrates: 26gFiber: 2gSugar: 16gProtein: 2g

All nutritional information presented within this site are intended for informational purposes only. I am not a certified nutritionist and any nutritional information on BitterSweetBlog.com should only be used as a general guideline. This information is provided as a courtesy and there is no guarantee that the information will be completely accurate. Even though I try to provide accurate nutritional information to the best of my ability, these figures should still be considered estimations.

Brace for Impact

Nerves fraying more severely than the sleeves on my favorite old sweater, our newest friend Sandy has us all running scared around here. Although we still have yet to meet the old gal, she’s already hurling wind and a few scattered raindrops our way, no doubt a mere hint of what’s to come. Even the most dire forecast can usually be ignored or at least rationalized, but when officials say that it will likely be worse than Irene, and can cause “life-threatening devastation,” well, that’s not so easy to brush off. After losing last Halloween in that brutal beating and having my very first car accident due to the road conditions, I for one am pretty nervous.

It’s a good thing that before even learning of this Frankenstorm, it turned out that I was already preparing food for it. Of course, food and electricity are at the top of the list of concerns for this vegan blogger, so thank goodness that at least the edibles are covered.

Devilishly spicy but not unbearably so, these crunchy roasted pumpkin seeds are dosed in tongue-tingling sriracha. Lightly salted and easy to munch, they were intended to be an ideal Halloween party snack, but instead are also perfectly suited to become emergency rations. Shelf-stable in an air-tight container for up to a month, this nutty blend of pumpkin and sesame seeds will prove ideal to munch on should the power go out.

There’s a million and a half ways to roast pumpkin seeds, but it never hurts to have a new flavor concept. Even if you’re not concerned about massive flooding or the potential for a week or more without electricity, I have a feeling these would still be just as enjoyable.

No matter where you are, stay safe everyone! Here’s hoping that Halloween festivities are the most frightening events in coming days, and not the aftermath of Sandy.

Yield: Makes About 2 Cups

Sriracha Seeds

Sriracha Seeds

Devilishly spicy but not unbearably so, these crunchy roasted pumpkin seeds are dosed in tongue-tingling sriracha. Lightly salted and easy to munch, they were intended to be an ideal Halloween party snack, but instead are also perfectly suited to become emergency rations.

Cook Time 45 minutes
Total Time 45 minutes

Ingredients

  • 2 Cups Raw, Fresh Pumpkin Seeds (From 1 Medium Sugar Pumpkin)
  • 2 Tablespoons White Sesame Seeds
  • 2 Tablespoons Black Sesame Seeds
  • 2 Tablespoons Sriracha
  • 1 Tablespoon Olive Oil
  • Coarse Sea Salt

Instructions

  1. Preheat your oven to 300 degrees and line a baking sheet with aluminum foil or a silicone baking mat; set aside.
  2. Toss all the seeds into a medium-sized bowl along with the sriracha and olive oil. Stir well to combine and thoroughly coat the dry goods with the liquid seasoning. Pour everything out onto your prepared sheets, and spread the seeds into a single even layer. Sprinkle lightly with coarse salt before popping them into the oven.
  3. Bake for 35 – 45 minutes until golden brown, stirring every 20 minutes or as needed. Let cool completely before eating or storing in an air-tight container.

Nutrition Information:

Yield:

8

Serving Size:

1

Amount Per Serving: Calories: 115Total Fat: 7gSaturated Fat: 1gTrans Fat: 0gUnsaturated Fat: 5gCholesterol: 0mgSodium: 180mgCarbohydrates: 11gFiber: 4gSugar: 1gProtein: 4g

All nutritional information presented within this site are intended for informational purposes only. I am not a certified nutritionist and any nutritional information on BitterSweetBlog.com should only be used as a general guideline. This information is provided as a courtesy and there is no guarantee that the information will be completely accurate. Even though I try to provide accurate nutritional information to the best of my ability, these figures should still be considered estimates.

You Don’t Know Jack-o-Lantern

Once the highlight of every autumn, Halloween has begun to lose its charm. Once an opportunity to escape into an alternate persona, collect hordes of sweet treats, and explore new neighborhoods filled with bright lights and wild decorations, now it’s little more than a note on a calender page. Much of that has to do with simply growing older no doubt, an unfortunate side effect of becoming too mature or too serious. More than that, however, the great prize at the end of the journey holds little allure now. Artificially flavored, colored, and pumped full of unsavory fillers, not to mention the sad prevalence of animal products in mainstream options, the whole song and dance seems somehow hollow without that great candy climax to look forward to. For someone with an active and voracious sweet tooth to reject free candy has got to say something.

Rest assured, not all candy has lost its appeal. The homemade, hand-crafted stuff is in a category of its own, especially since it’s the sort that no parent would allow their child to take on a trick-or-treat outing. Ironic that the mass-produced junk would be considered a safer, better option. Fine by me though, because that only means I get to horde more of the choice picks for myself, such as these lightly spiced pumpkin pâte de fruits. Gummy candies all grown up, these seasonal treats are perfect for the entire autumn season, not just the standard Halloween sugar high.

Soft yet toothsome, the crunch of sugar coating the outside gives way to smooth pumpkin jelly, tinged with cinnamon, ginger, and nutmeg. A hint of molasses adds depth, contrasted by a bright splash of cider vinegar. Unlike so many other “pumpkin spice” novelties, these edible orange jewels genuinely taste like the gourd of their namesake.

Continue reading “You Don’t Know Jack-o-Lantern”