

Author: Hannah (BitterSweet)
Author of My Sweet Vegan, Vegan Desserts, Vegan a la Mode, and Easy as Vegan Pie.
St. Patty’s
Leprechauns, lucky four-leaf clovers, soda bread, potatoes, excessive amounts of beer, and green-colored everything.
These are the only things I know about St. Patrick’s Day.
With an understanding that’s as spotty as an inbred dalmatian at best, I couldn’t tell you how any of the above are interrelated here. Who was St. Patrick? What did he once do? Why are we celebrating him? The best answer ever offered tends to be along the lines of “…Does it really matter? Pass me another drink!”
There is no doubt good reason to declare the 17th of March a holiday every year, and yet I still couldn’t tell you a single thing about it. Rather than fuss over the details, it really is better just to take the opportunity to make merry.

Happy to fill in the gaps on any day that give me an excuse to compose a special sweet treat, this one didn’t immediately fill me with dessert inspiration. Not wanting to go along the route of a big, boozy, knock-out grand finale, the options, like my knowledge of official St. Patrick’s Day traditions, were severely limited. At the last minute possible, it all began to fall into place. Potatoes were the start of this production, and remembering the old-fashioned formula for potato candy, the remaining pieces quickly fell into place.
What are shamrock patties?
Sweet, refreshing, and strongly minty, these soft patties are the green cousins to the typically chocolate-covered mint fondants. Contrasted by an emerald-colored coating of slightly bitter matcha, these mature treats are far more complex in flavor than their playful appearance might suggest.

Can’t find cocoa butter?
Considering how last-minute this recipe is being delivered, you could certainly run with the idea and just use a simple coating of melted bittersweet chocolate instead. Consider dressing up your patties with colored sugar or sprinkles for some extra bling, too.

Yield: Make 3 – 4 Dozen Patties
Shamrock Patties

Sweet, refreshing, and strongly minty, these soft patties are the green cousins to the typically chocolate-covered mint fondants. Contrasted by an emerald-colored coating of slightly bitter matcha, these mature treats are far more complex in flavor than their playful appearance might suggest.
Prep Time
45 minutes
Cook Time
5 minutes
Additional Time
1 hour
Total Time
5 minutes
Ingredients
Mint Patties:
- 1/4 Cup Smooth Mashed Potatoes*
- 1 Tablespoon Vegan Butter
- 3 – 4 Cups Confectioner’s Sugar
- 1/2 Teaspoon Vanilla Extract
- 1/4 Teaspoon Peppermint Oil**
- Pinch Salt
Matcha Coating:
- 1/4 Cup (2 Ounces) Cocoa Butter
- 1/4 Cup Confectioner’s Sugar
- 1 Teaspoon Matcha Powder
To Garnish:
- Green Colored Sugar or Sprinkles, if Desired
Instructions
- Place your mashed potatoes in the bowl of your food processor fitted with the paddle attachment, or in you food processor. Add the vegan butter and cream the two together until smooth.
- Incorporate 2 cups of confectioner’s sugar to start, along with the vanilla, peppermint oil, and salt. Start on a slow speed, or pulse to combine. The mixture will likely look like thick icing at this point, so add in another cup of confectioner’s sugar, and once again mix on low. You’re looking for it to become the consistency of soft cookie dough; malleable, but not gooey or drippy. If it still seems to be too loose, mix in up to an additional cup of the sugar, as needed.
- Turn the potato candy out onto a silicone baking mat or piece of parchment paper and gently flatten it out to about 1/4 – 1/2 inch in thickness. To prevent sticking, either sprinkle on a very light dusting of confectioner’s sugar and/or top it with a second silicone baking mat or sheet of parchment before taking the rolling pin to it. Stash your candy disk in the fridge for at least 30 minutes before proceeding.
- Once chilled, pull out a small shamrock-shaped cookie cutter approximately 1-inch wide. Cut out your clovers and transfer them to the prepared sheet. Gather up the candy scraps, re-roll, and cut again, until you’ve used all of the dough. Should the dough become too soft and finicky to work with, just toss it back in the fridge for another 15 – 30 minutes, and try once more. Now, stash the whole sheet of cut centers in the freezer for at least 30 minutes before getting to work on the coating.
- Place your cocoa butter in a microwave-safe bowl and heat for 1 – 3 minutes, so that it completely liquefies. Meanwhile, mix together the remaining ingredients in a small dish, making sure that they’re thoroughly combined and that there are no clumps of matcha. Once the cocoa butter is melted, whisk in the dry ingredients, stirring vigorously to make sure that everything is completely dissolved into the molten fat.
- Pull out your semi-frozen mint patties, and dip each into the matcha coating, one at a time. Place them back on the baking mat or parchment and watch the coating set up right before your eyes. This top coat is thinner than conventional white chocolate, so you may wish to double-dip once the first layer has solidified. If using, quickly sprinkle the decorate sugar over the dipped patties as soon as you set them down.
Notes
*Peel and chop one russet potato into small chunks. Boil for 7 – 10 minutes, until very tender, and drain thoroughly. Beat well either with the paddle attachment of your stand mixer, or a potato masher, until completely smooth and lump-free. Do not add any liquid or seasoning. Measure out 1/4 cup and reserve the rest for another use.
**Peppermint oil is much stronger than peppermint extract, and thus the two are not directly interchangeable. If you can’t get a hold of the oil, try substituting 3/4 – 1 1/4 teaspoons of extract, to taste, and bear in mind that you will likely need more confectioner’s sugar to make up for the added liquid.
Recommended Products
Please note that some of the links above are affiliate links, and at no additional cost to you, I will earn a commission if you decide to make a purchase after clicking through the link. I have experience with all of these companies and I recommend them because they are helpful and useful, not because of the small commissions I make if you decide to buy something through my links.


Nutrition Information:
Yield:
48Serving Size:
1Amount Per Serving: Calories: 117Total Fat: 1gSaturated Fat: 0gTrans Fat: 0gUnsaturated Fat: 1gCholesterol: 0mgSodium: 7mgCarbohydrates: 28gFiber: 0gSugar: 28gProtein: 0g
All nutritional information presented within this site are intended for informational purposes only. I am not a certified nutritionist and any nutritional information on BitterSweetBlog.com should only be used as a general guideline. This information is provided as a courtesy and there is no guarantee that the information will be completely accurate. Even though I try to provide accurate nutritional information to the best of my ability, these figures should still be considered estimations.
3.14, and So On and So Forth
Math has never been and will never be my strong suit; The fact that I got passing grades and can still perform basic addition and multiplication is nothing short of a miracle, although that would still put me about on par with the skills of a 10 year old. Luckily, computers and calculators have taken all the agita out of complex equations, keeping recipes on track and making sure that all the numbers in my bank account add up correctly. The limitations of my grasp on such simple mathematics had never been quite so plainly evident, however, when I finally had to step up and learn the inner workings of the cash register at work.
Always happy to hide in back, hovering over the stove or fussing with messy knife cuts, five happy years had passed since first coming aboard at the restaurant, and customer interaction has always been kept to a minimum. Sure, I’ll chime in occasionally as I’m eaves dropping on conversations about veganism, cooking, or what-have-you, but ever the introvert, my place has been as far from the front of the house as possible. In the case of our tiny kitchen, that’s really only a few feet, but when immersed in gallons of cake batter, it feels like miles.
Called upon to take up the slack at dire times, however, I couldn’t think of a good reason to continue this illogical avoidance, and thus began to learn the strange way of our out-dated cash register. Some buttons are mislabeled, a few ring up the wrong prices, and some are completely without labels, but that confusion was nothing compared to the ordeal of making change for patrons. Not able to automatically spit out change or even the correct number for change, I was left with a dinky solar-powered calculator and impatient people anxious to get their due coins and run. We aren’t called Health in a Hurry for nothing! Those first few days, I feel as though I must have mischarged everyone for more money than actually came in.

So I can’t tell you a damn thing about math, but I can tell you that today, March 14th (3/14) is semi-officially pi day! Any reason to bust out a pastry-laden creation is good enough for me, even if it involves that confounding arithmetic. Going down the savory route for once, spring flavors danced in my head, inspiring a fresh new take on the traditional pot pie.

Yet again, I’m perhaps a bit early on this one, but you’ll thank me in a few weeks when you already have these recipes in your arsenal. Cradled in a flaky, golden crust, asparagus and fava beans commingle with the standard mirepoix, mushrooms, and savory spices. Just creamy enough without being overly rich or heavy, this is one hearty meal that still won’t weigh you down. Topped off with tender potatoes, crisped around the edges and finished with coarse sea salt, it’s one stunning entree to present to a loved one. And let me tell you, you had better REALLY love that special someone, because this is admittedly a good deal of work for two servings. If you don’t have a huge appetite, it could be stretched to perhaps 3 or 4… But based on the delectable taste, I can make no guarantees. Save this one for a special occasion- You’re sure to win some serious brownie points!

Yield: Makes 2 - 4 Servings
Fresh Fava Bean Pot Pie

Cradled in a flaky, golden crust, asparagus and fava beans commingle with the standard mirepoix, mushrooms, and savory spices. Just creamy enough without being overly rich or heavy, this is one hearty meal that still won’t weigh you down. Topped off with tender potatoes, crisped around the edges and finished with coarse sea salt, it’s one stunning entree to present to a loved lone.
Prep Time
25 minutes
Cook Time
1 hour 10 minutes
Additional Time
1 hour 15 minutes
Total Time
2 hours 50 minutes
Ingredients
Bottom Pastry Crust:
- 1 1/4 Cups All Purpose Flour
- Pinch Salt
- 6 Tablespoons Vegan Butter
- 2 – 4 Tablespoons Cold Water
Fava Bean Filling:
- 2 Tablespoons Olive Oil
- 1 Medium Carrot, Peeled and Finely Diced
- 1 Stalks Celery, Diced
- 1/2 Small Yellow Onion, Diced
- 1 Skinny Leek, Quartered Lengthwise and Chopped (1 Cup)
- 1 Cup Roughly Chopped Crimini or Button Mushrooms
- 1/2 Teaspoon Salt
- 1 Teaspoon Cornstarch
- 1/2 Cup Plain, Unsweetened Non-Dairy Milk
- 2 Tablespoons Mirin, or Dry White Wine + 1 Teaspoon Light Agave Nectar
- 1 Teaspoon Red Wine Vinegar
- 1 Bay Leaf
- 2 Teaspoons Nutritional Yeast
- 1/4 Teaspoon Poultry Seasoning
- 1/4 Teaspoon Hot Paprika
- Pinch Freshly Ground Black Pepper
- 1 1/2 Cup Shelled and Skinned Fresh Fava Beans, or Frozen and Defrosted
- 1 Cup Chopped Asparagus (1/2-Inch Pieces)
- 1/4 Cup Fresh Parsley, Chopped
Potato Top Crust:
- 1 Medium Russet Potato
- 1/2 Tablespoon Olive Oil
- Pinch Coarse Sea Salt
- Fresh Chopped Chives or Scallion for Garnish, Optional
Instructions
- First things first, prepare the pastry dough. The easiest way is to toss the flour, salt, and margarine into a food processor, and pulse until you get a coarse consistency with lumps of margarine the size of peas. Add in the water slowly, one tablespoon a time, while continuing to pulse, until it all comes together into a cohesive dough.
- Otherwise, you can also place the flour and salt in a large bowl, and cut in the margarine by hand with a pastry cutter or two forks. Then add in the water until it comes together. Wrap up your pastry in plastic wrap, flatten it out to a rough disk, and stash it in the fridge for at least one hour, or overnight.
- Once chilled, turn the dough out on a lightly floured surface and roll it out gently, as thinly as possible without creating holes. Approximately 2 – 4 cm is ideal. Lightly oil two medium sized glass or ceramic dishes that can hold about 4 cups each, and cut out rounds of pastry slightly larger than the bowls. Ease the pastry into each prepared dish, and use your fingers to smooth out the corners and sides. Press the pastry hard against the rim of the dishes to trim it, and leave a tiny bit of overhang to help keep it standing tall while baking. Place the pastry-lined bowls in the fridge for the time being.
- Preheat your oven to 375 degrees, and set to work on the filling next.
Place a large pot or sautee pan over medium heat, and add in the oil. Once hot, toss in the prepared carrots, celery, onions, leeks, and mushrooms, and cook, stirring occasionally, for about 10 minutes. - Once softened and lightly browned, add in the salt and cornstarch, stirring well to thoroughly coat the vegetables in the starch. Pour in the “milk,” mirin, and vinegar, and mix vigorously to prevent lumps from forming. Next, incorporate the bay leaf, nutritional yeast, poultry seasoning, paprika, and black pepper, to taste. Turn down the heat to medium-low and simmer for about 15 minutes.
- Meanwhile, pull out your mandoline if you’ve got one, and slice the potato into coins of about 1 mm in thickness. You can also do this by hand with a sharp knife; Just be sure to have patience in good supply. Toss the slices with oil, and set aside.
- Turn off the heat on the filling, and toss in the fava beans, asparagus, and parsley at the last possible moment- You don’t want them to get over-cooked in the oven.
- Mix well to distribute the veggies. Divide the filling evenly between your two pastry-lined dishes, and place both on a baking sheet for easier removal from the oven, and to catch any accidental drips. Layer your potatoes in a circular pattern on top of each pie, and finish each with a light sprinkle of coarse salt. You will likely have extra potato, but hang on to them; They make for fantastic chips.
- Move the assembled pies into the preheated oven, and bake for 45 – 50 minutes, until the crust is lightly golden brown and the potatoes are browned around the edges. In case the potatoes threaten to burn, tent the pies with aluminum foil about 35 minutes into the baking process.
- Let cool for at least 10 – 15 minutes before serving, and finish with a sprinkle of chopped chives or scallion, if desired.
Recommended Products
Please note that some of the links above are affiliate links, and at no additional cost to you, I will earn a commission if you decide to make a purchase after clicking through the link. I have experience with all of these companies and I recommend them because they are helpful and useful, not because of the small commissions I make if you decide to buy something through my links.


Nutrition Information:
Yield:
4Serving Size:
1Amount Per Serving: Calories: 563Total Fat: 28gSaturated Fat: 5gTrans Fat: 3gUnsaturated Fat: 21gCholesterol: 5mgSodium: 450mgCarbohydrates: 61gFiber: 6gSugar: 11gProtein: 12g
All nutritional information presented within this site are intended for informational purposes only. I am not a certified nutritionist and any nutritional information on BitterSweetBlog.com should only be used as a general guideline. This information is provided as a courtesy and there is no guarantee that the information will be completely accurate. Even though I try to provide accurate nutritional information to the best of my ability, these figures should still be considered estimations.
TGIF – Thank God It’s Fauschnaut Day
Or more accurately, Thank God It’s the Friday after Fauschnaut Day. As per usual, I’m a day (or three) late and a recipe short. Though the “official” Fauschnaut itself is essentially a potato-based donut served dripping with a sticky, dark corn syrup, or showered in cinnamon sugar, in the free-wheeling spirit of Fat Tuesday, I figured that a slight deviation from tradition might be acceptable. Especially when the results are so delicious, and much less greasy, who could argue otherwise? Sure, the parties and celebrations may be long over, but considering that fact that these donuts are actually baked and not fried, they’re not such a sinful option even as we enter the more austere days of lent.

Originally destined for the pages of Vegan Desserts, but bumped in the final revision not out of distaste, but in favor of a more decadent, over-the-top rendition, these are more suitable treats for the everyday sort of indulgence.
If you don’t have a donut pan kicking around in your kitchen, you can also bake off the batter in a mini muffin pan to make something more akin to donut holes.
Yield: Makes 12 Doughnuts
Baked Cider Donuts

Baked and not fried, these apple-infused rings are a lighter indulgence with all the flavor and sweetness of a traditional doughnut.
Prep Time
10 minutes
Cook Time
15 minutes
Total Time
15 minutes
Ingredients
Cider Donuts:
- 2 Cups All-Purpose Flour
- 1 1/2 Teaspoon Baking Powder
- 1 1/2 Teaspoon Baking Soda
- 1/2 Teaspoon Salt
- 2 Teaspoon Ground Cinnamon
- 1/2 Teaspoon Ground Nutmeg
- 1 Teaspoon Apple Cider Vinegar
- 1/2 Cup Dark Brown Sugar
- 1/2 Cup Apple Butter (No Sugar Added)
- 1/3 Cup Maple Syrup
- 1/3 Cup Apple Cider
- 1/3 Cup Vanilla Vegan Yogurt
- 3 Tablespoons Olive Oil
Vanilla Glaze:
- 1 Cup Confectioner’s sugar
- 1 Teaspoon Vanilla Extract
- 2 Tablespoons Plain Non-Dairy Milk
Instructions
- Preheat your oven to 375 degrees. Lightly grease a donut pan.
- Bring together the dry ingredients in one bowl to start, combining the flour, baking powder, baking soda, salt, cinnamon and nutmeg. Set this bowl aside.
- In a separate bowl, stir up the wet ingredients; the sugar, apple butter, maple syrup, apple cider, yogurt, oil, and vinegar. Add the dry ingredients into the wet and stir just to combine.
- Spoon the batter into your prepared donut pan, filling the indentations half-way to the top. Pop them into the oven and bake for 10 – 14 minutes, until the tops spring back when lightly touched.
- While the donuts are baking, prepare the glaze by whisking together all of the ingredients in a shallow bowl.
- Once baked, turn the donuts out onto a wire rack and let them sit for a minute or two, until they’re cool enough to handle but still hot. Dip them into the glaze and let them completely finish cooling.
- If you want a thicker layer of glaze, either dip them a second time after the first coat has dried a bit, or wait for the donuts to cool completely before dipping.
Recommended Products
Please note that some of the links above are affiliate links, and at no additional cost to you, I will earn a commission if you decide to make a purchase after clicking through the link. I have experience with all of these companies and I recommend them because they are helpful and useful, not because of the small commissions I make if you decide to buy something through my links.


Nutrition Information:
Yield:
12Serving Size:
1Amount Per Serving: Calories: 246Total Fat: 4gSaturated Fat: 1gTrans Fat: 0gUnsaturated Fat: 3gCholesterol: 1mgSodium: 324mgCarbohydrates: 47gFiber: 1gSugar: 29gProtein: 3g
All nutritional information presented within this site are intended for informational purposes only. I am not a certified nutritionist and any nutritional information on BitterSweetBlog.com should only be used as a general guideline. This information is provided as a courtesy and there is no guarantee that the information will be completely accurate. Even though I try to provide accurate nutritional information to the best of my ability, these figures should still be considered estimations.
Au Naturel
I’ve got to hand it to them- The folks at Book Publishing Co. really know how to get serious blog coverage, as proven by the half–dozen reviews for The Natural Vegan Kitchen I’ve already spied floating about the blogosphere. Tempted by my very own copy for review, plus the opportunity for readers to win one or one of many other vegan cookbooks for themselves, it was an offer I couldn’t refuse, either.
Based on the cooking principals of macrobiotics, the emphasis on health and whole foods can be seen in every recipe, right down to the nutrition facts posted at the bottom of each page. A boon for anyone concerned about what they eat, the virtues of these methods are clear and proven in black and white. However, since most tasty nightshades are frowned upon, desserts are made without white flour or sugar, and fat is kept to a minimum, I had to wonder: At what price did these nutrition stats ring in?

Diving right in at my favorite section, desserts, the Lemon Kanten Parfaits sounded like wonderfully invigorating, citrus treats to brighten up these lingering wintery days. Skeptical of a dessert sweetened solely with apple juice, it wasn’t until I took my first spoonful that I really saw the potential in this assembly. Light, refreshing, and surprisingly satisfying, I might have preferred that the kanten set up a bit more firmly, and had a more intense lemon flavor, but I can definitely taste the makings of a winner here. Opting to laying on crushed oatmeal cookies to lend a more decadent quality and finishing off with a dollop of rich cashew creme, the dessert on a whole was wonderfully well-balanced. Call it the sleeper hit of the book, I was greatly impressed by this initial offering.
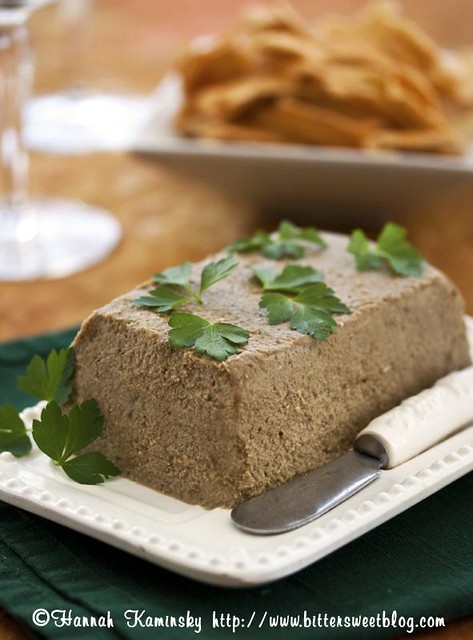
Unfortunately, the same can not be said about the Lentil-Walnut Pate. Thrilled to discover that I already had everything required on hand, I whipped it up in a flash and was chowing down in no time. What met my tongue, however, was a bland, mushy paste completely devoid of personality or interest. Perhaps with more aggressive seasoning or a creative blend of flavorful spices, it might be improved, but this one as written gets a big “thumbs down” from me.

Craving a hearty meal to warm up a chilly evening, the Moroccan Vegetable Stew Over Couscous immediately stood out as a “must make.” Substituting soy curls for the seitan and switching out the currants for green peas, (due to my well-documented distaste for dried fruits in savory dishes) the preparation was very straight-forward and dinner was on the table before I could even arrange place settings. Packed with tender butternut and the “meaty” duo of soy curls and chickpeas, all served over fluffy couscous, this was one seriously satisfying dish. Warmly spiced but not hot, even the most timid of palates could appreciate this flavor profile. Rounded out by the inherent sweetness of the squash, yet again, I found it an incredibly well thought out composition of complementary elements.
Yield: Makes 6 Servings
Moroccan Vegetable Stew over Couscous

Packed with tender butternut and the “meaty” duo of soy curls and chickpeas, all served over fluffy couscous, this was one seriously satisfying dish. Warmly spiced but not hot, even the most timid of palates could appreciate this flavor profile.
Prep Time
5 minutes
Cook Time
20 minutes
Additional Time
30 minutes
Total Time
55 minutes
Ingredients
Moroccan Vegetable Stew
- 2 Tablespoons Water
- 1 Teaspoon Olive Oil
- 2 Medium Carrots, Sliced Thinly
- 2 Cups Peeled and Cubed Butternut Squash
- 1 Cup Diced Onion
- 2 Cloves Minced Garlic (2 Teaspoons)
- 1 Teaspoon Ground Cumin
- 2 Cups Cooked Chickpeas
- 2 Cups Thinly Sliced Seitan or Rehydrated Soy Curls
- 1 14-Ounce Can Diced Tomatoes
- 1 1/2 Cups Vegetable Broth
- 1/3 Cup Frozen Peas
- 1/2 Teaspoon Ground Cinnamon
- 1/2 Teaspoon Salt
- 1/8 Teaspoon Crushed Red Pepper Flakes
To Serve
- 1 Cup Dry Couscous
- 2 Tablespoons Chopped Fresh Parsley
- 2 Tablespoons Lemon Zest
Instructions
- Heat the water and oil in a stock pot over medium heat. Add the carrots, butternut, onion, garlic, and cumin. Cook and stir occasionally for 5 – 10 minutes, until the vegetables are tender. Add in the chickpeas, seitan or soy curls, tomatoes, broth, peas, and spices, and bring to a boil over medium-high heat. Decrease the heat to low, cover, and simmer for 30 minutes so that the flavors can meld.
- Cook the couscous according to the instructions (I typically boil twice as much water by volume to couscous, turn off the heat, add the dry couscous, cover, and let sit for 5 minutes. Fluff with a fork before serving) and ladle the stew over the couscous. Top with parsley and lemon zest to garnish.
Notes
Adapted from The Natural Vegan Kitchen by Christine Waltermyer with Permission from Book Publishing Co
Nutrition Information:
Yield:
6Serving Size:
1Amount Per Serving: Calories: 344Total Fat: 3gSaturated Fat: 0gTrans Fat: 0gUnsaturated Fat: 2gCholesterol: 0mgSodium: 458mgCarbohydrates: 50gFiber: 11gSugar: 9gProtein: 31g
Springing Up Everywhere
Stubborn as ever, the lack of spring vegetables and 30-degree sunshine doesn’t deter me from celebrating the premature arrival of the new season. Besides, the tiny buds of crocuses are already beginning to peer up from the tender, half-frozen earth, and that’s reinforcement enough for me.
Turning to the only edible that’s is reliably and unfailingly available so early in the season, the fridge has been stocked to the brim with fresh herbs. Mint, parsley, dill, basil, and cilantro; I don’t think there have ever been so many choices of flavorful greenery on hand at one time.

Because everything is better in cute little individual portions, I fashioned my bread into muffins, while bumping up the herb content to accommodate my vast selection. A cross between a light muffin and a fluffy biscuit, even I was impressed with how well this off-the-cuff adaptation came out. Add in rich, cheesy cheddar flavor, and you’ve got yourself a winning combination.

Both hearty and light, thanks to that vibrant herbal addition, these muffins managed to strike that fine balance between seasons that I’m still struggling with myself. Any combination of herbs would likely work just as well, so don’t be afraid to switch it up if you don’t have these exact greens on hand.
Yield: Makes 9 - 12 Muffins
Cheddar Herb Muffins

A cross between a muffin and a biscuit, both hearty and light, fresh herbs balance out rich cheesy flavor in this savory vegan treat.
Prep Time
10 minutes
Cook Time
20 minutes
Additional Time
10 minutes
Total Time
40 minutes
Ingredients
- 1 Cup Unsweetened Non-Dairy Milk
- 1/3 Cup Olive Oil
- 1 Teaspoon Apple Cider Vinegar
- 1 3/4 Cups All Purpose Flour
- 1 1/2 Teaspoons Baking Powder
- 1/2 Teaspoon Baking Soda
- 1/2 Teaspoon Salt
- 1/2 Teaspoon Smoked Paprika
- 1/4 Teaspoon Freshly Ground Black Pepper
- 4 Ounces (1 Cup) Vegan Shredded Cheddar
- 1/3 Cup Chopped Scallions
- 1/4 Cup Chopped Fresh Basil
- 3 Tablespoons Chopped Fresh Dill
- 1/2 Cup Chopped Walnuts, Toasted
Instructions
- Preheat your oven to 375 degrees, and lightly grease 9 – 12 medium muffin tins.
In a large measuring pitcher, combine the non-dairy milk, oil, and vinegar. Stir well, and let sit for at least 5 minutes for the milk to curdle. - Meanwhile, in a separate bowl, whisk together the flour, baking soda and powder, salt, paprika, and pepper, making sure that all of the ingredients are distributed evenly throughout the mixture. Add in the cheese, chopped herbs, and walnuts, and mix well.
- Pour the pitcher of wet ingredients into the bowl of dry, and use a wide spatula to bring the two together, stirring as few times as possible to create a mostly smooth batter. A few lumps are just fine, and certainly beat an over-mixed, tough dough.
- Scoop the batter into your prepared muffin tins, mounding it up in the centers. Depending on how large you want you muffins, fill the tins either just to the top, or pile the batter on well over the rim. Naturally, I like my muffins big and bountiful, so I got fewer out of the mix.
- Move your muffin tin into the oven, and bake for 16 – 20 minutes, until a toothpick inserted into the centers comes out clean and dry. If the muffins seem slightly pale at that point, just run them under the broiler for 1 – 3 more minutes, until nicely golden brown.
- Let rest in the tins for 10 minutes before transferring to a wire rack to cool completely. Serve warm or toasted, along side a hearty bowl of soup, stew, or just with a faint smear of buttery spread.
Recommended Products
Please note that some of the links above are affiliate links, and at no additional cost to you, I will earn a commission if you decide to make a purchase after clicking through the link. I have experience with all of these companies and I recommend them because they are helpful and useful, not because of the small commissions I make if you decide to buy something through my links.


Nutrition Information:
Yield:
12Serving Size:
1Amount Per Serving: Calories: 202Total Fat: 13gSaturated Fat: 3gTrans Fat: 0gUnsaturated Fat: 9gCholesterol: 11mgSodium: 274mgCarbohydrates: 16gFiber: 1gSugar: 1gProtein: 6g
All nutritional information presented within this site are intended for informational purposes only. I am not a certified nutritionist and any nutritional information on BitterSweetBlog.com should only be used as a general guideline. This information is provided as a courtesy and there is no guarantee that the information will be completely accurate. Even though I try to provide accurate nutritional information to the best of my ability, these figures should still be considered estimations.