Hop Into the New Year

“Best of” lists and top-twelve countdowns litter the airwaves and blogosphere alike, rehashing the highlights of the passing year on an endless loop. 2012, for better or for worse, was a year of pivotal events that will continue to cast a long shadow over the future of many. Even for those living it, the true meanings of those days are hard to take in, to fully appreciate and turn over rationally in one’s mind.

At least on a much smaller scale, it’s safe to say that the successes and celebrations far outnumbered the moments of despair on this little blog, and incredibly, BitterSweet survives to see another year. Still, I’d much rather move forward, onward and upwards, rather than continue to look back. Shouldn’t we start making new memories to rejoice in right away?

New Year’s Eve is one of the few times I allow myself to be superstitious in the least. Adopting the practices of a dozen different cultures, the momentous occasion is typically observed by a day of cleaning, scrubbing the physical grime and digital disorder out of my life. Kagami mochi is prepared and erected in the kitchen, although never eaten. (Our tradition is to set it on fire a week into the new year, but that’s another story.)

What are traditionally lucky foods?

Most importantly, of course, are the first few foods, which must be just as full of symbolic luck as they are flavor. Greens are necessary no matter what the course, promising wealth in the form of monetary greens later. Peas and beans swell when cooked, suggesting prosperity. The combination of the two more directly represent health, because what could be more wholesome than greens and beans? I think you see where I’m going with this.

Hoppin’ John, the southern staple, featuring collard greens, black-eyed peas, and rice, has tons of unfulfilled potential. Typically weighed down with pork but light on spices, through my eyes as an outsider, there seemed to be room for improvement. Turning the dish into a creamy, well-balanced risotto, it can play the role of either a side or the star of the show on any dinner table. Incredibly savory and soothing, it’s the perfect heart-warming and rib-sticking dish for these chilly early January days. Whether it actually brings in luck or not for the new year, anyone should feel lucky enough just to steal a bite.

Yield: Makes 4 - 6 Servings

Hoppin' John Risotto

Hoppin' John Risotto

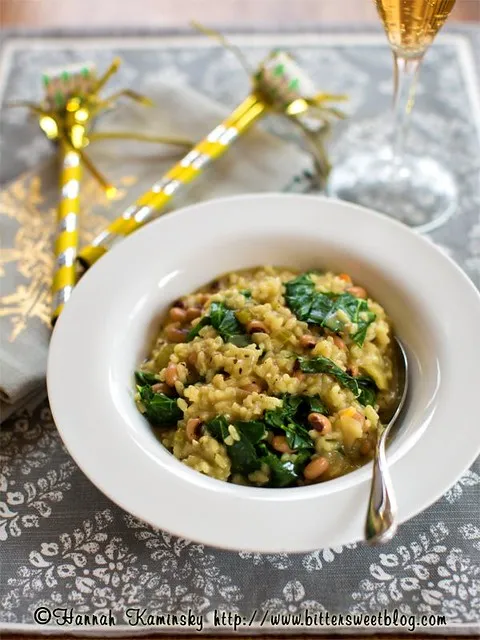
Turn Hoppin' John into a creamy risotto and it can play the role of either a side or the star of the show on any dinner table. Featuring blackeyed peas and collard greens, it's sure to bring luck and comfort your way.

Prep Time 10 minutes
Cook Time 40 minutes
Total Time 50 minutes

Ingredients

  • 1 Bunch (About 1 Pound) Fresh Collard Greens, Thoroughly Washed and Dried, Stemmed and Chopped
  • 1 14-Ounce Can (1 3/4 Cup) Black-Eyed Peas, Rinsed and Drained
  • 2 Tablespoons Olive Oil
  • 2 Tablespoons Vegan Butter or Coconut Oil
  • 4 1/2- 5 Cups Vegetable Stock
  • 1 Medium Yellow Onion, Diced
  • 1/2 Medium Red, Orange, or Yellow Bell Pepper, Diced
  • 2 Stalks Celery, Diced
  • 3 - 4 Garlic Cloves, Finely Minced
  • 1 1/2 Cups Sushi Rice*
  • 1/2 Cup Dry White Wine or Water
  • 1/2 Cup Full-Fat Coconut Milk
  • 2 Tablespoons Braggs Liquid Aminos or Soy Sauce
  • 1/4 Cup Nutritional Yeast
  • 1 1/2 Teaspoons Dried Thyme
  • 1/2 Teaspoon Dried Oregano
  • 1 Dried Bay Leaf
  • 1/4 Teaspoon Crushed Red Pepper Flakes
  • 1/4 Teaspoon Freshly Ground Black Pepper
  • 1/2 Teaspoon Liquid Smoke
  • Salt and Pepper, to Taste

Instructions

  1. Begin by prepping all of the vegetables so that it’s a streamlined process to add them all in later. Starting heating the oil and butter or coconut oil in a large stock pot or saucepan over medium heat. Pour the vegetable stock into a separate saucepan and heat over a second burner on medium heat. Keep this covered, just below a simmer at all times.
  2. Add the chopped onion into the large pot, stirring to coat the the hot fat. Sweat and saute for 2 – 4 minutes, until semitransparent and aromatic, before tossing in the bell pepper, celery, and garlic as well. Continue cooking, stirring occasionally, for about 5 – 8 minutes to soften all the vegetables, just barely beginning to brown them around the edges. Add in the rice last, stirring well to coat with the oil and vegetable liquid, for about 2 minutes or until somewhat translucent in appearance.
  3. Deglaze the pan by slowly pouring in the wine or water, carefully scraping up any bits that might be stuck to the bottom. Turn down the heat to medium-low. Add in the coconut milk, liquid aminos or soy sauce, nutritional yeast, and all of the remaining herbs and spices. Bring the liquid up to a simmer, and once it has mostly absorbed into the rice, add in 1 cup of the hot stock.
  4. Continue to cook gently, stirring every few minutes to check on the consistency, adding in another 1/2 – 1 cup of the stock as needed. The rice should cook for about 20 – 25 minutes, until tender but creamy. In the final 10 minutes of cooking, incorporate the beans and greens, adding the greens a few handfuls at a time so that they can wilt down and not overflow out of the pot.
  5. Always keep the mixture looking somewhat liquid-y without being soupy; remember, this is not a pilaf where you want dry, distinct grains.  Add salt and pepper to taste, and remove the bay leaf before serving. Enjoy immediately, as the rice will continue to thicken as it cools.

Notes

*Purists may cry afoul, but yes, sushi rice is my grain of choice for risotto. Arborio or carnaroli rice are the “authentic” options, but I find sushi rice every bit as creamy, tender, and clean-tasting, not to mention far cheaper.

Recommended Products

Please note that some of the links above are affiliate links, and at no additional cost to you, I will earn a commission if you decide to make a purchase after clicking through the link. I have experience with all of these companies and I recommend them because they are helpful and useful, not because of the small commissions I make if you decide to buy something through my links.

Nutrition Information:

Yield:

6

Serving Size:

1

Amount Per Serving: Calories: 373Total Fat: 17gSaturated Fat: 7gTrans Fat: 1gUnsaturated Fat: 8gCholesterol: 0mgSodium: 3089mgCarbohydrates: 43gFiber: 8gSugar: 12gProtein: 12g

All nutritional information presented within this site are intended for informational purposes only. I am not a certified nutritionist and any nutritional information on BitterSweetBlog.com should only be used as a general guideline. This information is provided as a courtesy and there is no guarantee that the information will be completely accurate. Even though I try to provide accurate nutritional information to the best of my ability, these figures should still be considered estimations.


Traditional Takeout

As young children across the country feverishly unwrap mounds of tinsel-clad packages, parents tending a huge roast with all the fixings for dinner, an entirely different tradition marks my Christmas day. The classic Jewish Christmas, otherwise known as seeing a movie and getting Chinese food takeout, seems to be growing in popularity. Who knew it was even a thing 5, 10 years ago? Suddenly everyone knows about this once obscure and occasionally controversial plan. In fact, quite a few families that still lovingly string up Christmas trees and sing carols every year also join in on the fun, too. It’s the ultimate secular holiday that everyone can enjoy.

Options may be limited for fellow meatless eaters, but no matter how many times I get plain old broccoli and tofu, it just never gets old. Maybe the MSG makes it particularly addictive, but there are few things quite as satisfying as the instant gratification of savory, salty brown sauce smothering cubes of crispy fried bean curd and tender green florets. Venturing to recreate this endlessly versatile sauce, suddenly the sky is the limit for protein alternatives. As an extra-special treat this year, a rare package of Konjac-based vegan shrimp remained on ice, tucked away in the back of the freezer for just such an opportunity.

Disarmingly similar in coloring and surprisingly bouncy, their chewy texture was disconcertingly similar to actual seafood, according to the omnivores at the table. They imparted relatively little flavor though, for better or for worse, so while novel, I think I’d still prefer my tofu standby. Next time, I’ll gladly fire up the oil and toss in a few cubes instead, although you can’t go too far wrong with a solid brown sauce.

Yield: Makes 3 - 4 Servings

Vegan Shrimp and Broccoli

Vegan Shrimp and Broccoli

Quick, easy, and always satisfying, it's hard to be a savory brown sauce over any combination of protein and vegetables. Plant-based shrimp make this version unique, but you can always substitute your favorite meatless alternative.

Prep Time 5 minutes
Cook Time 10 minutes
Total Time 15 minutes

Ingredients

Shrimp and Broccoli:

  • 1/2 Pound (1 Package) Frozen Vegan Shrimp, or 1 Pound Fried Tofu
  • 1 Pound Fresh Broccoli, Cut into Florets

Brown Sauce:

  • 1 Tablespoon Toasted Sesame Oil
  • 3 Cloves Garlic, Finely Minced
  • 1 Tablespoon Fresh Ginger, Grated
  • 1/3 Cup Soy Sauce
  • 1 Cup Vegetable Stock
  • 1/3 Cup Mirin
  • 1/4 Teaspoon Crushed Red Pepper Flakes
  • 2 Tablespoons Cornstarch

To Serve:

  • Sesame Seeds, to Garnish (Optional)
  • Cooked White Rice, to Serve

Instructions

  1. Thaw out the frozen shrimp if using or prepare your tofu. Place the broccoli florets in a microwave-safe dish with a splash of water, and steam for 2 – 4 minutes, until fork-tender. Drain and blanch in ice water to stop the cooking and keep the broccoli bright green. Set aside.
  2. To prepare the brown sauce, begin by heating the sesame oil in a medium saucepan over medium heat. Add in the garlic and ginger, and cook briefly, until aromatic. Meanwhile, whisk together all of the remaining ingredient in a separate bowl, being sure to beat out any clumps of starch so that the mixture is completely smooth. Carefully pour the liquids into the hot pan, standing away from the stove in case of any splash back. Whisk gently as the sauce comes up to temperature, until it reaches a full boil and has visible thickened. Turn off the heat and let the sauce cool for a minute or two.
  3. Place the broccoli and shrimp (or tofu) in a large bowl, and toss with a sizable dollop of brown sauce. There will likely be extra sauce, so apply it sparingly. Continue drizzling in sauce until the goodies are coated to your liking. Transfer to a serving bowl and top with a light sprinkling of sesame seeds. Enjoy with a mound of hot rice and have a happy holiday!

Recommended Products

As an Amazon Associate and member of other affiliate programs, I earn from qualifying purchases.

Nutrition Information:

Yield:

4

Serving Size:

1

Amount Per Serving: Calories: 330Total Fat: 10gSaturated Fat: 2gTrans Fat: 0gUnsaturated Fat: 8gCholesterol: 120mgSodium: 1909mgCarbohydrates: 38gFiber: 5gSugar: 11gProtein: 21g

All nutritional information presented within this site are intended for informational purposes only. I am not a certified nutritionist and any nutritional information on BitterSweetBlog.com should only be used as a general guideline. This information is provided as a courtesy and there is no guarantee that the information will be completely accurate. Even though I try to provide accurate nutritional information to the best of my ability, these figures should still be considered estimations.


Popping Up Everywhere

The connection between Christmas and popcorn is tenuous at best, and yet is deeply rooted in the traditions of so many families. Whether it appears in ball format or strings adorning the annual evergreen tree, there is no escaping, nor explaining, those exploded edible kernels around the holiday season. Even as an outsider, I can’t help but associate this otherwise innocuous snack food with the frenzy of festive treats, weaving them into various gifts more often than not. Not even the all-knowing Google can provide a satisfying explanation to the centuries-old affiliation, and yet it remains, as relevant and convincing as ever.

And so come December, the popcorn comes out in force once again. This year, I opted to skip all the fussy individual balls, pressing the whole sticky mixture into one square baking dish instead. Easily yielding neat rectangular bars, they now fit seamlessly onto a cookie platter, amongst other sweet options or featured by themselves. Taking one more short cut by employing popcorn cereal rather than freshly popped maize may seem like a poor choice, but the corny essence still shines through loud and clear. Without the sharp hulls, they pose fewer potential hazards for sticking in between teeth, and there’s no risk of including unpopped kernels. An emergency trip to the dentist is not my idea of a Merry Christmas.

Perfectly festive red and green mix-ins add the excitement here, but if cranberries and pistachios are not your favorites, don’t be afraid to stray into more diverse ingredient pools. Dried cherries, strawberries, or raspberries would be alternatives that still keep the color theme, and of course the options are endless for other hues.

Yield: Makes 12 – 16 Bars

Christmas Popcorn Bars

Christmas Popcorn Bars

Popcorn balls reimagined as neat rectangular bars, they now fit seamlessly onto a cookie platter. Pistachios and cranberries are perfectly festive red and green mix-ins with a spirited nutty, tangy, and tart taste.

Prep Time 5 minutes
Cook Time 15 minutes
Additional Time 1 hour
Total Time 1 hour 20 minutes

Ingredients

  • 6 Cups Puffed Corn Cereal
  • 1 Cup Dried Cranberries
  • 3/4 Cup Shelled, Unsalted Pistachios, Toasted
  • 1/2 Cup Vegan White Chocolate Chips, Divided
  • 1 Tablespoon Vegan Butter or Coconut Oil, Melted
  • 1 Cup Light Corn Syrup or Light Agave Nectar
  • 1 Cup Granulated Sugar
  • 1/4 Teaspoon Salt
  • 1 Teaspoon Vanilla Extract

Instructions

  1. Pour the cereal, cranberries, pistachios, and half of the white chocolate chips into a very large bowl and set it aside, but keep it near the stove for easy access.
  2. Lightly grease an 8 x 8-inch square baking pan. Set a saucepan over medium heat and add in the butter or coconut oil, along with the corn syrup or agave, sugar, and salt stirring just to moisten all of the dry sweetener. From this point on, resist the temptation to stir the mixture, but swirl the pan gently instead to mix. This will prevent large sugar crystals from forming.
  3. Allow the syrup to cook until it bubbles up vigorously and becomes frothy. Reduce the heat slightly so that it’s at a steady but low boil and cook for about 5 minutes. Turn off the stove and stir in the vanilla. Pour the hot sugar mixture over your waiting cereal and mix-ins, carefully but quickly fold it in using a wide spatula. Transfer the sticky cereal into your prepared pan, and press gently using the spatula so that it evenly fills the space. Sprinkle the remaining white chocolate chips over the top, pressing them in gently so they adhere.
  4. Let cool completely before turning the whole sweet block out and slicing into bars.

Notes

If you can't find vegan white chocolate, you can use your favorite dark chocolate chips (semi-sweet or bitter sweet) instead.

Recommended Products

Please note that some of the links above are affiliate links, and at no additional cost to you, I will earn a commission if you decide to make a purchase after clicking through the link. I have experience with all of these companies and I recommend them because they are helpful and useful, not because of the small commissions I make if you decide to buy something through my links.

Nutrition Information:

Yield:

16

Serving Size:

1

Amount Per Serving: Calories: 227Total Fat: 4gSaturated Fat: 2gTrans Fat: 0gUnsaturated Fat: 1gCholesterol: 1mgSodium: 135mgCarbohydrates: 51gFiber: 1gSugar: 41gProtein: 1g

All nutritional information presented within this site are intended for informational purposes only. I am not a certified nutritionist and any nutritional information on BitterSweetBlog.com should only be used as a general guideline. This information is provided as a courtesy and there is no guarantee that the information will be completely accurate. Even though I try to provide accurate nutritional information to the best of my ability, these figures should still be considered estimations.

Run, Run, as Fast as You Can…

…But you’ll never escape my ravenous sweet tooth, Mr. Gingerbread Man.

Fully embracing the temptations of excess, especially abundant in this celebratory season, all I want to make and eat is candy. Typically, just a bite or two of concentrated sweetness will do me, but reaching a sugar coma has seemed to be the end goal recently. At least, that’s how the revelry tends to end, with my poor throbbing head so much the worse for wear. Must the desire for a few extra comforting confections always carry such a terrible price tag? Turns out that raw nuts help quite a bit to satiate the inner sweet-toothed monster, and a handful of whole grains give even tiny morsels far greater staying power.

When Hodgson Mill originally sent a box of pro bono flours and baking mixes, I found myself stumped by the pre-measured mixtures. They’re simply not something I stock my pantry with or employ, so straight away, it was a curious puzzle: What can be made with cake mix, that isn’t cake? Perhaps it’s fudging the boundaries of definition a bit, but how about cake truffles?

With a half-empty jar of speculoos spread just begging to be finished off, the pairing was inevitable, and a delicious match indeed. Enrobed in dark chocolate, the tender cake centers have just enough spice and sweetness to disguise the whole wheat and flax within. Each bite yields nothing but candy bliss, without the sugar hangover afterward.

Better yet, these adorable treats can be dressed up as cake pops. Adorable hand-held gifts or party favors, not a single one of these gingerbread men will escape the mouths of delighted guests.

Naturally, you can just as well whip up a little over one pound of gingerbread cake from any recipe you desire, boxed or fully homemade. Just be mindful of the amount of sugar, because the frosting itself is quite sweet. In the end, though, it’s all good when it’s dipped in chocolate.

Yield: Makes 30 – 40 Truffles

Speculoos Gingerbread Cake Truffles

Speculoos Gingerbread Cake Truffles

Enrobed in dark chocolate, the tender gingerbread cake meets cinnamon-spiced speculoos spread, creating a harmonious balance of rich, warm flavors. Each bite is a delightful fusion of cozy holiday spices and indulgent sweetness, making it the perfect treat for the season.

Prep Time 45 minutes
Cook Time 30 minutes
Additional Time 3 hours
Total Time 4 hours 15 minutes

Ingredients

Gingerbread Cake:

  • 1 15-Ounce Package Vegan Gingerbread Cake Mix
  • 1 1/2 Cups Plain Non-Dairy Milk
  • 1/2 Tablespoon Whole Flaxseeds, Ground
  • 2 Tablespoons Water
  • 1/2 Teaspoon Apple Cider Vinegar
  • 1/4 Cup Olive Oil

Speculoos Frosting:

  • 3/4 Cup Speculoos Spread
  • 1/4 Cup Vegan Butter, at Room Temperature
  • 1 Cup Confectioner’s Sugar
  • 1/2 – 1 Tablespoon Plain Non-Dairy Milk

Chocolate Coating:

  • 12 Ounces (2 Cups) Semi-Sweet Chocolate Chips
  • 2 Tablespoons Coconut Oil or 100% Cocoa Butter
  • Optional Additions and Garnishes:

Small Lollipop Sticks

  • Colored Nonpareil Sprinkles
  • Chocolate Jimmies*

Instructions

  1. Preheat your oven to 350 degrees and lightly grease an 8 x 8 square pan.
    In a large bowl, whisk all of the cake ingredients together until thoroughly combined, with no pockets of dry ingredients remaining. Bake for 28 – 32 minutes, until set around the edges and a toothpick inserted into the center of the cake pulls out cleanly, without any slick of raw batter. Let cool completely before breaking up the cake and crumbling it into small, even pieces.
  2. The frosting is equally effortless and speedy: Place the speculoos spread, vegan butter, and confectioner’s sugar in the bowl of your stand mixer, and start the machine on a low speed. Once the powder has been incorporated and is no longer at risk of flying out, turn up the speed to high, and slowly drizzle in the milk, until the frosting is smooth, homogeneous, and a spreadable consistency.
  3. Add a modest dollop into the bowl of cake crumbs and mix it all around. This is a messy job, as the best way to combine the two components is to get in there with your hands. Don’t be shy! It could be a fun job for the kids to help out with, too. Add in more frosting as needed, until the mixture just comes together when squeezed. You will likely have extra frosting, so don’t be tempted to add all of it, lest you want mushy truffles.
  4. Dump the cake mixture out onto a silicone baking mat or piece of parchment paper, and flatten it out to about 1/2 – 3/4 inch in thickness. Use a small gingerbread man cookie cutter to cut out the shapes, pulling away the excess. Recombine the extra “dough”, flatten out once more, and cut more figures until the cake is all used up. Insert sticks now if using, and carefully move the silicone baking mat or parchment onto a baking sheet. Place the whole thing in the freezer on a flat surface, and let freeze for at least 3 hours, until solid.
  5. To coat the truffles, combine the chocolate and coconut oil or cocoa butter in a microwave-safe dish, and heat for 60 seconds. Stir very well until the mixture is smooth. If there are still a few stubborn chips that refuse to melt, continue heating the coating at 30 second intervals, stirring thoroughly between each, until entirely lump-free.
  6. Dip each truffle center, one at a time, into the melted chocolate. Use a fork to pull individual truffles out of the mixture and allow the excess coating to drip free. Be especially careful with any truffles on sticks, because they are particularly delicate. Move each piece back onto the silicone baking mat or piece of parchment paper, and quickly add sprinkles for the eyes and mouth before the coating solidifies. Repeat with the remaining truffles. Store in the fridge in an airtight container.

Notes

*Before dipping the truffles, go through the bottle of sprinkles and pick out any that have a slight curve to them. The majority will be straight, but if you look closely enough, you will find plenty that are “smiling.” You may also want to apply your sprinkles with a pair of tweezers for the most precision.

Recommended Products

Please note that some of the links above are affiliate links, and at no additional cost to you, I will earn a commission if you decide to make a purchase after clicking through the link. I have experience with all of these companies and I recommend them because they are helpful and useful, not because of the small commissions I make if you decide to buy something through my links.

Nutrition Information:

Yield:

40

Serving Size:

1

Amount Per Serving: Calories: 219Total Fat: 11gSaturated Fat: 4gTrans Fat: 0gUnsaturated Fat: 6gCholesterol: 3mgSodium: 146mgCarbohydrates: 30gFiber: 1gSugar: 20gProtein: 2g

All nutritional information presented within this site are intended for informational purposes only. I am not a certified nutritionist and any nutritional information on BitterSweetBlog.com should only be used as a general guideline. This information is provided as a courtesy and there is no guarantee that the information will be completely accurate. Even though I try to provide accurate nutritional information to the best of my ability, these figures should still be considered estimations.


Holly, Jolly, Nog-gy

Thank goodness Christmas is still ahead of us. Winding down one winter holiday so early in the season turns out to be a brilliant stroke of good luck, because now the celebrations can go on twice as long. Eggnog is hands-down my favorite flavor of the upcoming fete, despite the fact that I’ve never had a nog with egg in it. An rich and frothy beverage combining all the best sweet, savory, and salty elements that could possibly mingle in one glass, it doesn’t have to be “authentic” to be utterly delicious. As long as there’s a light splash of rum and a generous sprinkle of nutmeg, it’s all nog to me.

Converting those essential essences into a bite-sized sweet treat was a must for gift giving and snacking this year. A truffle of a different color, these would be beautiful mixed into an assortment of various spiced, mint, or dark and candies as well. In fewer words, they play well with others.

Yield: Makes 12 – 18 Truffles

Nog Truffles

Nog Truffles

Convert the essential essences of eggnog into a bite-sized sweet treat for foolproof success in gift giving and holiday snacking.

Ingredients

Nog Truffles:

  • 1 Cup Raw Whole Cashews, Soaked for 2 – 3 Hours and Thoroughly Drained
  • 1/4 Cup Light Agave Nectar
  • 1/4 Cup (2 Ounces) 100% Pure Cocoa Butter, Melted
  • 1 Tablespoon Dark Rum
  • 2 Teaspoons Vanilla Extract
  • 1 1/2 Teaspoons Nutritional Yeast
  • 1/4 Teaspoon Ground Nutmeg
  • 1/2 Teaspoon Ground Cinnamon
  • 1/4 Teaspoon Kala Namak (Black Salt)

White Chocolate Coating:

  • 2/3 Cup Vegan White Chocolate Chips
  • 1 Tablespoon 100% Pure Cocoa Butter
  • Ground Nutmeg, to Garnish

Instructions

  1. Place the soaked and drained cashews in your blender or food processor, along with all of the remaining ingredients that make up the centers. Blend until completely and perfectly smooth, pausing to scrape down the sides of the work bowl as needed to ensure that all small nut fragments are incorporated.
  2. Transfer the sweet puree to a heat-safe bowl and let rest in the freezer until firm; at least 1 hour.
  3. Retrieve the truffle centers from the freezer and use a small cookie scoop or 2 spoons to scoop out about 1 tablespoon of the mixture at a time, rolling the chunks into smooth balls between the palms of your hands.
  4. Place the rounded centers onto a silicone baking mat or piece of parchment paper on top of a sheet pan, and repeat until the mixture is used up. Work quickly to prevent the filling from becoming too soft and unworkable. Move the whole sheet of naked truffles back into the freezer on a flat surface, and chill until solid; at least another hour.
  5. When you’re ready to finish off the candies, combine the white chocolate chips and cocoa butter in a microwave-safe dish, and heat for 60 seconds. Stir very well until the mixture is smooth. If there are still a few stubborn chips that refuse to melt, continue heating the coating at 30 second intervals, stirring thoroughly between each, until entirely lump-free.
  6. Dip each truffle center, one at a time, into the melted white chocolate. Use a fork to pull them out of the mixture and allow the excess coating to drip free.
  7. Move each piece back onto the silcone baking mat or piece of parchment paper, and quickly sprinkle lightly with additional ground nutmeg before the coating solidifies. Repeat with the remaining truffles. Store at room temperature in an air-tight container.

Recommended Products

Please note that some of the links above are affiliate links, and at no additional cost to you, I will earn a commission if you decide to make a purchase after clicking through the link. I have experience with all of these companies and I recommend them because they are helpful and useful, not because of the small commissions I make if you decide to buy something through my links.

Nutrition Information:

Yield:

18

Serving Size:

1

Amount Per Serving: Calories: 100Total Fat: 7gSaturated Fat: 3gTrans Fat: 0gUnsaturated Fat: 4gCholesterol: 1mgSodium: 55mgCarbohydrates: 9gFiber: 0gSugar: 6gProtein: 2g

All nutritional information presented within this site are intended for informational purposes only. I am not a certified nutritionist and any nutritional information on BitterSweetBlog.com should only be used as a general guideline. This information is provided as a courtesy and there is no guarantee that the information will be completely accurate. Even though I try to provide accurate nutritional information to the best of my ability, these figures should still be considered estimations.


I Have a Little Latke

Chanukah celebrations already well underway, we approach the sixth of eight nights this evening, bringing the holiday ever nearer to a close. Before many people have even had the chance to drag an evergreen tree into their living rooms or sing one carol, menorahs will be cooled and put away for another year. Crazy how fast it’s sped by this time around! I’m still struggling to keep up, injecting extra holiday cheer into what seem like otherwise ordinary winter days. That’s why I’d make the argument that it’s not at all too late for latkes- In fact, the early date of Chanukah means that these luscious potato pancakes should be fair game through the rest of the month, while everyone else is still celebrating Christmas, too.

Hopefully no one expects an average latke out of me by now. This year, my starchy spud cakes are thick, tender on the inside with a crisp exterior, perfumed throughout with rich Indian spices. Inspired by a favorite takeout dish, Bombay Aloo, this nontraditional take on the standard Chanukah staple will make it hard to go back to plain potatoes. Brightened with piquant jalapeno and a complex blend of garam masala, they’re just spicy enough to add excitement without setting the most timid of palates on fire. Pairing beautifully with the standard sour creme, you could also embrace the theme and switch out the typical applesauce for a sweet and savory apple chutney instead. Whatever you do, don’t let this opportunity to enjoy latkes pass you by.

Yield: Makes 10 – 12 Thick Latkes, 16 – 18 Thinner, Smaller Latkes

Bombay Aloo Latkes

Bombay Aloo Latkes

Inspired by a favorite takeout dish, Bombay Aloo, this nontraditional take on the standard Chanukah staple will make it hard to go back to plain potatoes. Brightened with piquant jalapeno and a complex blend of garam masala, they’re just spicy enough to add excitement without setting the most timid of palates on fire.

Cook Time 20 minutes
Total Time 20 minutes

Ingredients

  • 2 Pounds Yukon Gold Potatoes, Peeled and Shredded
  • 1/2 Small Yellow Onion, Shredded
  • 1 Medium Fresh Jalapeno, Finely Minced
  • 1 1/2 Tablespoons Grated Fresh Ginger
  • 4 Cloves Garlic, Finely Minced
  • 1 1/4 Teaspoons Garam Masala
  • 1 Teaspoon Whole Cumin Seeds, Toasted
  • 3/4 Teaspoon Turmeric
  • 3/4 Teaspoon Salt
  • 2 Tablespoons Tomato Paste
  • 1 1/2 Teaspoons Lemon Juice
  • 1/4 Cup Potato Starch or Cornstarch
  • About 1/4 Cup Canola Oil, for Frying

Instructions

  1. After running both the potatoes and onion through the shredder (the food processor attachment is easiest, in my opinion) place both in a strainer and press down firmly, extracting as much liquid as possible. No need to get too crazy, but you should be able to remove about 1/3 cup starchy potato water. This will help the shreds hold together better while cooking.
  2. In a large bowl, mix together the minced jalapeno, ginger, garlic, spices, salt, and tomato paste until smooth. Add in the drained potatoes, drizzling them first with the lemon juice before tossing with the seasonings. Stir well to blend the paste throughout, getting in there and using your hands as needed. Sprinkle the cornstarch over last, tossing to coat and evenly distribute throughout the shreds.
  3. Heat about half of the oil in a medium-sized skillet over moderate heat. Once the oil is shimmering, it’s hot enough to start cooking up the latkes. For large, thick potato pancakes, I use about 1/3 cup of firmly packed shreds, using the measuring cup to mold them into an even round. Press the potato puck out lightly, so that it’s about 1 cm thick. For more dainty latkes, use closer to 1/4 cup of loosely packed shreds, flattening them out to about 1/2 cm thick. Cook no more than 3 latkes at one time, giving them all enough space to comfortable flip when the time comes.
  4. Allow the latkes to sizzle undisturbed for about 3 – 5 minutes on each side, flipping only once. When they’re golden brown on both sides, remove the latkes to paper towel-lined plates to drain. Add more oil to the skillet as needed for additional latkes. Serve immediately, or transfer to a wire rack and store in a 250 degree preheated oven until they’re all cooked and ready.

Recommended Products

Please note that some of the links above are affiliate links, and at no additional cost to you, I will earn a commission if you decide to make a purchase after clicking through the link. I have experience with all of these companies and I recommend them because they are helpful and useful, not because of the small commissions I make if you decide to buy something through my links.

Nutrition Information:

Yield:

18

Serving Size:

1

Amount Per Serving: Calories: 115Total Fat: 3gSaturated Fat: 0gTrans Fat: 0gUnsaturated Fat: 3gCholesterol: 0mgSodium: 97mgCarbohydrates: 20gFiber: 2gSugar: 1gProtein: 2g

All nutritional information presented within this site are intended for informational purposes only. I am not a certified nutritionist and any nutritional information on BitterSweetBlog.com should only be used as a general guideline. This information is provided as a courtesy and there is no guarantee that the information will be completely accurate. Even though I try to provide accurate nutritional information to the best of my ability, these figures should still be considered estimates.