No Labor Required

Always sneaking up without warning and consequently inspiring nothing but confusion, Labor Day is a bit of an odd-ball holiday that never fails to catch me off guard.  Here I am, finally getting used to the heat of summer and enjoying the abundance of tomatoes, and all of a sudden, you’re telling me that it’s officially time to transition into fall?  And, what’s this, school is already back in session?  Not so fast!  I’m not ready to relinquish my flip flops and luxuriously long days of sunlight!  To add insult to the abrupt interruption, no matter who I ask, I still can’t figure out what one is supposed to celebrate or even do on Labor Day, besides have a picnic, perhaps.

Well this year, I’m more prepared than ever, staying abreast of what my wall calendar has scribbled on it in both print and my own handwriting, and noticing all of those pesky little “holidays” coming up. By the time we reach labor day though, it will be a welcome respite from the hustle and bustle of new classes and an insane work schedule. Perhaps I could get into the spirit of this celebration after all.

Besides, now that the veggies are about as fresh and delicious as they will ever be, the options of easy party food are practically endless. Rather than making a big to-do about these natural beauties, I prefer to let them shine with as little adornment as possible, carried by their own unique flavors.

Finally digging into fresh corn, one of my seasonal favorites, it’s time to use it or lose it! So delicate is this starchy and oft-mistreated vegetable that up to half of its inherent sweetness can be squandered simply within the passing of a day. As a friend of mine has said to me on more than one occasion, “If you plan to cook fresh corn, put a pot of water on the stove to boil first, and then go pick it!” While I wouldn’t expect everyone to have such easy access to corn fields, do try your best to buy the corn the same day you plan to serve it, and don’t leave any leftovers hanging around too long. As if that will be a real problem.

Yield: Makes 4 Servings

Summer Corn Salad

Summer Corn Salad
No Ratings

Impeccably fresh summer produce needs little effort to shine. Roasting them intensifies their flavors, concentrates sweetness, and creates a boldly flavorful side dish in a flash.

Prep Time 15 minutes
Cook Time 30 minutes
Total Time 45 minutes

Ingredients

  • 4 Cups Cherry or Grape Tomatoes, Halved (or Quartered if Large)
  • Olive Oil
  • Salt and Pepper
  • 2 Ears Fresh Sweet Corn
  • 1/2 Cup Caramelized Onions
  • 1 Tablespoon Dried Fines Herbes, or 3 Tablespoons Fresh Chives (to keep things simple)
  • 1/4 Cup Fresh Lemon Juice

Instructions

  1. Preheat your oven to 400 degrees, and line a baking sheet with aluminum foil for easy clean up.
  2. Slice your tomatoes as necessary, and spread them out in one even layer on your baking sheet. Drizzle generously with olive oil to coat, and then sprinkle lightly with both salt and pepper. Roast for 25 – 30 minutes, until they’re slightly shriveled and browned around the edges. Let cool completely.
  3. Meanwhile, cook your corn as desired. I know that people can get very particular about this, so use whatever method you prefer. Personally, I like to get out a giant stock pot, fill the very bottom with water, and then lightly steam my ears of corn (covered) for about 10 – 15 minutes. The time will also depend on your specific corn. On the other hand, my mom tends to simply pop them in the microwave in a dish with a splash of water, and nuke ’em for 2 – 3 minutes per ear, turning them midway through. Once cooked, let the ears cool.
  4. Use a sharp knife to strip the kernels of corn from the ears, and collect them in a large bowl. For anyone who’s counting, you should end up with about 1 1/2 – 2 cups of kernels. Mix in your roasted tomatoes, caramelized onions (which I try to always have on hand for times like these… They just go so well with everything, you may just find yourself getting into the habit of cooking down a bag of onions every weekend, too!), herbs, and lemon juice.
  5. Toss well to distribute all of the ingredients, adjust salt and pepper if necessary, and chill thoroughly before serving.

Notes

Learn how to caramelize onions from Simply Recipes.

Recommended Products

Please note that some of the links above are affiliate links, and at no additional cost to you, I will earn a commission if you decide to make a purchase after clicking through the link. I have experience with all of these companies and I recommend them because they are helpful and useful, not because of the small commissions I make if you decide to buy something through my links.

Nutrition Information:

Yield:

4

Serving Size:

1

Amount Per Serving: Calories: 195Total Fat: 7gSaturated Fat: 2gTrans Fat: 0gUnsaturated Fat: 4gCholesterol: 6mgSodium: 130mgCarbohydrates: 35gFiber: 5gSugar: 22gProtein: 3g

All nutritional information presented within this site are intended for informational purposes only. I am not a certified nutritionist and any nutritional information on BitterSweetBlog.com should only be used as a general guideline. This information is provided as a courtesy and there is no guarantee that the information will be completely accurate. Even though I try to provide accurate nutritional information to the best of my ability, these figures should still be considered estimations.

Simplicity in Salad-Form

Unlike some vegans who feel compelled to go against the age-old stereotype that herbivores subsist entirely on twigs and leaves, I’m not afraid to say that I love salads.  Think what you may, but in my eyes, a “salad” can be just about anything, and rarely involves lettuce when I’m in charge. 

Truly, how would this most basic and yet complex term be defined?  Anything chilled and mixed with a dressing?  Think about fruit salad- A sweet twist on the concept that everyone should be quite familiar with.  And then there are bean salads, grain salads, and some bewildering “salads” from down south that involve mayo, pineapple, and bacon. 

They don’t always make sense, they aren’t always healthy, and I certainly don’t endorse them across the board, but it pains me to think that most people still imagine a sad bowl of limp, pale iceberg and maybe some tired old tomato wedges when I say the word “salad.”

On that note, I have come bearing salad, but not one of those obligatory, unwanted side salads that must be choked down in order to get to dessert.  This salad here is comprised mainly of toothsome barley, making it a more wholesome interpretation of pasta salad, in a sense.  Fresh, sweet peas take advantage of the season’s bounty, although frozen and thawed can absolutely work in a pinch. Add in a generous glug of vinegar for a pleasant acidic bite, a handful of chives, and you’re practically done.

Simple almost to the point of brainlessly easy, it’s the perfect quick dish for a hot summer day, or lazy picnic any time.  Just pack it up into little jars, and you’re good to go.  It keeps well, both refrigerated and not, so you don’t have to worry about it spoiling while you go play outside.

Yield: Serves 4 – 6 as a Side Dish

Barley and Fresh Pea Salad

Barley and Fresh Pea Salad
No Ratings

This salad here is comprised mainly of toothsome barley, making it a more wholesome interpretation of pasta salad, in a sense. Fresh, sweet peas take advantage of the season’s bounty, although frozen and thawed can absolutely work in a pinch. Add in a generous glug of vinegar for a pleasant acidic bite, a handful of chives, and you’re practically done.

Prep Time 2 minutes
Total Time 2 minutes

Ingredients

Instructions

  1. A salad like this hardly needs instructions, but here goes: Toss the cooked barley and peas in a bowl, crumble in the “feta,” drizzle in both vinegars and oil. Add the chopped herbs and toss well. Taste, and add salt and pepper as desired. Serve immediately, or cover and chill for up to three days.

Recommended Products

Please note that some of the links above are affiliate links, and at no additional cost to you, I will earn a commission if you decide to make a purchase after clicking through the link. I have experience with all of these companies and I recommend them because they are helpful and useful, not because of the small commissions I make if you decide to buy something through my links.

Nutrition Information:

Yield:

6

Serving Size:

1

Amount Per Serving: Calories: 147Total Fat: 6gSaturated Fat: 2gTrans Fat: 0gUnsaturated Fat: 3gCholesterol: 13mgSodium: 183mgCarbohydrates: 20gFiber: 4gSugar: 2gProtein: 5g

All nutritional information presented within this site are intended for informational purposes only. I am not a certified nutritionist and any nutritional information on BitterSweetBlog.com should only be used as a general guideline. This information is provided as a courtesy and there is no guarantee that the information will be completely accurate. Even though I try to provide accurate nutritional information to the best of my ability, these figures should still be considered estimates.

All About Balance

Stress. The general public, myself included, simply oozes stress. It’s bad enough on a typical day, with the usual work- and school-related pressures, but now that it’s officially December, as of a few hours ago, the whole game has changed. For many, it’s time to go into full-out holiday madness mode, eschewing a quiet and cozy celebration for something big, perhaps a touch complicated, but above all else, labor intensive.

While most of my own ideas revolve around blog posts or decorating the house, it’s slowly occurred to me that even this “simple” strategy could easily spiral out of control, threatening to eat up every spare moment up until the big day (or in my case days) to hammer out all the fine details. And boy, if you’re working on a Hannukah extravaganza, good luck; the first day will be on our doorsteps in less than two weeks. Less than two weeks! I kid you not, it’s enough to overwhelm even the calmest party planners among us. Even I’m getting a bit freaked out now, so let just take a moment to breathe, shall we?

Like my boss would say, it’s all about balance. All the rich, fatty delights of the holidays are sure to tempt at every turn, but this early in the game, they’re nothing but trouble. Pair this with the urgent need to get things done, and it’s no wonder that stress levels are through the roof! With a belly full of soy nog and candy cane fudge, all one could reasonably hope to accomplish might be a sound nap, not focused worked of any sort. Trust me, I know from experience!

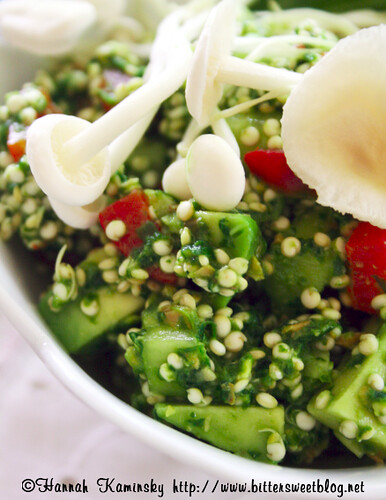
To dilute some of that excess holiday cheer that will be headed your way, I offer today not a sweet fix, but instead a wholesome savory dish in an attempt to balance out the treats to come. Quinoa, my favorite super grain (well seed, technically) is paired with one dynamite green spread that will definitely see many repeat performances in my kitchen from here on in. Although I’m calling it a pesto, you may notice that it is not, in fact, anything like traditional pesto- There’s no basil nor pine nuts. Pistachios stand in for the nuts, and spinach provides the greenery here, creating an earthy but dare-I-say buttery sauce. If nothing else, make the pesto and use it in sandwiches, as a tofu marinade, over pasta, or even as a party dip!

Although I went down a more unusual route and decided to soak both the pistachios and quinoa, you could easily skip over this step to make the dish more speedy, using plain pistachios and cooked quinoa. Just be sure to cool the quinoa completely before adding in the veggies, because there’s little worse than hot cucumber!

Yield: Makes 4 - 6 Servings

Lean, Green Quinoa Salad

Lean, Green Quinoa Salad
No Ratings

Quinoa, my favorite super seed, is paired with one dynamite green pesto. Pistachios stand in for the nuts, and spinach provides the greenery here, creating an earthy but dare-I-say buttery sauce.

Prep Time 10 minutes
Total Time 10 minutes

Ingredients

Pistachio Pesto:

  • 1/4 Cup Pistachios, Soaked Overnight
  • 3 Cloves Roasted Garlic
  • 2 Tablespoons White Miso Paste
  • 2 Tablespoons Nutritional Yeast
  • 6 Ounces Fresh Baby Spinach
  • 1 Tablespoon Lemon Juice
  • 2 Tablespoons Olive Oil

Quinoa Salad:

  • 1 Cup Quinoa, Soaked Overnight and Sprouted
  • 1 English Cucumber, Diced
  • 1 Large Red Pepper, Roasted and Diced
  • 1 Ripe Avocado, Diced

To Serve:

  • Enoki Mushrooms (Optional)
  • Additional Spinach (Optional)

Instructions

  1. The pesto comes together very quickly and easily, just like any other pesto would: Toss the pistachios and garlic into your food processor or blender first, and pulse until there are no large pieces of either
    left. Add in the miso, nutritional yeast, and spinach. It will seem like way too much greenery, but trust me, it blends down to practically nothing. Pulse until the spinach is largely broken down, and then
    drizzle in the lemon juice and oil while the machine runs. Blend longer if you want a smoother sauce, or stop right here and set the pesto aside.
  2. In a large bowl, toss together the [very well rinsed and drained] sprouted quinoa, cucumber, red pepper and avocado. If you plan on keeping this salad and serving it later, just toss the avocado pieces in lemon juice first and drain them thoroughly, to prevent them from browning. Add your pesto into the mix, and stir to evenly distribute the veggies and coat everything evenly in pesto. Top each serving with mushrooms and extra fresh spinach, if desired.

Notes

Although I went down a more unusual route and decided to soak both the pistachios and quinoa, you could easily skip over this step to make the dish more speedy, using plain pistachios and cooked quinoa.

Recommended Products

Please note that some of the links above are affiliate links, and at no additional cost to you, I will earn a commission if you decide to make a purchase after clicking through the link. I have experience with all of these companies and I recommend them because they are helpful and useful, not because of the small commissions I make if you decide to buy something through my links.

Nutrition Information:

Yield:

6

Serving Size:

1

Amount Per Serving: Calories: 227Total Fat: 14gSaturated Fat: 2gTrans Fat: 0gUnsaturated Fat: 11gCholesterol: 0mgSodium: 290mgCarbohydrates: 22gFiber: 7gSugar: 3gProtein: 8g

All nutritional information presented within this site are intended for informational purposes only. I am not a certified nutritionist and any nutritional information on BitterSweetBlog.com should only be used as a general guideline. This information is provided as a courtesy and there is no guarantee that the information will be completely accurate. Even though I try to provide accurate nutritional information to the best of my ability, these figures should still be considered estimates.

Po-Tay-To, Po-Tah-To; Just Not May-O!

Like clockwork, as the days grow progressively longer and warmer, grills emerge from hibernation at just about any opportunity, eager as their owners to host all of the newly sprung vegetables, plus plenty of old favorites. 

Summer holidays practically require the presence of a grill, and with Memorial Day just around the corner, it seems like high time to dust that old furnace off.  Tossing on veggie burgers and not-dogs, toasting up simple white bread buns to golden-brown perfection, it’s the start of a perfectly “American” meal.  But what to serve alongside those main dishes?  Perhaps a side of fries or chips, maybe potato salad- Just as long as the lovable spud makes an appearance.

Here’s where my menu takes a somewhat different turn. Potato salad sounds great in concept, but mayonnaise, dairy-based or otherwise, is simply not welcome in this household. Serve something containing even a half ounce of that white glop, and you may very well have an all out revolt on your hands.

Thus, eschewing this vile condiment in favor of a lighter dressing, I tend to favor olive oil, lemon juice, and whatever fresh herbs happen to be on hand. This time though, it felt necessary to start the season off with a bang and spice things up a bit.

Essentially glorified samosa filling freed of its pastry, this starchy side is just the thing to liven up any backyard BBQ spread. Delicious served both warm or chilled, it can easily be made a day ahead of time to give you one less thing to worry about later.

Don’t wait until you have a party to make it though- Any number of savory mains would pair beautifully with these spicy potatoes, and you can keep it for up to a week in the fridge.

Yield: Serves 6 – 8 as a side dish

Samosa Potato Salad

Samosa Potato Salad
No Ratings

Essentially glorified samosa filling freed of its pastry, this starchy side is just the thing to liven up any backyard BBQ spread. Delicious served both warm or chilled, it can easily be made a day ahead of time to give you one less thing to worry about later.

Prep Time 5 minutes
Cook Time 18 minutes
Total Time 23 minutes

Ingredients

  • 2 Pounds White New Potatoes
  • 1 Bay Leaf
  • 1/3 Cup Olive Oil
  • 2 – 3 Large Shallots, Chopped (About 1 Cup)
  • 4 Cloves Garlic, Finely Minced
  • 1 Inch Fresh Ginger, Peeled and Grated
  • 2 Teaspoons Garam Masala
  • 1/2 Teaspoon Ground Coriander
  • 1/2 Teaspoon Turmeric
  • 1 Teaspoon Ground Cumin
  • 1 Tablespoon Fresh Lemon Juice
  • 1 1/2 Cups Frozen Peas
  • Salt and Pepper
  • Fresh Chives (Optional)

Instructions

  1. Wash the potatoes thoroughly before chopping them into bite-sized pieces. Place them in a large pot, and fill it with cold water so that all of the pieces are covered. Move the pot onto the stove, toss in the bay leaf, cover with a lid, and bring to a boil over moderate heat. Once boiling, cook with the lid off for 5 – 8 minutes, until the potatoes are fork-tender. Discard the bay leaf, drain, and let cool.
  2. Mean while, heat the oil in a large skillet over medium heat, and add in the shallots. Cook for about 3 minutes until somewhat translucent, and add in the garlic and ginger.
  3. After another minute or two has
    passed, incorporate all of the spices and lemon juice.
  4. Add in the the peas, and continue to stir the mixture for 5 minutes or so, until the peas have completely thawed.
  5. Toss the potatoes and dressing together in a large bowl, add salt and pepper to taste, and top with freshly chopped chives, if desired. Serve immediately if you want it warm, or let cool and chill thoroughly in an air-tight container.

Recommended Products

Please note that some of the links above are affiliate links, and at no additional cost to you, I will earn a commission if you decide to make a purchase after clicking through the link. I have experience with all of these companies and I recommend them because they are helpful and useful, not because of the small commissions I make if you decide to buy something through my links.

Nutrition Information:

Yield:

8

Serving Size:

1

Amount Per Serving: Calories: 226Total Fat: 9gSaturated Fat: 1gTrans Fat: 0gUnsaturated Fat: 8gCholesterol: 0mgSodium: 73mgCarbohydrates: 32gFiber: 5gSugar: 4gProtein: 5g

All nutritional information presented within this site are intended for informational purposes only. I am not a certified nutritionist and any nutritional information on BitterSweetBlog.com should only be used as a general guideline. This information is provided as a courtesy and there is no guarantee that the information will be completely accurate. Even though I try to provide accurate nutritional information to the best of my ability, these figures should still be considered estimates.

You Win Some, You Lose Some

It’s true that you can’t always win, but I have a feeling that it’s quite possible to always lose. Slogging through a bit of a losing streak myself, it certainly seems that way at least. My apricot ice cream lost, although I’m not the least bit surprised, having watched first-hand as the tally of my competitors’ votes swelled into impressive numbers, while my own inflated temporarily only to burst and collapse like a cheap inflatable pool toy. I’ve given up on entering blog raffles, as the suspense kills me and by the time some one else’s name is announced, you’re just beating a dead horse over here. Nope, I have better things to pin my hopes to. Even though I haven’t officially heard back from the lovely folks at Whole Foods about the most recent contest of theirs that I entered, I have no doubt that a gentle letter of rejection is sure to arrive any moment.

The premise for this contest was simple enough; Make a healthy meal for $4 or less per serving. No problem, that’s pretty much the norm around here anyways. Savories still aren’t my forte though, so taking the safer route, I whipped up a tasty tofu dish and an easy pilaf. Admittedly, the tofu was rather forgettable- Delicious, yes, but nothing to write home about. It was that pilaf, a bulgur pilaf to be exact, that really got my appetite going. I even contemplated sending in an entry of only the pilaf, since it’s a good balance of protein, grains, and veg if you ask me, and I’m all for one-dish meals as well.

Ginger, garlic, and miso make up a flavorful broth, which toothsome whole grain bulgur is only too happy to soak up. Rounded out by some nutty almonds and bright green peas, it’s a simple yet comforting dish that is agreeable to just about every palate. It might not win any awards, but it’s a keeper in my book.

Yield: Serves 2 as a main dish, 4 as a side.

Miso Bulgur Pilaf

Miso Bulgur Pilaf
5.0 Stars (2 Reviews)

Ginger, garlic, and miso make up a flavorful broth, which toothsome whole grain bulgur is only too happy to soak up. Rounded out by some nutty almonds and bright green peas, it’s a simple yet comforting dish that is agreeable to just about every palate.

Prep Time 5 minutes
Cook Time 25 minutes
Additional Time 5 minutes
Total Time 35 minutes

Ingredients

  • 1 Cup Bulgur Wheat
  • 1 Tablespoon Olive Oil
  • 2 Cloves Garlic, Finely Minced
  • 1/2 Teaspoon Ground Ginger
  • 1/2 Teaspoon Lemon Zest
  • 1 Teaspoon Soy Sauce
  • 2 Tablespoons Brown Rice Miso Paste
  • 1 3/4 Cups Water
  • 1/4 Cup Frozen Peas, Thawed
  • 1/2 Cup Whole Almonds, Toasted
  • 1 Tablespoon Chopped Chives

Instructions

  1. Heat a dry skillet over the stove and toss in the bulgur. Toast for about 10 minutes, shaking the pan occasionally to keep the bulgur moving, until it smells nutty and turns slightly darker brown. Pour the grains out onto a plate, and place the emptied skillet back over the heat.
  2. Add in the oil, garlic and ginger, and cook for just a minute or two until the spices have browned a bit. Stir in the lemon zest, soy sauce, and miso paste, breaking up any lumps that may form. Stand back a bit while slowly pouring in the water, as it may hiss and splash slightly. Scrape everything off the bottom if it’s sticking, and add your toasted bulgur into the mix, along with the peas. Turn down the heat, cover, and let simmer for 15 minutes. If all of the liquid hasn’t been absorbed by then, simply continue to cook over low heat, uncovered, until it has all evaporated.
  3. Let stand for 5 minutes off the heat, and stir in the almonds and chives.

Recommended Products

Please note that some of the links above are affiliate links, and at no additional cost to you, I will earn a commission if you decide to make a purchase after clicking through the link. I have experience with all of these companies and I recommend them because they are helpful and useful, not because of the small commissions I make if you decide to buy something through my links.

Nutrition Information:

Yield:

4

Serving Size:

1

Amount Per Serving: Calories: 198Total Fat: 13gSaturated Fat: 1gTrans Fat: 0gUnsaturated Fat: 11gCholesterol: 0mgSodium: 331mgCarbohydrates: 17gFiber: 5gSugar: 2gProtein: 6g

All nutritional information presented within this site are intended for informational purposes only. I am not a certified nutritionist and any nutritional information on BitterSweetBlog.com should only be used as a general guideline. This information is provided as a courtesy and there is no guarantee that the information will be completely accurate. Even though I try to provide accurate nutritional information to the best of my ability, these figures should still be considered estimates.