Sophisticated Solo Snacking

Holiday season firmly behind us, the time of endless parties and merriment may have passed, but even as we enter the frigid month of January, I’m unwilling to fully surrender to that immense shift. Winter hibernation beckons invitingly, yet the inertia of both work and play pulls me forward, with little conscious decision on my part. Once the wheels start spinning, they can’t simply stop at the drop of a hat, much like my restless mind that continues to churn away. Always coming up with the perfect come-back hours or days too late, it’s the same phenomenon that provides inspiration for recipes that would have been ideal for occasions that have already come to pass.

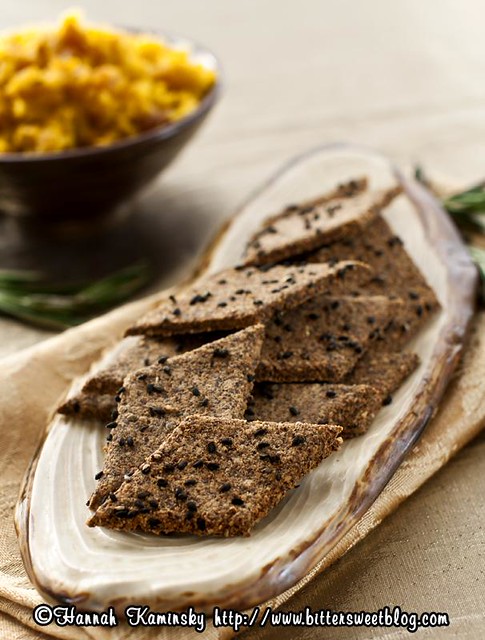
Thankfully, a raucous celebration is not required to enjoy a slightly more sophisticated snack than the norm, and it’s probably recommended that you enjoy such a savory treat far from the maddening crowds. Bringing together the nutty, toasted notes of hazelnut with herbaceous rosemary, these simple crackers are perhaps more addictive than such a small batch should allow. Horde them if you must, because I guaranteed they’ll fly fast if served to company.

Despite the wild success of such a simple crunchy snack, it’s hard to eat many dry crackers plain. Crackers are always accompanied by dip in the best of circumstances, complimenting and contrasting the crisp texture. Inspired by the tried-and-true beet marmalade we serve at Health in a Hurry, I whipped up a golden version to serve on the side. A bit more like a chutney than a spread, the sweetness of caramelized onions and apple cider mellow the earthy flavors of gold beet in a mild but flavorful harmony. Lest that fools you into thinking this is one boring accompaniment, don’t forget about the surprising kick of cayenne that sneaks up out of the blue, rounding things out nicely.

It’s for the best that we move away from the relentless holiday demands. A few quiet nights at home with more intimate parties of one or two, with a nice, carefully assembled snack platter sound much more appealing anyhow.

Yield: 4 Servings

Hazelnut-Rosemary Crackers

Hazelnut-Rosemary Crackers

Bringing together the nutty, toasted notes of hazelnut with herbaceous rosemary, these simple crackers are perhaps more addictive than such a small batch should allow. Horde them if you must, because I guaranteed they’ll fly fast if served to company.

Prep Time 20 minutes
Cook Time 1 hour 20 minutes
Total Time 1 hour 40 minutes

Ingredients

  • 1 Cup Raw Hazelnuts
  • 1/4 Cup Whole Flax Seeds, Ground
  • 1/4 Cup Water
  • 1 Tablespoon Nutritional Yeast
  • 1 Tablespoon Tamari or Soy Sauce
  • 1 Tablespoon Lemon Juice
  • 1 Teaspoon Dried Rosemary
  • 1/4 Teaspoon Ground Cinnamon
  • 1 Teaspoon Black Sesame Seeds (Optional)

Instructions

  1. Preheat your oven to 250 degrees, and line a baking sheet with a piece of parchment paper or a silpat.
  2. Pulse the hazelnuts in your food processor until ground down to a fine meal, with as few coarse chunks as possible. It’s helpful to start with frozen nuts for the best texture, to prevent them from warming up and turning to nut butter. If they threaten to cross that line, just pause and move the bowl of the food processor into the fridge to cool down before proceeding.
  3. Grind the flax seeds down to a powder separately, in a coffee or spice grinder. Add the flax meal to the food processor, along with all of the remaining ingredients except for the sesame seeds. Pulse to combine. Once smooth, transfer the mixture to your prepared baking sheet, and use lightly moistened hands to flatten it out slightly. Top with a second silpat or parchment paper, and roll out to about 1/8th of an inch in thickness. This second sheet will help prevent the “dough” from sticking to your rolling pin, without the need for added flour.
  4. Score the sheet of soft cracker dough into equal rectangles or diamonds, and lightly sprinkle with sesame seeds if desired. Press the seeds in gently with the palm of your hand to ensure that they stick. Bake for a total of 80 minutes, rotating the baking sheet every 20 minutes to ensure even browning. Let cool completely (they will continue to crisp as they cool) and then break along the scored lines. Store in an air-tight container for up to 1 week.
  5. If you’d prefer a raw snack, simply spread the mixture on a teflex or other non-stick sheet instead, and dehydrate until crisp. Your mileage/timing may vary.

Notes

Yield varies depending on size and shape of your crackers, but makes approximately about 4 servings.

Nutrition Information:

Yield:

4

Serving Size:

1

Amount Per Serving: Calories: 244Total Fat: 21gSaturated Fat: 2gTrans Fat: 0gUnsaturated Fat: 19gCholesterol: 0mgSodium: 477mgCarbohydrates: 9gFiber: 6gSugar: 2gProtein: 8g
Yield: 2 - 3 Cups

Gold Beet Marmalade

Gold Beet Marmalade

A bit more like a chutney than a spread, the sweetness of caramelized onions and apple cider mellow the earthy flavors of gold beet in a mild but flavorful harmony. Lest that fools you into thinking this is one boring accompaniment, don’t forget about the surprising kick of cayenne that sneaks up out of the blue, rounding things out nicely.

Prep Time 15 minutes
Cook Time 30 minutes
Total Time 45 minutes

Ingredients

  • 1 Pound Gold (Yellow) Beets
  • 1 Tablespoon Olive Oil
  • 1 Small Red Onion, Diced
  • 1/3 Cup Apple Cider or Unfiltered Apple Juice
  • 1 Tablespoon Lemon Juice
  • Pinch Cayenne Pepper
  • Salt and Black Pepper, to Taste

Instructions

  1. First things first, roast the beets: Wrap your beets in aluminum foil so that they’re completely covered in a neat little pouch, and place them on a baking sheet to catch any potential drips. Cook in an oven preheated to 450 degrees for 20 – 30 minutes, until fork tender. Let rest until they’re cool enough to peel.
  2. Meanwhile, heat up the oil in a medium skillet on the stove, over medium-low heat. Introduce the diced onion and stir frequently, until soften, not browned, and a golden caramel color. This will take anywhere from 15 – 30 minutes, so keep a close eye on the pan. Turn off the heat and let cool.
  3. Introduce both the peeled beets (cut down to slightly more manageable chunks if they were huge roots to begin with) and the caramelized onions in the food processor, along with the remaining ingredients. Pulse to combine, until the beets are broken down to very small, coarse pieces, but not pureed into a smooth spread. Though the marmalade is best if allowed to chill and mellow for at least an hour, it’s perfectly tasty eaten right away.

Nutrition Information:

Yield:

12

Serving Size:

1

Amount Per Serving: Calories: 42Total Fat: 1gSaturated Fat: 0gTrans Fat: 0gUnsaturated Fat: 1gCholesterol: 0mgSodium: 79mgCarbohydrates: 8gFiber: 1gSugar: 6gProtein: 1g

Sweets for the Sweet Tooth

Extreme sweet teeth are a dominant trait in my family, but it tends to manifest itself in different ways. For example, both my mom and I are happier with carefully composed desserts and baked goods, complex with layers of cake, creamy fillings, and perhaps a bit of a crunch hidden somewhere, but neither my sister nor my dad would likely be as pleased. They have straight-up sugar teeth; the sort of teeth that crave pure, unadulterated sweetness, and are much more likely to drift towards a candy shop than a bakery come dessert time.

While I will admit that I tend to cater to my own tastes when dreaming up new recipes, I do aim to please, so this little sugar-bomb was developed with the other half of my family in mind.

Simple and super-sweet, just a tiny square of this maple fudge should satisfy even the most intense sugar cravings. Homemade candies in general are always a favorite for gift-giving, and this decadent option would certainly fit the bill. Throw in a pinch of spices to shake things up a bit if you’d like, but the unique and irreplaceable flavor of maple is a treat enough to me.

Yield: Makes 36 – 45 Small Squares

Maple Fudge

Maple Fudge

Simple and super-sweet, just a tiny square of this maple fudge should satisfy even the most intense sugar cravings. Homemade candies in general are always a favorite for gift-giving, and this decadent option would certainly fit the bill. Throw in a pinch of spices to shake things up a bit if you’d like, but the unique and irreplaceable flavor of maple is a treat enough to me.

Prep Time 5 minutes
Cook Time 30 minutes
Additional Time 3 hours
Total Time 3 hours 35 minutes

Ingredients

  • 2 Cups Granulated Sugar
  • 1 1/4 Cups 100% Maple Syrup
  • 1/3 Cup Unsweetened Non-Dairy Milk
  • 2 Tablespoons Vegan Butter
  • 1 Cup Chopped and Toasted Walnuts
  • 1/8 Teaspoon Salt

Instructions

  1. Lightly grease an 8 x 8 inch square pan and set aside.
  2. In a medium saucepan, combine the sugar, maple syrup, and non-dairy milk, and bring to a boil over moderate heat. Once the mixture comes to a full boil, stop stirring, and insert your candy thermometer. Continue to cook, swirling the pan instead of stirring if necessary, until it comes to about 238 – 240 degrees (soft ball stage).
  3. Remove the pan from the heat, and let it sit until it has cooled to 145 degrees. At that point, the top of the candy may have crystallized, and the whole mixture should be somewhat thicker, albeit grainy. Incorporate the butter and continue to beat it vigorously with a wooden spoon for about 10 full minutes- You’ll know that you’re doing it right when it feels like your arm is about to fall off.
  4. The mixture should become thicker, lighter in color, and less glossy. Beat in the nuts and salt, and spread it into your prepared pan, pressing it into the corners and smoothing down the top with a spatula.
  5. Let sit for at least 3 hours before cutting into very, very small squares. Just a bite will satisfy!
  6. Never refrigerate, or the fudge will become damp and mushy. Store in an airtight container at room temperature.

Recommended Products

Please note that some of the links above are affiliate links, and at no additional cost to you, I will earn a commission if you decide to make a purchase after clicking through the link. I have experience with all of these companies and I recommend them because they are helpful and useful, not because of the small commissions I make if you decide to buy something through my links.

Nutrition Information:

Yield:

45

Serving Size:

1

Amount Per Serving: Calories: 78Total Fat: 2gSaturated Fat: 0gTrans Fat: 0gUnsaturated Fat: 2gCholesterol: 0mgSodium: 8mgCarbohydrates: 15gFiber: 0gSugar: 14gProtein: 0g

All nutritional information presented within this site are intended for informational purposes only. I am not a certified nutritionist and any nutritional information on BitterSweetBlog.com should only be used as a general guideline. This information is provided as a courtesy and there is no guarantee that the information will be completely accurate. Even though I try to provide accurate nutritional information to the best of my ability, these figures should still be considered estimations.


A Cookie in Every Oven

If ever there was an ideal time to bake cookies, it would be now. At this very moment, cookie swaps are happening across the nation, and gifts of cookie platters and cookie baskets are being piled high. Rainbows of doughs are rolling out on kitchen counters, a world of flavored batters are being dropped onto baking sheets, and scores of every shape a cookie cutter can create are cooling on wire racks. Just imagine what it would look like if we could take a peek at the combined efforts of all those holiday bakers, hard at work. The scent of sugar rising into the brisk air and cookbook pages encrusted in flour, it just wouldn’t be Chanukah or Christmas without a full menu of cookies planned for hungry friends and family to devour.

As much as I may crave the classics, the desire to create something new and exciting always take the reins when assembling ingredients, and no two cookie trays ever end up alike. Simple, straight-forward bakery-style chocolate chip cookies are easily my most requested variety, a rare recipe that I do actually follow without variation… Most of the time.

Using the holidays as my license to experiment, I wanted to give the basic idea a bit of a savory, salty twist, to balance out the sweeter items sure to follow. An unexpected hint of herbaceous rosemary adds an unexpected but entirely welcome change of pace, further enhanced by the natural nuttiness of crunchy toasted pecans. Inspired by the addictive party snack of spiced rosemary nuts, I couldn’t help but keep the theme going and tossing in a generous dose of spice here as well. Lending a bright kick just as the taste of chocolate and pecans begin to fade, it’s the element that makes you go back for just one more bite, trying to pinpoint what that enchanting flavor was.

It’s certainly not your grandma’s or your mom’s chocolate chip cookie, but that’s probably a good thing, too. With so many options already available around this time of year, why not take the opportunity to try something a bit different?

Yield: Makes 12 - 18 Cookies

Spiced Rosemary Chocolate Chip Cookies

Spiced Rosemary Chocolate Chip Cookies

An unexpected hint of herbaceous rosemary adds an unexpected but entirely welcome change of pace, further enhanced by the natural nuttiness of crunchy toasted pecans. Inspired by the addictive party snack of spiced rosemary nuts, I couldn’t help but keep the theme going and tossing in a generous dose of spice here as well. Lending a bright kick just as the taste of chocolate and pecans begin to fade, it’s the element that makes you go back for just one more bite, trying to pinpoint what that enchanting flavor was.

Prep Time 10 minutes
Cook Time 16 minutes
Additional Time 5 minutes
Total Time 5 minutes

Ingredients

  • 1/2 Cup Vegan Butter, Melted
  • 1/2 Cup Dark Brown Sugar, Firmly Packed
  • 1/3 Cup Granulated Sugar
  • 2 Tablespoons Maple Syrup
  • 1/2 Teaspoon Vanilla Extract
  • 1 1/2 Cups All Purpose Flour
  • 3/4 Teaspoon Ground Cinnamon
  • 1/4 Teaspoon Cayenne Pepper
  • 1/4 Teaspoon Smoked Paprika
  • 1 Tablespoon Fresh Rosemary (or 1 Teaspoon Dried), Finely Chopped or Ground
  • 1/2 Teaspoon Baking Soda
  • 1/4 Teaspoon Salt
  • 1 Cup Toasted and Chopped Pecans
  • 1/2 Cup (3 Ounces) Semi-Sweet Chocolate Chips or Chunks

Instructions

  1. Preheat your oven to 325 degrees and line two baking sheets with parchment paper or silicone baking mats. Set aside.
  2. In the bowl of your stand mixer, blend together the melted butter, both sugars, maple syrup, and vanilla until smooth and fully combined.
  3. Sift the flour into a separate bowl, and add in all of the spices, rosemary, baking soda, and salt. Lightly toss both the pecan pieces and chocolate chips in, to coat with the flour.
  4. Add the dry goods into the stand mixer in two additions, being careful not to overwork the dough but mix it just enough to bring everything together, without any pockets of flour lurking at the bottom. Be sure to scrape down the sides of the bowl between additions so that everything gets incorporated.
  5. Scoop out dough with a medium-sized cookie scoop, or two large spoons in about 3 – 4 tablespoon portions. Give the cookies plenty of space on your prepared baking sheets, leaving at least and inch between blobs. I usually bake only 9 per sheet, to ensure that none of them spread and collide. Flatten the raw cookie dough out lightly with the palm of your hand, so that they’re nice and round, and about 1/2 inch in thickness.
  6. Bake for 12 – 16 minutes, watching closely to make sure that they are just barely golden brown around the edges when you pull the from the oven. They should still look fairly under-baked in the center, to ensure a soft and chewy texture.
  7. Let cool on the sheets for 5 minutes, and then move them off to a wire rack. Store in an air-tight container at room temperature for up to a week, if they last that long.

Recommended Products

Please note that some of the links above are affiliate links, and at no additional cost to you, I will earn a commission if you decide to make a purchase after clicking through the link. I have experience with all of these companies and I recommend them because they are helpful and useful, not because of the small commissions I make if you decide to buy something through my links.

Nutrition Information:

Yield:

18

Serving Size:

1

Amount Per Serving: Calories: 171Total Fat: 10gSaturated Fat: 4gTrans Fat: 0gUnsaturated Fat: 5gCholesterol: 14mgSodium: 107mgCarbohydrates: 20gFiber: 1gSugar: 11gProtein: 2g

All nutritional information presented within this site are intended for informational purposes only. I am not a certified nutritionist and any nutritional information on BitterSweetBlog.com should only be used as a general guideline. This information is provided as a courtesy and there is no guarantee that the information will be completely accurate. Even though I try to provide accurate nutritional information to the best of my ability, these figures should still be considered estimations.

Dreaming of a Sweet Christmas

No amount of planning ever seems to leave me properly prepared for the holidays, despite mustering all the enthusiasm possible and diligently keeping an eye on the calendar. Days mysteriously grow shorter, schedules fuller, and to further complicate matters, those originally simple plans of mine curiously evolve to become more and more complicated. Getting a head start usually means laying out a detailed list of presents to make, recipes to try, and fun activities to participate in… Which is lost or completely disregarded by the time December actually rolls around. After spending one too many of the last mailing days before Christmas stuck in line at the post office, fighting off the other hordes of procrastinators frantic to make the final cut off, it became clear that my approach wasn’t working.

This year, the plan is to plan less. Stick to simple but nice holiday cards, rather than elaborate gifts with complicated shipping requirements and deadlines. Make whatever recipes strike my fancy, whenever that might happen. Enjoy the holidays whenever they allow, without forcing artificial merriment at every turn. “Low-key” is the mantra of the season- No pressure, no anxiety, no self-flagellation when things don’t work out perfectly. Sounds like a much more enjoyable way to pass the next few weeks, don’t you think?

And just like that, I find myself almost on top of the key points that constantly evaded my grasp the previous year. Greeting cards are done and printing, and the first set of festive sweets has already sprung forth from the oven, seemingly without effort. It may be a push to fit that pending manuscript into the festivities, but at least it doesn’t seem like such a great burden to squeeze into the jam-packed holiday game plan.

It needn’t be a grand holiday, or one to remember above others, even. It just needs to be less than torturous, and adding in a bit of sweetness and good company would be a nice touch, too.

Yield: Makes 52 – 60 Cookies; 26 – 30 Sandwiches

Pistachio Praline Linzer Cookies

Pistachio Praline Linzer Cookies

Caramelized pistachio cream is sandwiched between two crisp shortbread cookies, seen through cut-out windows frosted with coarse sugar. They're as beautiful to look at as they are satisfying to eat.

Prep Time 30 minutes
Cook Time 45 minutes
Additional Time 15 minutes
Total Time 1 hour 30 minutes

Ingredients

Pistachio Praline Paste:

  • 1 Cup Granulated Sugar
  • 1/4 Cup Water
  • 2 Cups Shelled, Skinned and Toasted Pistachios
  • 3/4 Teaspoon Salt
  • 1 Tablespoon Olive Oil

Linzer Cookies:

  • 1 Cup Vegan Butter
  • 1/4 Cup Dark Brown Sugar, Firmly Packed
  • 1/3 Cup Granulated Sugar
  • 2 1/2 Cups All Purpose Flour
  • 1/2 Cup Almond Meal
  • 1/2 Teaspoon Baking Powder
  • 1/2 Teaspoon Salt
  • Zest of 1 Orange
  • 1 Teaspoon Ground Ginger
  • 1/3 Cup Vegan Sour Cream
  • 1 Teaspoon Vanilla Extract

Instructions

  1. To prepare the pistachio praline, place the sugar and water in a medium saucepan over moderate heat. Stir to combine, and bring to a boil. Allow the sugar to cook until it caramelizes to a deep amber color; about 10 – 15 minutes.
  2. Quickly add in the pistachios, stir to coat with the hot sugar, and immediately
    transfer everything out to a silpat or piece of parchment paper. Let cool completely before breaking it into chunks, and tossing the pieces into your food processor, along with the salt and oil.
  3. Pulse to break down the brittle to a coarse consistency, and then let the motor run until very smooth. It may take as long as 10 minutes, so be patient. Let cool before using, or store in an air-tight container in the fridge for up to two weeks.
  4. For the cookies, preheat your oven to 350 degrees and line three baking sheets with silicone baking mats or parchment paper. Set aside.
  5. Cream together the butter and both sugars until homogeneous and fluffy, pausing to scrape down the sides of the bowl as needed. Add the flour, almond meal, baking powder, salt, zest, and ginger, starting the mixer slowly to prevent the dry goods from flying out. Mix briefly before introducing the sour cream and vanilla as well. Mix just until a cohesive, smooth dough is formed.
  6. Turn it out onto a lightly floured surface. Press the dough into an even round and roll it out to 1/8th of an inch in thickness. Use a 2 1/2 inch round cookie cutter to cut out the shapes.
  7. Cut out the centers of half of the rounds with a smaller shape of your choice. Transfer the cookies to your prepared sheets, and chill them for 15 minutes before moving them right into the oven.
  8. Bake for 10 – 15 minutes, until just barely golden around the edges. Let cool.
  9. Assemble the linzer cookies by spreading 1 teaspoon of the praline paste on a whole cookie, and topping it with a cut-out cookie. Repeat with remaining cookies, and enjoy.

Notes

For a quick fix, you can mix 1/2 cup confectioner's sugar with pistachio butter for the filling, or use prepared vegan nutella for a chocolate twist.

Recommended Products

Please note that some of the links above are affiliate links, and at no additional cost to you, I will earn a commission if you decide to make a purchase after clicking through the link. I have experience with all of these companies and I recommend them because they are helpful and useful, not because of the small commissions I make if you decide to buy something through my links.

Nutrition Information:

Yield:

30

Serving Size:

1

Amount Per Serving: Calories: 155Total Fat: 8gSaturated Fat: 4gTrans Fat: 0gUnsaturated Fat: 3gCholesterol: 16mgSodium: 149mgCarbohydrates: 20gFiber: 1gSugar: 11gProtein: 2g

All nutritional information presented within this site are intended for informational purposes only. I am not a certified nutritionist and any nutritional information on BitterSweetBlog.com should only be used as a general guideline. This information is provided as a courtesy and there is no guarantee that the information will be completely accurate. Even though I try to provide accurate nutritional information to the best of my ability, these figures should still be considered estimations.

Bonus! For a gift that keeps on giving, nothing beats a delicious, tried-and-true recipe from a friend. To share this recipe with someone you love, snatch up the free printable recipe card below. Just set your printer to “scale to fit” your paper, trim the excess as needed, fold down the center, and doodle something on the cover, or paste a photo if you prefer.

An Alluring Date

Give me a new ingredient, and I’ll practically move heaven and earth to find a way to use and enjoy it, no matter how unusual or scarce it may be. I make a point to try everything vegan at my disposal at least once, and some of my favorite fresh discoveries have been made this way. Thus, when I first discovered date syrup, the mere concept was irresistibly appealing. Never before had I considered a syrup made solely of those naturally sweet and succulent fruits, and yet it made so much sense- Thank goodness someone thought of the concept and bottlate syed it!

Tasting for all the world like pure dates in liquid form, like one would expect, it pours just like molasses and has a pleasantly demure sweetness, much less in-your-face sugary than agave or maple. Though I can happily see using this as a simple topping on pancakes or even ice cream, I was clamoring to get this nectar into the kitchen to see what it could do in some treats.

Using the deep, molasses-like, earthy flavors to my advantage, I started out by dabbling a bit on the savory side of the street. Truthfully, more like the sweet-and-salty side, these candied cashews are all of the above, and then some. Tangy from a healthy dose of balsamic vinegar, and just a touch spicy thanks to a little pinch of cayenne and paprika, they’ve got it all going on, and are incredibly addictive to boot. Pleasing all realms of the palate, it’s disconcertingly easy to just munch on handfuls of these little morsels while watching a movie or chatting it up with friends.

Thinking more towards healthy sweets, this date syrup seemed like the perfect thing to introduce to a crispy snack bar. Packed with wholesome things like oats, wheat germ, and puffed rice, it’s easy to excuse that little handful of chocolate chips and think of these as health food. Plus, the date syrup keeps things from being tooth-achingly sweet, so it’s hard to feel guilty about these simple little squares. Ideal for packing in a lunch box or taking along for a snack on the road, these will absolutely see a repeat performance in my kitchen sooner or later.

Now I don’t usually share two recipes in one post, but both of these were so incredibly good, I can hardly leave you guys hanging. Just consider it a little “thank you” gift for being so patient while I got my school situation under control!

Yield: Makes 2 Cups; 8 Servings

Sweet and Salty Balsamic Cashews

Sweet and Salty Balsamic Cashews

These candied cashews are tangy from a healthy dose of balsamic vinegar and just a touch spicy thanks to a little pinch of cayenne and paprika.

Cook Time 20 minutes
Total Time 20 minutes

Ingredients

  • 1/4 Cup Date Syrup
  • 2 Tablespoons Balsamic Vinegar
  • 1 Tablespoon Raw Sesame Seeds
  • 1 Teaspoon Olive Oil
  • 1 Teaspoon Salt
  • 1/4 Teaspoon Cayenne Pepper
  • 1/4 Teaspoon Paprika
  • 2 Cups Whole, Raw Cashews

Instructions

  1. Preheat your oven to 350 degrees line a baking sheet with parchment paper or a silicone baking mat.
  2. Simply whisk together all of the wet ingredients and spices, and once everything is combined, add in the cashews and toss to coat. Pour everything out onto your prepared sheet, spreading the nuts out into an even layer so than none are overlapping. Bake for 15 – 20 minutes, stirring occasionally, until there’s no remaining liquid between the cashews and the nuts themselves are golden brown.
  3. Pull the sheet off the baking sheet to let the cashews cool. Break up any clusters, and store in an air-tight container at room temperature.

Nutrition Information:

Yield:

8

Serving Size:

1

Amount Per Serving: Calories: 224Total Fat: 15gSaturated Fat: 3gTrans Fat: 0gUnsaturated Fat: 11gCholesterol: 0mgSodium: 270mgCarbohydrates: 19gFiber: 2gSugar: 9gProtein: 6g

All nutritional information presented within this site are intended for informational purposes only. I am not a certified nutritionist and any nutritional information on BitterSweetBlog.com should only be used as a general guideline. This information is provided as a courtesy and there is no guarantee that the information will be completely accurate. Even though I try to provide accurate nutritional information to the best of my ability, these figures should still be considered estimates.

Yield: Makes 16 – 25 Bars

Double Date Chocolate Chip Bars

Double Date Chocolate Chip Bars

Packed with wholesome things like oats, wheat germ, and puffed rice, it’s easy to excuse that little handful of chocolate chips and think of these as health food. Plus, the date syrup keeps things from being tooth-achingly sweet, so it’s hard to feel guilty about these simple little squares.

Prep Time 20 minutes
Cook Time 15 minutes
Total Time 35 minutes

Ingredients

  • 2 Cups Old-Fashioned Rolled Oats
  • 1 1/2 Cups Crispy Brown Rice Cereal
  • 1/2 Cup Wheat Germ
  • 1/2 Teaspoon Salt
  • 1/2 Teaspoon Ground Cinnamon
  • 1/2 Cup Date Syrup
  • 1/4 Cup Date Sugar
  • 2 Tablespoons Coconut Oil
  • 2 Teaspoons Vanilla Extract
  • 1 Cup Semi-Sweet Chocolate Chips

Instructions

  1. Preheat your oven to 325 degrees, and lightly grease a 9 x 9-inch baking dish.
  2. Place the oats, rice cereal, wheat germ, salt, and cinnamon in a large bowl, and toss to combine. Set aside.
  3. In a medium sauce pan, combine the date syrup, date sugar, and coconut oil, and set over medium heat. Cool until the sugar has dissolved, and the mixture is just on the brink of boiling. Incorporate the vanilla, and quickly pour the hot syrup into the bowl of dry goods. Mix gently but thoroughly to combine. Add in the chips and stir to distribute them through the mixture. (Adding them last helps to prevent them from melting, but if you’d prefer an all-over chocolate bar, go ahead and add them first to the syrup, let them sit for a moment to melt, and them stir everything together.)
  4. Transfer everything into your prepared pan, and use lightly greased hands or a non-stick spatula to firmly press the mixture into the bottom of the pan. Bake for about 15 minutes, until lightly browned around the edges. Let cool completely in the pan before turning out onto a cutting board and slicing into bars.

Nutrition Information:

Yield:

25

Serving Size:

1

Amount Per Serving: Calories: 108Total Fat: 4gSaturated Fat: 2gTrans Fat: 0gUnsaturated Fat: 1gCholesterol: 0mgSodium: 53mgCarbohydrates: 18gFiber: 2gSugar: 10gProtein: 2g

All nutritional information presented within this site are intended for informational purposes only. I am not a certified nutritionist and any nutritional information on BitterSweetBlog.com should only be used as a general guideline. This information is provided as a courtesy and there is no guarantee that the information will be completely accurate. Even though I try to provide accurate nutritional information to the best of my ability, these figures should still be considered estimates.

Simple Snackies

Consider, if you would, the almond.

Unassuming, humble, maybe even a bit plain. Every and their best friends eat almonds in something or other; Cookies, salads, casseroles, you name it. They’re nothing new, but I think they deserve a second thought.

Personally, 9 times out of 10 I will be reaching for the super salty almonds over anything else available. Yes, I absolutely am, without a doubt, a chronic and progressive salt-addict. The more I get, the more I want. Sadly, not even canned soups, pumped up with enough sodium to make the Red Sea appear mild, are safe from my special “spice.” Salt shakers are dangerous things in my house; It’s not unheard of to refill it once a week.

But I want to have no guilt over at least one little snack. Almonds are so chock full of those lovely vitamins and heart-happy essential oils everyone always talks about, it’s just not fair to write them off due to sodium. Not to mention the wallop of protein they contain into such a small space, which makes them an excellent food for the road or other spots tough to find proper sustenance. Sure, you could always eat them raw, but I just don’t find them flavorful enough to satisfy my palate.

That’s why I turned to my second favorite and far over-used seasoning: Cinnamon! Yes, if it’s not salt, it’s cinnamon. Into oatmeal, cereal, over toast, in bread, English muffins… It really just goes so well with practically every grain. This time, paired with a nut, it proves to retain the same flavor enhancing powers I lust after.

Really, it’s so easy to make these you truly don’t even need to measure. I just want you to try it and see for yourself that wholesome foods don’t need to be complicated or fussy; Nor, do they have to deprive you of a tasty treat.

Yield: Makes 4 Servings

Cinnamon Glazed Almonds

Cinnamon Glazed Almonds

A wholesome sweet snack with a bold punch of cinnamon spice.

Prep Time 5 minutes
Cook Time 10 minutes
Total Time 15 minutes

Ingredients

  • 1 Cup Raw Almonds
  • 1/4 Cup Maple Syrup
  • 1/4 Cup Confectioner's Sugar
  • 1 Tablespoon Olive Oil
  • 1 Tablespoon Ground Cinnamon

Instructions

  1. Preheat the oven to 350 degrees. Place a silpat or parchment paper on a baking sheet.
  2. Toss all ingredients into a small bowl and combine thoroughly, being sure to coat all the almonds completely in the syrup and spice. Spread evenly in one layer on the baking sheet and roast in the oven for 5 minutes. Shake around a bit to flip them over and make sure they aren’t sticking too badly. Bake for another 5 minutes or more, until they turn a slightly darker brown or smell nutty. Watch carefully, because nuts can go from lovely golden to blackened gravel in no time flat.
  3. Remove from the oven and immediately take off of sheet, or they will continue to cook. Allow to cool and store in an airtight container.

Notes

You could easily double, triple, or even quadruple the amounts without any difficulty. Extra can be stored in the freezer for up to 3 months.

Nutrition Information:

Yield:

4

Serving Size:

1

Amount Per Serving: Calories: 272Total Fat: 17gSaturated Fat: 2gTrans Fat: 0gUnsaturated Fat: 15gCholesterol: 0mgSodium: 3mgCarbohydrates: 28gFiber: 4gSugar: 20gProtein: 6g