Who’s Your Baba?

Winter survival depends on preparedness:

  • Plenty of moisturizer for dry skin
  • An ample supply of dry beans and other long-lasting pantry staples
  • As many types of citrus as you can cram in the fruit bin.

When the snow is falling in thick white sheets with no end in sight, the bright, cheerful flavors of winter citrus are the only things that can rescue my dampened mood. For days short on sunshine, vibrant yellow lemons are the next best thing. Their energizing zest makes its way into salads and desserts alike, while whole oranges and clementines are a favorite midday snack. Grapefruit juice kicks off the morning on a high note, and let’s not forget about those sour little limes.

Lime Baba Au Rhum

For whatever reason, limes find their way into fewer of my recipes and daily eats than any other citrus, so it seemed only fair to reverse that trend. Perfect for our recent bout of snow, which is still sticking to the ground and discouraging me from driving out into the suburban wilderness, a yeasted, lime-enhanced cake was just what the doctor ordered. Warming the kitchen as they baked and lifting the spirits once eaten, the winter blues don’t stand a chance with these zesty pastries on hand.
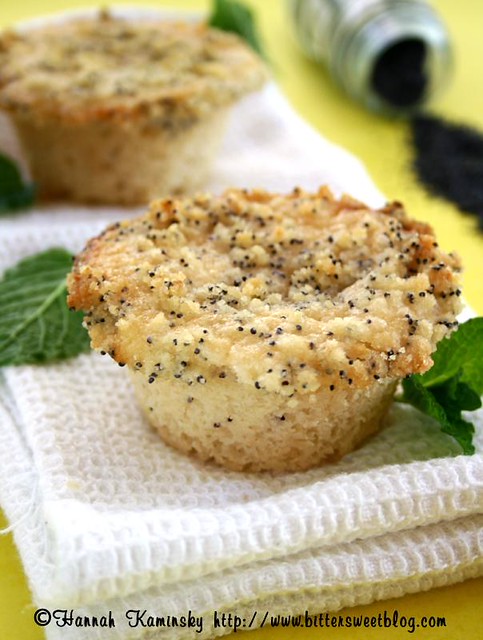
Yield: Makes 6 – 12 Babas

Lime Baba Au Rhum

Lime Baba Au Rhum

These yeasted, zesty lime pastries are brushed with a rum syrup and apricot glaze. Their bright, spirited flavor is sure to take the chill off any winter day.

Prep Time 30 minutes
Cook Time 25 minutes
Additional Time 2 hours
Total Time 2 hours 55 minutes

Ingredients

Baba Dough:

  • 1 3/4 Cups All Purpose Flour
  • 1/4 Cup Granulated Sugar
  • 1 (1/4 Ounce) Package Active Dry Yeast
  • 1/2 Teaspoon Salt
  • 1/4 Cup Whole Flax Seeds, Ground
  • 3/4 Cup Water
  • 1/4 Cup Plain Non-Dairy Milk
  • 1/4 Cup Lime Juice
  • 2 Teaspoons Lime Zest
  • 5 Tablespoons Vegan Butter, Melted
  • 1/2 Cup Toasted and Chopped Walnuts

Rum Syrup:

  • 1 Cup Granulated Sugar
  • 1/2 Cup Dark Rum
  • 1/2 Cup Water

Apricot Glaze:

  • 1/2 Cup Apricot Preserves
  • 1 Tablespoon Water

Instructions

  1. Rather than the typical proofing approach for making bread, these babas are assembled more like a cake. First, whisk together the flour, yeast, sugar, salt, and ground flax seeds in the bowl of your stand mixer (if using; otherwise a large bowl will do.) Once the dry goods are thoroughly combined, turn your attention to the liquids. Heat the water and non-dairy milk to about 120 degrees, but not to a boil, or else you’ll kill the yeast. This should feel hot to the touch but not burn your fingers.
  2. Pour the liquid into the large bowl, and start mixing on low speed. Immediately follow that addition with the lime juice, zest, melted vegan butter, and walnuts. Continue mixing until the dough begins to come together, and then switch to the dough hook on your stand mixer. The dough will be very soft and sticky, so keep a close eye on it to make sure it doesn’t creep up on top of the hook or get stuck to the sides of the bowl.
  3. Use your spatula to guide it back as needed, and continue beating for about 5 minutes to develop the gluten. Once fairly smooth, leave the dough in the bowl and cover the whole thing with a piece of plastic wrap. Let rise in a warm place for 1 – 1 1/2 hours, until nearly doubled in size.
  4. Lightly grease 6 popover tins or 10 – 12 standard muffin cups; set aside.
    Gently punch down your risen yeast batter, and divide it equally between your greased tins. Let rise once more for about 30 minutes, or until the dough has expanded to fill the tins. Meanwhile, preheat your oven to 350 degrees. Once risen, bake for 20 – 25 minutes, until golden brown all over. Turn out the yeasted cakes onto wire racks and let cool.
  5. Prepare the rum syrup by simply combining the sugar, rum, and water in a small saucepan over medium heat. Cook until the sugar has dissolved, and you’re ready to go.
  6. Prick the babas all around the sides with a fork before dipping each in the syrup, to allow for better absorption. Dip each two or three times, and then return them to the cooling rack to rest, or serve immediately.
  7. To serve, microwave the apricot jam and water together for just 30 – 60 seconds, to loosen up the jam and warm it through. Stir well, and apply liberally to the tops of your babas. Feel free to serve with an additional spoonful of the rum syrup over the top, too.

Recommended Products

Please note that some of the links above are affiliate links, and at no additional cost to you, I will earn a commission if you decide to make a purchase after clicking through the link. I have experience with all of these companies and I recommend them because they are helpful and useful, not because of the small commissions I make if you decide to buy something through my links.

Nutrition Information:

Yield:

12

Serving Size:

1

Amount Per Serving: Calories: 295Total Fat: 10gSaturated Fat: 1gTrans Fat: 1gUnsaturated Fat: 8gCholesterol: 0mgSodium: 99mgCarbohydrates: 46gFiber: 2gSugar: 27gProtein: 4g

All nutritional information presented within this site are intended for informational purposes only. I am not a certified nutritionist and any nutritional information on BitterSweetBlog.com should only be used as a general guideline. This information is provided as a courtesy and there is no guarantee that the information will be completely accurate. Even though I try to provide accurate nutritional information to the best of my ability, these figures should still be considered estimations.

Sunshine On a Rainy Day

Oh spring, you’re such a tease.

Naturally the 70-degree, sunny weather couldn’t last, but did you have to go so far in the opposite direction, so quickly? Now grey clouds have rolled in and settled downward, engulfing and insulating our little town from the rest of the world. Like a blanket of cushy bubble wrap, I’m comfortably stuck in place; this fog is thick enough that I can pretend it’s still winter. Not that I really want to, of course… I think we’ve all had enough winter for one, or perhaps two years at this point.

So here we are, arriving at April’s doorstep.

The atmosphere is just barely warmed over and the forecast still foreboding. The only thing to do is bake muffins, and those muffins absolutely must contain bright, cheerful citrus- I think it might even be a law in some states. Consider these simple yet comforting lemon-poppy seed sweets as artificial sunshine for this dark, chilly time in between seasons. Better than an anti-depressant, in my opinion.

Yield: Makes 12 Muffins

Lemon-Poppy Seed Muffins

Lemon-Poppy Seed Muffins

Brimming with bright, zest flavor, these tender muffins are topped with a light crumb for a crispy, satisfyingly chewy bite all around the edges.

Prep Time 20 minutes
Cook Time 18 minutes
Additional Time 10 minutes
Total Time 48 minutes

Ingredients

Poppy Seed Topping:

  • 2 Tablespoons Olive Oil
  • 6 Tablespoons Granulated Sugar
  • 1/4 Cup All Purpose Flour
  • 2 Teaspoons Poppy Seeds

Lemon-Poppy Seed Muffins:

  • 2 Cup All-Purpose Flour
  • 2/3 Cup Granulated Sugar
  • 2 Teaspoon Baking Powder
  • 1 Teaspoon Baking Soda
  • 1 1/2 Teaspoons Poppy Seeds
  • 1/2 Teaspoon Salt
  • 1 Cup Vegan Sour Cream or Non-Dairy Yogurt
  • 2/3 Cup Lemon Juice
  • 1/4 Cup Olive Oil
  • 2 Teaspoons Lemon Zest
  • 1 Teaspoon Vanilla Extract

Instructions

  1. Preheat your oven to 375 degrees and lightly grease a baking tin of 12 standard muffin cups.
  2. To first make the topping, simply mix together all of the ingredients in a small bowl, stirring with a fork, until thoroughly combined and slightly clumpy. Set aside.
  3. Moving on to the main muffins, whisk together the flour, sugar, baking powder and soda, poppy seeds, and salt in a large bowl. Make sure that all of the dry ingredients are thoroughly combined. In a separate bowl, whisk together the “sour cream” or yogurt, lemon juice, canola oil, lemon zest, and vanilla until smooth.
  4. Pour these wet goods into the bowl of dry, and with a wide spatula, stir just enough to bring the two together. Make sure there are no remaining pockets of flour hiding in the batter, but it’s alright if a few small lumps remain.
  5. Distribute the batter between the prepared muffin cups, and don’t be afraid to really mound them up- The more the tins are filled, the better the muffin tops will be. Sprinkle your poppy seed topping evenly over each unbaked muffin, piling it on until you’ve used it all up.
  6. Bake for 16 – 20 minutes, until a toothpick inserted into the centers of the muffins comes out clean, with perhaps just a few moist but fully baked crumbs clinging to it.
  7. Let rest in the tins for 10 minutes before transferring them to a wire rack until completely cool.

Recommended Products

Please note that some of the links above are affiliate links, and at no additional cost to you, I will earn a commission if you decide to make a purchase after clicking through the link. I have experience with all of these companies and I recommend them because they are helpful and useful, not because of the small commissions I make if you decide to buy something through my links.

Nutrition Information:

Yield:

12

Serving Size:

1

Amount Per Serving: Calories: 270Total Fat: 11gSaturated Fat: 5gTrans Fat: 0gUnsaturated Fat: 6gCholesterol: 1mgSodium: 308mgCarbohydrates: 39gFiber: 1gSugar: 20gProtein: 4g

All nutritional information presented within this site are intended for informational purposes only. I am not a certified nutritionist and any nutritional information on BitterSweetBlog.com should only be used as a general guideline. This information is provided as a courtesy and there is no guarantee that the information will be completely accurate. Even though I try to provide accurate nutritional information to the best of my ability, these figures should still be considered estimations.


WholeSoy Story

Plagued by a bad reputation and image issues for years, it’s safe to say that vegan yogurt has finally moved out of the dark corner of specialty health food store and into mainstream markets. Once viewed as a sad substitute, more akin to radioactive sludge than cultured dairy products, this basic staple has come a long way in a very short time.

My favorite flavors tend to skew towards citrus; orange, lemon, key lime, or grapefruit if you’ve got it. Tart, brightly acidic, intense but in a good, “wake you up” sort of way, the best options are just lightly sweetened. Bright and punchy, but still well balanced by a moderate amount of sugar. Thick, rich, and almost like custard, it’s been hard to find anything quite like it since WholeSoy & Co went under.

Unexciting as it may sound, unsweetened plain yogurt is my mainstay these days. This blank canvas can open the door to all sorts of cooking and baking applications, from sweet to savory and all things in between. Without the vaguest hint of sweetness and a very tangy finish, it has almost a cheesy flavor. Thoroughly drained and pressed, I can easily see it becoming a delicious farmer’s cheese type of spread! I couldn’t wait long enough to find out, but after two days sitting in cheesecloth, it did thicken up nicely to create…

Frozen yogurt. Blood orange frozen yogurt, to be precise. I must have caught the ice cream bug again because all of a sudden, I just can’t stop churning! With a few more gorgeous blood oranges languishing in the fridge, I felt compelled to do something special with them, and this easily fit the bill.

Bold and tangy, the citrus sings a pitch-perfect harmony with the yogurt base. Crunchy shards of caramelized peel add in bursts of intense orange flavor, accompanied by deep, burnt sugar notes to round it all out. This recipe takes a bit more patience than your standard frozen dessert, but it is absolutely worth the wait.

Yield: Makes About 1 Quart

Blood Orange Frozen Yogurt

Blood Orange Froyo

Blood orange juice colors and flavors this frozen treat with a rich citrus infusion. Crunchy shards of caramelized orange peel add in bursts of intense flavor, accompanied by deep, burnt sugar notes to round it all out.

Prep Time 30 minutes
Cook Time 1 hour
Additional Time 2 days 6 hours
Total Time 2 days 7 hours 30 minutes

Ingredients

  • 1 (24-Ounce) Container Unsweetened, Plain Vegan Yogurt
  • 2 Blood Oranges
  • 1/2 Cup Granulated Sugar
  • 1/2 Cup Water
  • 3/4 Cup Light Agave Nectar
  • 2 Tablespoons Grand Marnier, Limoncello, or Vodka
  • 1/2 Teaspoon Vanilla

Instructions

  1. line a strainer with two layers of cheesecloth, place over a large bowl to catch the drips, and pour all of the soy yogurt in. Cover the top with another sheet of cheesecloth, and place the plastic yogurt container lid on top of that. Use a can of beans or tomatoes (anything you’ve got) as a weight by putting it squarely on top of the plastic lid. The lid is there to disperse the weight a bit, and prevent yogurt from squeezing out around the sides of the can. Let sit in a cool place (but not the fridge) for approximately 48 hours, until 1/2 cup of “whey” has drained out.
  2. Meanwhile, take your oranges and remove the peel in long, thin strips. Cut away as much pith as possible, and reserve the oranges’ flesh for later. Place the peels in a small sauce pan and add water to cover. Bring it to a boil, turn off the heat, and thoroughly drain away the liquid. Cover again with fresh water, and repeat this process for a total of 3 times. This will help to remove excess bitterness.
  3. Next, add in the the sugar and 1/2 cup of water, turn on the heat to medium, and bring it to a boil. Once the sugar has dissolved, reduce the heat slightly so that it’s stays at a gentle but energetic simmer. Swirl the pan every few minutes, until the sugar begins to take on a golden amber color. At the point that the mixture is fully golden brown and caramelized, quickly pour everything out on a silpat or piece of
    parchment paper, and do you best to separate the peels. Let cool completely before breaking into small shards. Save them in an air-tight container to prevent the sugar from melting or softening.
  4. With both of the most difficult elements ready to go, transfer the drained yogurt into your blender or food processor, along with the agave, alcohol of choice, and vanilla. Trim away any remaining white pith from the reserved orange flesh, remove pips if you spot any, and toss the whole oranges in as well. Blend thoroughly, stopping to scrape down the sides of the bowl as needed, until completely combined and perfectly smooth. Be patient, and don’t worry if the mixture becomes rather warm in the process.
  5. Chill thoroughly for at least 2 hours before churning in your ice cream maker according to the manufacturer’s instructions. As you transfer the soft, fresh frozen yogurt into an air-tight container, fold in your caramelized orange peel shards.
  6. Stash the containers in your freezer for at least 4 hours before scooping and serving. The peels will eventually soften over time, so this is best served within a week, though it can certainly be stored longer.

Recommended Products

Please note that some of the links above are affiliate links, and at no additional cost to you, I will earn a commission if you decide to make a purchase after clicking through the link. I have experience with all of these companies and I recommend them because they are helpful and useful, not because of the small commissions I make if you decide to buy something through my links.

Nutrition Information:

Yield:

8

Serving Size:

1

Amount Per Serving: Calories: 169Total Fat: 0gSaturated Fat: 0gTrans Fat: 0gUnsaturated Fat: 0gCholesterol: 1mgSodium: 17mgCarbohydrates: 36gFiber: 1gSugar: 33gProtein: 1g

All nutritional information presented within this site are intended for informational purposes only. I am not a certified nutritionist and any nutritional information on BitterSweetBlog.com should only be used as a general guideline. This information is provided as a courtesy and there is no guarantee that the information will be completely accurate. Even though I try to provide accurate nutritional information to the best of my ability, these figures should still be considered estimations.