
I never had a Christmas tree growing up, nor a Hannukah bush, so it seems like I’m now making up for lost time. They’re just so much fun to decorate, and provide so much room for creative interpretations, I can barely keep track of all of my ideas for these lovely evergreens. Even when they’re stoically weathering the conditions outside, dusted with a coat of powdery snow, they are an incredibly beautiful symbol of the season. I guess in that case, you might say I had a tree every single year for the holidays; it’s just always been outside!

This miniature forest, however, you’ll definitely want to keep indoors. Composed of chocolate cake, mint frosting, and all the sprinkles you can pile on, it’s far tastier than the traditional pine, and perhaps even more fun to adorn.
The trickiest part of creating these edible trees is locating cone-shaped paper cups, that are NOT lined with wax, but those are easily ordered online if you can’t find them at your local office supply store. Lightly spritz the insides with baking spray, and place them in oven-safe mugs so that they stand pretty much upright.

Whip out your favorite chocolate cake or cupcake recipe, and use that to fill the cones 3/4 of the way to the top. Place the mugs onto a baking sheet to easily pull the cake out of the oven, and also prevent overflow should the batter bubble over the edge. Save part of the batter and use that to fill in an equal number of mini cupcake tins- These will become the stumps later on. Bake the stumps and the trees separately.
Baking time will vary, but bear in mind that it will take longer than your average cupcake, and you’ll need to use a long skewer to test all the way down into the tip of the cone. Be patient and wait until your tester comes out completely clean, otherwise you’ll end up with mushy trees!

Let the cake pieces cool, then trim the uneven edges off both the cones and stumps. Now you’re ready to prepare whichever vanilla frosting you’re most fond of. Add in about a teaspoon of peppermint extract, and a few drops of natural green food coloring. Beat it all until fluffy and smooth, and smear a dollop on top of each stump. Carefully tear the paper cone away from the cake, and stick that on top of the stump. If you’re having some trouble getting it to stand up straight without falling, or plan on having your kids help decorate and will need some reinforcements, stick a thin wooden dowel through the whole thing, and then firmly plant the end of it into a styrofoam block.
Transfer the remaining frosting into a pipping bag fitted with a large star tip, and simply press the tip to the side of the cake, starting at the bottom, give it a little pressure, and pull straight away. Go around the cake, working your way up, until you reach the top. Once the trees are covered with pine needles, it’s time to pull out the sprinkles, dragees, and quins, and just have fun with it!
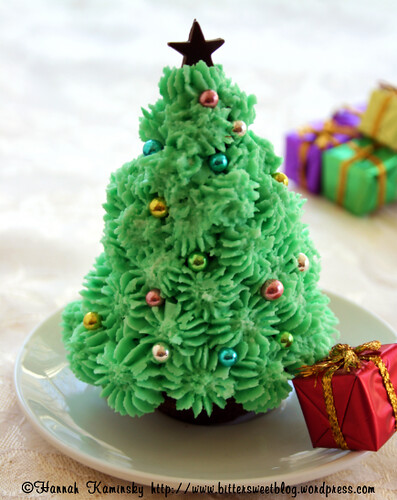
You could also go the more elegant route and give each tree a light dusting of confectioner’s sugar for that classic snowy look.

There are a number of other similar ideas for tree cake out there, each very creative and cute, so look around, get inspired, and make one of these for each guest at your holiday dinner. They’re both fun to make and eat!
Too pretty (well, almost) to eat!! :-D
They look amazing! I wonder if I have the patience to try making them…..?
These are too cute Hannah! I love the one that’s dusted with sugar.
Hannah-
Just too cute! How in the world do you come up with these amazing little recipes for every month of the year! I bet when you grow up you could have your own cooking/baking TV show! Or own a 5 star vegan resteraunt… Me and my mother (she’s non-vegan, but trying) are going to make your cinnamon buns recipe on christmas eve… It says it makes 7 pans, and there’s alot of ingretients- is that about 49 to 56 buns?
OH! I love these Hannah!!!
gaaah I love them – they’re adorable.
Gorgeous!!
That is just adorable!
Those are the cutest trees ever!
i really think that is the cutest cupcake EVER!! if it can even be called a cupcake..i think it is on a whole other level!
Wow how lovely is that?? You are incredible!
These look amazing.
How cute!
These are absolutely adorable! Love them!
Hannah, all I can say is: WOW!!!!!!!!!!!!!
So so pretty, Hannah! You’ve outdone yourself yet again!
what a cool idea. Super cute!
WOW! Hannah… how creative you are!
Those are totaly beautiful! I’m impressed, what a great idea! BRAVO!
I love this idea, your are so creative and your treat always look amazing!!!
Amazing! Definitely the cutest Christmas Trees I have ever seen!
VeganYumYum pulled these off without cone-shaped cups: http://veganyumyum.com/
FANTASTIC. The best lookin’ cupcake-trees out there! What tip did you use? Pretty!
Would it be possible to bake these in ice cream sugar cones?
Hannah – the vegan Martha Stewart!
hannah,
these are great and yours look loads better with the cone. nice job!
xo
kittee
Absolutely gorgeous, Hannah! Definitely the best ones I’ve seen.
Hannah, these are so adorable!! What a fantastic idea, you’re so creative :)
These xmas tree cakes look fantastic! You are always full of creative ideas.
You amaze me, those are the cutest cakes ever!
These are so creative and cute, Hannah!
how cute! they look delicious. : )
Love your little trees! I made them last year and they were a hit too!
Quick question, do you have a recipe for frosting cos all I use is icing sugar and water, which isnt that fantastic. I’d really appreciate a push in the right direction :) :)
Oh frosting that doesnt require shortening cos we dont get shortening in South Africa :(
Freakin’ adorable!
This is absolutely beautiful! I love what you come up with :)
Oh my, did I just die a little? Why yes, yes I did. These are amazing, and I love the powdered-sugar-dusted “snowy” trees. I don’t know if I could even EAT something that cute! Kudos!
Those are ADORABLEE! :D my favourite is the one with different coloured silver balls. Im sure they are very yummy too…:) x
So cute! And perfect as usual. Hannah, I love this idea.
What a cute post, Hannah!
lovely!
Oh waouw it’s so cute & adorable ! J’adore j’adore !
what a fabulous idea! I agree with everyone it is simply adorable!!!
These look wonderful! Thanks for sharing this great idea :D
WOW… just wow, that’s all I can say… WOW!
SO CUTE and CRAFTY! I adore them so much! You did a wonderful job!
And thanks for leting us in on the secret! I love to see how things are done!
I hope to make some one day! :D
LOVE.
Those are absolutely gorgeous. Well done!
sooo cute!
do you have a good source for natural food coloring? Thanks!
So pretty and creative!
Wow! These are SO cute! Your pictures and step-by-step instructions are very informative. I might just have to make these!
These are wonderful, great idea!
This reminds me of one of your old posts on cake in a jar. Christmas tree cakes! What a cute idea, but dangerous too! I can imagine there will be many, many green-stained teeth come Christmas as a result of these little trees. :)
You did a great job with those! I’m certain my children especially my daughter would have a field day with those. She tells people she’s a “pro-in training”! I have her fooled! She thinks I know what I’m doing. HA!
Btw, thanks so much for your help. I’m going to take your advice and buy online!
THX!
~ingrid
These are so cute!! I really like the unfrosted one.
These are so gorgeous! I’ve been trying to think of what to give my christmas guests as little party favors and I think this just hit the top of the list!
I saw those somewhere else and they were so cute. I think yours are even better.
What a fabulous idea! Nice touch, with the icing sugar mimicking snow.
How creative and cute too :)
Todella kauniita!! Mahtava idea tehdä kakusta kuusia.
Holy crap, you’re brilliant!
These are gorgeous!
If you can’t find the paper cones, you can use waffle cones lined with parchment.
That’s so lovely!
I want to do same for tomorrow now, but I can’t!!
That’s so gorgeous! I so wish I was good at pastries, this is amazing!
[…] А идеята за декорацията е от блоговете на Vegan Yum Yum и BitterSweet. Доколкото разбрах може да се използва каквато и да […]